10. Tagging
Tagging is the process where you connect a descriptive word to an item or a group of items.
For example: One of your items is a PDF document that contains valuable information. You decide to tag the item with the word “important”. Tagging helps you to organize results, for example by separating important and unimportant information.
Tagging can be done in several ways in Intella Connect. This chapter gives you an overview of the possibilities:
- Tagging in the main window
- Tagging in the Previewer
- Letting other items inherit tags automatically
- Pin a tag to a button
- See all tagged items
- Searching with tags
- Deleting a tag
10.1. Tagging in the main window
10.1.1. Adding tags
To add tags:
- Select one or more items from the Table or Thumbnail view.
- Open the context menu (right mouse click on one of the selected items) and select “Add tags...”.
- In the “Assign tags” dialog you can select already defined tags and define new tags, with an optional description. When you click OK, the marked tags will be linked to the selected items.
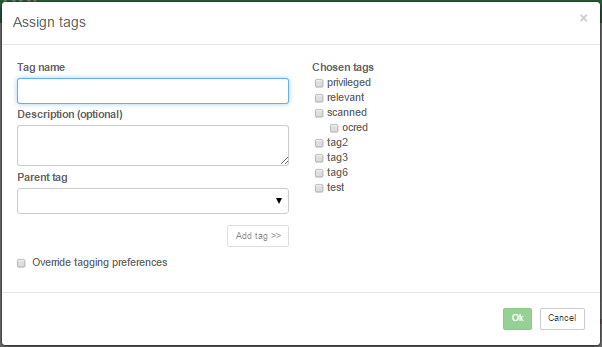
- Chosen Tags - shows a list of tags. Select a tag name to tag the selected items.
- New tag name + Description - define a new tag with the specified name and an optional description and then click on “Add tag” button.
- Parent tag - when creating a new tag, a parent tag can be specified. Parent tags can be used to logically group tags, e.g. grouping custodian names, reviewers, locations or priorities. Parent tags can also be used to tag items. For example, when you have tags called Europe and Asia with subtags representing specific countries, you can choose whether to tag an item with a continent or a country.
- Override tag preferences - use this checkbox to set the tag inheritance mode. This is described in more detail in the Automatic tag inheritance section
10.1.2. Removing tags
The Remove Tags dialog is used to remove tags from selected items:
- Select the items from which you want to remove the tags in the Table or Thumbnail view.
- Open the context menu (right mouse click) and select the “Remove tags...” menu option.
- In the “Remove tags...” dialog, select the tags that you want to remove and click OK.
Now the tags are no longer set on the selected items.
10.2. Tagging in the Previewer
If you want to tag or remove a tag in the Previewer, please take the following steps:
- Open the Previewer on the item.
- Click the Tag button
 to open the “Assign tags” dialog.
 - Enter a new tag or select an existing tag. To remove a tag (to remove the connection between an item and a tag) just de-select the tag from the list.
Three tags can be shown as hyperlinks in the Previewer. When a tag is listed as a hyperlink, clicking the hyperlink results in the tag being assigned to the current item.
You can also use Alt+1, Alt+2, Alt+3, etc. to quick-tag an item. The numbers correspond with the button positions. When the “Auto-forward” checkbox is selected, the Previewer will automatically switch to the next item in the list.
10.3. Automatic tag inheritance
When tagging items, the policy of your investigation may be that some related items should be tagged as well. One use case is when tagging items as irrelevant: all nested items may then be considered as irrelevant as well. Another use is tagging items as privileged; depending on your policy, this may then be extended to all other items within the same mail as well. Intella Connect offers mechanisms that let these additional tags to be set automatically.
The tagging inheritance options are shown by checking the Override tag preferences checkbox when setting a new tag.
The three radio buttons specify how other items in the hierarchy need to be handled:
- Only tag the selected item is self-explanatory.
- Also tag all attached/nested items results in all attached or nested items being tagged with the same tag as well. This works recursively, i.e. all children in the hierarchy are tagged.
- Also tag all other items nested in the same top-level item means that everything from the top-level mail down to the most deeply nested child gets the tag.
In addition to these three settings, you can specify that all duplicates should also be tagged. When this setting is switched on, all items in the case with the same MD5 or message hash will inherit the tag. Furthermore, their children or siblings may also be tagged automatically, based on the setting described above.
10.4. Pin a tag to a button
You can pin a tag to a button and keyboard shortcut (Alt+1, Alt+2, Alt+3) with the following steps:
- Select Tags in the facet panel.
- Right-click on a tag in the list to open the context menu.
- Select “Pin tag...” and select a number from the sub-menu.
Now you can use the hyperlinks in the Previewer and the keyboard shortcuts to tag an item.
Note: To unpin a tag from a button, select ‘Unpin tag’ in the context menu of Tags in the facet panel.
10.5. See all tagged items
To get an overview of all items that are tagged in your case, please take the following steps:
- Select Features in the facet panel.
- Select Tagged from the list and click Search
Now you can see all the items that have a tag in the Cluster Map panel.
10.6. Searching with tags
To search with tags, please take the following steps:
- Select Tags in the facet panel.
- Select a tag and click Search.
Now you can see the items that have the selected tag in the Cluster Map panel.
10.7. Deleting a tag
To delete a tag from your case, please take the following steps:
- Select Tags in the facet panel.
- Right click on a tag in the list.
- Select “Delete” and confirm.
Now this tag is no longer in your case.
Note: To delete a tag, you must be the creator of the tag or the admin user.