Cases shared by Intella Connect can be accessed in various ways in the browser (listed addresses are artificial):
The HTTPS (SSL) communication layer needs to know under which URL Connect’s pages will be served. Knowing that and having a proper certificate validated by a third party vendor (called a Certification Authority) will allow Connect to make use of a secure channel for serving network requests.
There are a number of things that need to be done before you can use HTTPS in Connect. Please make sure that all of these requirements are met.
These steps depend upon whether or not you already have a working SSL certificate, so please follow the steps most suitable for your situation.
I’m already in possession of an SSL (PKCS12) certificate issued for my company/domain
I do not have a SSL certificate or I want to use a new one
If you decided to use a domain for case sharing, then you need to configure it now. Please log in to the machine (server) where you will be running Connect and check it’s public IP (when in doubt, please use Google).
After that you need to log in to the management panel for your domain provider and set the DNS records so that the domain points to the current public IP.
Note: for purposes of this tutorial we will be using an artificial address/domain pair: 1.2.3.4, www.my-site.com
It might happen that the server machine is behind NAT, managed by a router. In that case you will need to set up appropriate port forwarding for at least two TCP ports: one for the Intella Connect Dashboard page and one for each shared case, as each case will get its own dedicated TCP port.
For the sake of this guide I will be using the following ports:
Start Connect. Then open up a browser and navigate to the Intella Connect Dashboard address listed above. At this point you should be able to see the Intella Connect Dashboard page. After you share a case on the port mentioned above, the case should be available on the above location as well
On the Intella Connect Dashboard page, after clicking on the Settings menu item, one can see the following configuration panel:
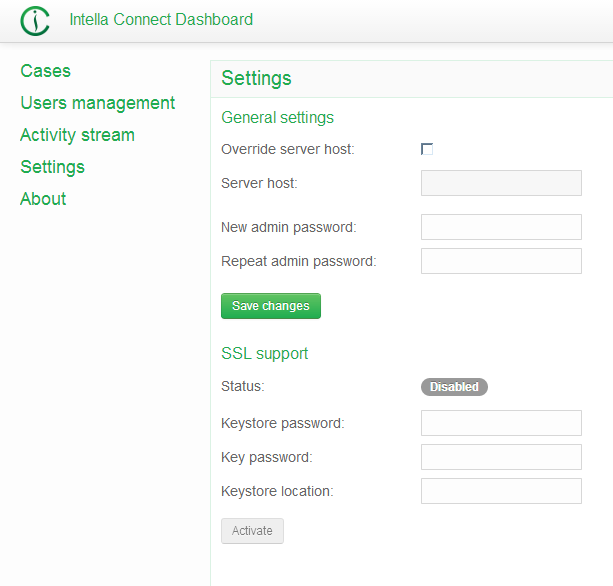
Figure: SSL settings in Connect
The most important thing to notice here are the properties of the so-called Keystore. A keystore is nothing more than a secure database that holds all the certificates needed by a server (in our case - Connect). In order to proceed, we will need to create the keystore manually.
Connect bundles a special utility program for working with keystores. This tool is a part of the bundled Java distribution and is called keytool.exe. In a default 64-bit installation of Connect it can be found in:
C:\Program Files\Vound\Intella Connect 1.7\jre\bin\keytool.exe
First, let’s prepare a directory to work with. For the sake of this tutorial, I’ve created C:\Users\Lukas\Desktop\ssl where I will be storing all the files needed.
Note: if you have your own certificate, then you don’t need to generate the private/public key pair in this step (note the -genkey flag) and you can safely proceed to adding certificates to the Keystore section
To create a keystore, please do the following:
Note: this and the following steps apply only if you did not have your own certificate already and you have just created one in the step before.
Since now you are in possession of an unsigned certificate, you need to ask a Certification Authority (CA) to sign it. CAs accept only requests for certificate signature, so you need to create one using the keytool.
On the command line, please enter the following command:
keytool -certreq -keyalg RSA -file C:\Users\Lukas\Desktop\ssl\my-site.com.csr -keystore C:\Users\Lukas\Desktop\ssl\my-site.com.keystore
You will be asked for the master password for the keystore, which you have defined in the first step. This should produce a file called my-site.com.csr
You will now have to supply this signature request to the Certification Authority. This process is specific to the authority signing the certificate. After the CA is done with processing your request, you should receive a set of signed (verified) certificates, which can now be added back to the keystore.
You will now have to add each certificate that you have received from your CA back to the keystore. Most likely you have received three files: the CA’s certificate, an intermediate certificate and the one which apply to your domain (IP). Please use keytool.exe again to add them using the commands below. Please keep in mind, that for this tutorial our CA has supplied us with three files (AddTrustExternalCARoot.crt, PositiveSSLCA2.crt and www_my-site_com.crt) which are stored in the “signed” subdirectory:
keytool -import -trustcacerts -alias AddTrustExternalCARoot -file C:\Users\Lukas\Desktop\ssl\signed\AddTrustExternalCARoot.crt -keystore C:\Users\Lukas\Desktop\ssl\my-site.com.keystore
keytool -import -trustcacerts -alias PositiveSSLCA2 -file C:\Users\Lukas\Desktop\ssl\signed\PositiveSSLCA2.crt -keystore C:\Users\Lukas\Desktop\ssl\my-site.com.keystore
keytool -import -trustcacerts -alias mykey -file C:\Users\Lukas\Desktop\ssl\signed\www_my-site_com.crt -keystore C:\Users\Lukas\Desktop\ssl\my-site.com.keystore
At this point you can come back to the Intella Connect Dashboard page and finish setting up SSL. The three mandatory fields that are listed there should be set as following:
After that you need to restart Connect to finish the process.
An appropriate warning about this should be displayed after you save the changes.
In the end you should be able to navigate to https://www.my-site.com:9999 and see the Lock icon in the browser’s address bar, which ensures you are using a secure connection.
When you share a case, it should now be available under the following URL: https://www.my-site.com:8084