While setting up Intella Connect is very straightforward, it does require a sound experience with network and computer configuration. Further to this, the person setting up Intella Connect will often need to enlist the experience, permissions (user credentials) and sign-off of a number of other specialists to complete a successful installation.
Intella Connect is a web server and as such requires that a successful setup takes the following into account:
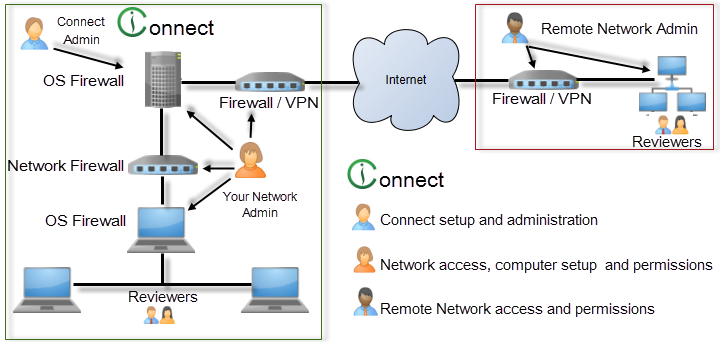
The image above shows a simplistic Intella Connect environment.
With this in mind, Vound suggests that the following user types are involved in the planning and installation of Intella Connect:
The Connect Admin - The person who will manage Intella Connect. They should have a detailed understanding of case management, e.g. be able to manage the administration of adding new cases and assigning reviewers to Intella Connect.
Your Network Admin – Your network administrator will be crucial in the setup of Intella Connect. He or she will have experience in setting up a web service on a server and will be able to guide the Intella Connect Administrator on the best and most secure configuration methods to do so.
They will need to have the user credentials and knowledge to:
An experienced network administrator should be able to install Intella Connect in 1-2 hours. However, this will take much longer if a detailed plan of what tasks need to be done prior to sharing a case is not undertaken.
Note: Failing to involve a competent network administrator is a mistake. It can lead to an insecure setup or cause network issues that can affect all other network users. It may even see you breach company policies on the transfer of data between networks.
What if you don’t have a network administrator? It is expected that you will have a good knowledge of Windows, networks and firewalls prior to installing Intella Connect. Please understand that Vound cannot offer support for these topics as they are the prerequisites for running a web service.
The Remote Network Admin – If you are planning to share a case over the Internet, you will need to have your network administrator work with the remote network administrator to enable secure case sharing. The remote network administrator will most likely have the same responsibilities as your network administrator and be best placed to ensure success.
In summary
Installing Intella Connect will involve more knowledge and experience than installing other Vound products. If you have not installed a web service or configured a fire wall before, you should seek help from a qualified network administrator prior to doing so. At all times, security and stability should be your goal.
The application folder contains an executable called IntellaConnect.exe that can be used to launch the application. The desktop and menu shortcuts also start this executable.
Important: Intella Connect will not install in an installation folder of an earlier version. Install a new version of Intella Connect in a folder with a new name, for example: C:\Program Files\Vound\Intella Connect 1.7.3\. It is possible to install multiple Intella Connect versions side by side.
To start Intella Connect, double-click on the Intella Connect icon on the Desktop or select Intella Connect from the Start menu.
Note: No splash screen or window will be shown when you start Intella Connect. Instead, an Intella Connect icon will show in the Windows system tray.
Locate the green Intella Connect logo in the system tray and either:
This will open the Intella Connect Dashboard in your web browser. When requested for a user account, enter admin as username and admin as password. These are the default values. How to change the admin password is explained in the User management section.

The Intella Connect Dashboard will only show the cases that have been created with the desktop-based Intella version (Intella 100, Intella 250, Intella Professional or Intella TEAM Manager) on the same computer where Intella Connect is running.
If you have not created any cases yet, you can do so in the Intella Case Manager. For more information, please refer to the section called “Creating a new case” in the Intella User Manual.
Select the case you wish to share by clicking on the case name in the Dashboard. This will show the case details on the right side of the page and allow you to access the settings and share function for that case.
Note: the first time you share a case, you may be alerted by your firewall software (for example the Windows Firewall) to allow networking for Intella Connect.
The TCP port for that case can be set in the “Port” field. How to define the users that will be able to access shared cases is explained in the User management section.
Once complete, click Share.
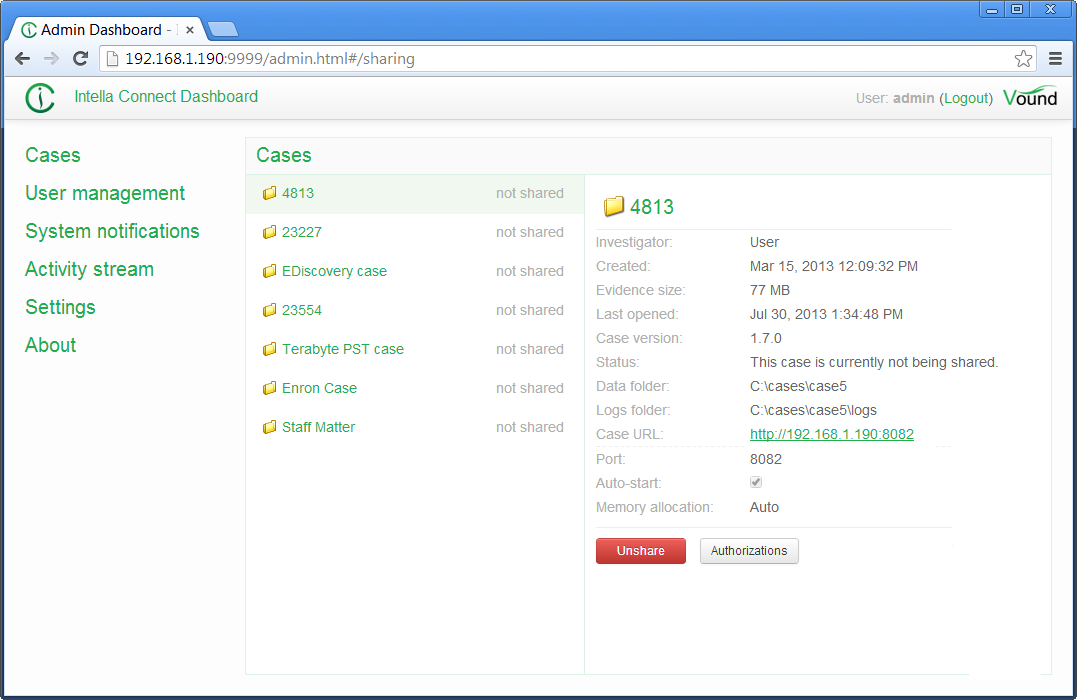
The image above shows the case having been shared. Note the location of the case address and port, shown as a green hyperlink.
Note: when you are sharing a case with Intella TEAM Manager or have it opened locally, you will not be able to share it with Intella Connect at the same time. Only one application can use a case at a time.
Before or after a case has been shared, you can define which users can access it. By default no user can connect to a shared case. To allow users to participate in a review you can click on the Authorizations button. This will open a modal window where you can assign users to various roles.
The purpose of this view is to list the roles defined in the RBAC (Role-Based Access Control) model and indicate which users are assigned what roles in this ase. Roles are emphasised by labels with a bright green color. Underneath each role there is a long input box that lists all the users who are assigned that role in this case. Each user can be associated with zero or more roles.
To learn more about users and roles please refer to the User management section.
Remember: a user can access a given case only if he is assigned a role with the “Case access” permission!
Assigning roles to users is quite straightforward. Click on the input box for a particular role (e.g. “Reviewer”) and start typing the desired user name (e.g. “admin” with a lowercase “a”). An autocompletion box will appear with hints about names available among your user accounts.
Removing a role for a given user is done via clicking on the little x button next to the user name.
Note: each change to the roles assignment should be persisted by clicking the green OK button. Changes will take effect immediately.
Case can optionally be shared with the Auto-start option enabled. The purpose of this function is to specify which cases should be automatically shared after the Intella Connect server starts. It is a good way of making sure that a certain set of cases is always available for a review, even when Intella Connect is restarted often.
If the case will fail to start, there should be a trace of this fact left in the Case Logs.
The Intella Connect main process and its child processes (one for each case that you share) are limited by the amount of RAM that the process can maximally use, despite how much memory is installed in the machine. In some cases this limitation can cause issues when reviewing or exporting the data. These issues can be recognized by errors in the log files containing the text “OutOfMemoryError” or “java heap space”.
When such errors occur, a workaround may be to set memory allocation manually, especially when the machine meets the recommended hardware settings (at least 8 GB of RAM). To increase these thresholds, select the case in the Case Dashboard and change the “Memory allocation” setting from Auto to Manual and increase the value.
Note that you can never specify more than half of the available system RAM. This is to make sure that when more then one case is shared, those processes and the OS still have sufficient memory available to them.
The case is now ready for access from any device having access over the network to the PC running Intella Connect.
A user with the appropriate permission can connect to a case by entering a case URL in his favorite web browser.
You should point users to the same URL you are using to access the Intella Connect Dashboard. Based on their role they will be redirected to the User dashboard where the cases they have access to will be listed and where they can change their avatar image.
Note: The remote computer has to have TCP/IP access to the computer specified as the Intella Connect server.

After logging, the reviewer can start reviewing the case.