To change the admin user’s password, click on Settings in the left side menu in the Intella Connect Dashboard.
The fields New admin password and Repeat admin password are used to change the admin user’s password. Once these two fields are filled in, click on the Save changes button to change the password. After clicking the button, the notification Password changed successfully will be shown and you will be logged out from the Intella Connect Dashboard. To log back in, please use admin as user name together with the newly configured password.
For managing Authentication and Authorization Intella Connect uses a mechanism called Role Based Access Control (RBAC). To effectively manage user accounts and their permissions, it is advisable to get familiar with this mechanism. It is a very simple yet powerful tool, allowing for full flexibility in creating various levels of access restrictions.
Below we describe the key entities used in an RBAC model:
It is important to understand that Roles are assigned to users per case. This means that a user can have different roles in different cases. In Intella Connect each user can have zero, one or many roles assigned to it in any given Case.
Note: RBAC gives Administrators unlimited flexibility in defining complex hierarchies of users closely matching their own organizations. However, we strongly recommend keeping the number of roles relatively small, so that the whole model remains manageable over time.
For simplicity, managing user accounts has been separated from managing roles and permissions. Both those features are accessible after clicking on User management in the left side menu in the Intella Connect Dashboard.
To create new users, modify and delete existing users, click on User management in the left side menu in the Intella Connect Dashboard.
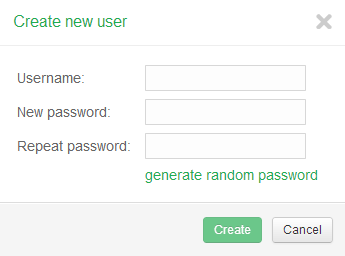
New users can be added by clicking on the Add button.

Note: Passwords can be generated by clicking on the generate random password link.
Once the user name and password fields are filled in, click on the Save changes button to add user.
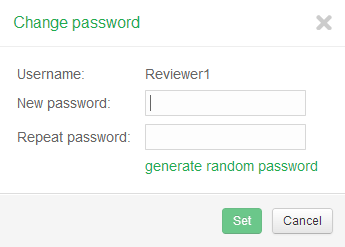
Select the user whose password you would like to change and click on the Set password button.
Once the password fields are filled in, click on the Set button to change the user’s password.

Note: Changing a user’s password will take effect after the user’s session expires or when the case sharing is restarted.
Select the user for whom you want to revoke access and click on the Remove user button.
After confirming the user removal, the selected user will no longer have access to any part of the Intella Connect system.
Note: Revoking a user’s access will take effect after the user’s session expires or when the case sharing is restarted.
As we said earlier, Intella Connect comes with a set of predefined permissions that can be assigned to any of the roles defined by the administrator. It also comes with a default role called Reviewer.
Backwards compatibility note: If you are migrating from previous versions of Intella Connect 1.7.x, the Reviewer role will be created for you and assigned to all the users that previously had access to a particular case. This means that you will not have to perform any manual actions yourself when upgrading to Intella Connect 1.7.3.
The Reviewer role has two permissions assigned to it by default, which lets users with this role access the case in which they are assigned this role and also perform various exporting tasks on the case’s items. This is demonstrated in the picture below, along with the user interface for RBAC management.
Note: In this section we only manage roles and their permissions. The last step will be to assign some roles to users in a context of given case, but this task is performed in the Cases sharing panel.
Adding new roles is straightforward: click on the Add button located underneath the Roles label. You will be asked for a name for the new role. Roles names should be unique. The new role will be immediately visible in the roles list.
Note: After a role has been added, it does not have any permissions assigned to it. It is also not assigned to any user automatically. This means that after a role has been added, it does not affect effective user permissions yet.
You can also delete roles easily, by selecting them in the roles list and clicking on the Delete button. You will be asked for confirmation, after which the role will be removed from the list. Deleting a role does not mean that this deletes the permissions associated with it, as those are defined by Intella Connect itself.
Note: Deleting a role that was already assigned to some user will have an instant impact on the user’s permissions, they will be recomputed instantly. This will happen even if the case is currently being shared.
Granting (or adding) and revoking permissions works very similar to roles management. Remember that permissions are always managed in a context of a role, so you have to select a role first in order to see what permissions are assigned to it already and modify this set.
Clicking on Grant new will open up a modal dialog that is used for selecting a desired permission. Permissions have their own unique internal IDs which are hidden from the view, so in the first combobox you can see a more human-readable description that should immediately let you know what that permission stands for.
Some of the permissions can be added to a role just one (like case access), other can be assigned multiple times (like reducing access to tagged items). In the latter case, the user interface will change a bit and you will be asked to add additional data which is needed by the permission to fulfil its purpose. Again, for the example of limiting access to tagged items, you will be asked to supply the tag name so that Intella Connect knows which tagged items are considered off-limits for users with that role. The user interface should render some hints as you proceed, making the process fairly straightforward.
Granting a new permission for the mentioned example is illustrated below:
Revoking a permission works similar to deleting a role. You will be asked for a confirmation, after which the permission should disappear from the permissions list. This will have an immediate impact on the role that it was assigned to.
Below is the list of permissions currently available in Intella Connect. We intend to add more permission types to this list in future releases:
Can access a case and participate in the review - this permission allows users to access a given case and perform a review. If a user does not have this permission for a certain case, he will not be able to get past the login prompt.
Can export items - allows users to create export sets and download items in their original format.
Cannot see items tagged with... (this needs an extra parameter: a tag name) - this permission allows for hiding certain items from certain reviewers, while letting others see the entire data set. Consider this: user A is granted with this permission (for “Privileged” tag) in a data set of 100 items. 10 of those items are tagged with the “Privileged” tag. One of these privileged items has 5 children, e.g. attachments or nested items. This means that user A will be able to see 85 items from this data set (10 + 5 = 15 items are hidden). The privileged 15 items will not show up in the cluster map, search results, facets, etc. If tagged items contain child items, they will be filtered from the results as well. User A will also have no access to the “Privileged” tag in the Tags facet, so he cannot himself modify it to change what he can or cannot see. Please read an important disclaimer at the end of this section.
Disclaimer about limiting access to items: use of this permission should be undertaken with caution in order to prevent leaking sensitive data. We advise users to test this solution thoroughly before using it in production. It is also important to apply a proper workflow when limiting access to items. For instance, creating an export set first and later applying restrictions to items is a potential leak of information, because the export set could have included privileged items before any restrictions were applied.Also, if a user with access to privileged items adds them to an export package, they become accessible to all other users with access to that case and with the exporting permission.Finally, using permissions to hide privileged items does not mean that those items are removed from the case. They are still present in the case database, but simply excluded from the results and hidden in the user interface for those users not entitled to view them. Therefore a clever attacker could still try to gain access to privileged data by attempting various attacks or malicious usage of communication channels. We advise to conduct a thorough security audit before giving case access to untrusted parties.