7. Sources
Sources are one of the key concepts of Intella. They represent the locations where items such as emails, documents and images can be found. Sources are explicitly defined by the user, providing full control over what information is searched.
7.1. Source types
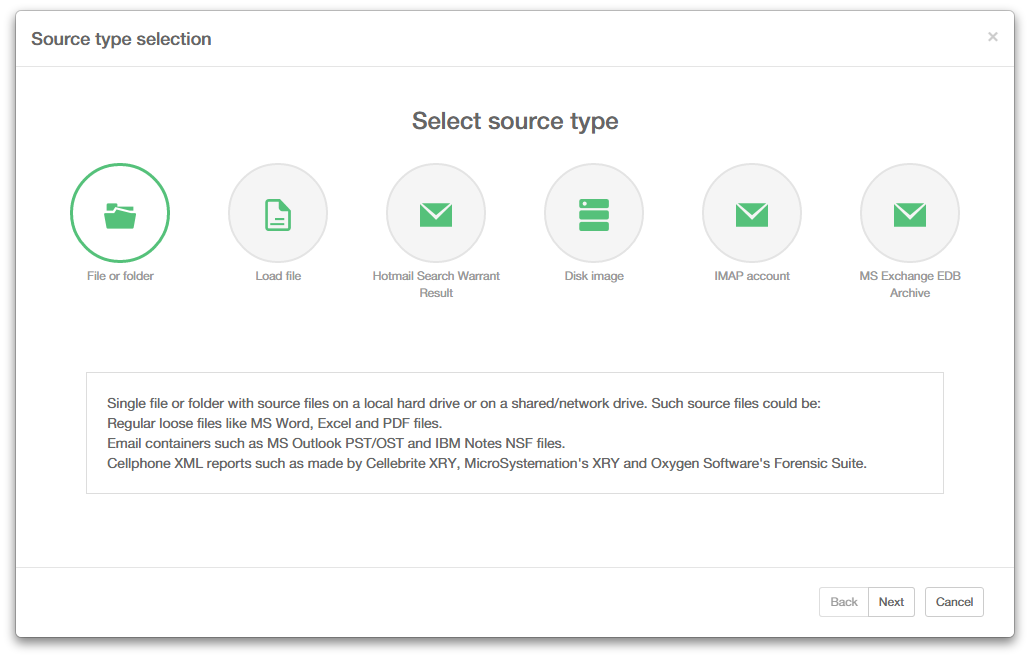
Intella distinguishes between various types of sources:
- File or Folder: A single file or folder with source files on a local hard drive or on a shared/network drive. Such source files could be:
- Regular loose files like MS Word, Excel and PDF files.
- Email containers such as MS Outlook PST/OST and IBM Notes NSF files.
- Cellphone XML reports such as made by Cellebrite XRY, MicroSystemation’s XRY and Oxygen Software’s Forensic Suite.
- Load file: a Concordance, Relativity or CSV load file.
- Hotmail Search Warrant Result (experimental): a collection of files in HTML and other formats, provided by Microsoft pursuant to a search warrant.
- Disk Image: one or more disk images in E01, Ex01, L01, Lx01, S01 or DD format.
- IMAP account: one or more email account(s) on an IMAP email server.
- MS Exchange EDB Archive: Microsoft Exchange database file.
7.1.1. Notes on mail formats
Intella supports PST and OST files created by the following versions of Microsoft Outlook: 97, 98, 2000, 2002, 2003, 2007, 2010 and 2013. Make sure that Intella has exclusive access to the PST or OST file; it cannot be open in Outlook or other application at the same time. Intella will try to recover the deleted items from the file. Recovered items will be located in a special folder named “<RECOVERED>”. Furthermore, Intella may encounter items outside the regular root folder. Any such items are placed in a special folder called “<ORPHAN ITEMS>”. There is limited ability to recover deleted emails from OST 2013 files, this is being worked on.
In order to index NSF files, IBM Notes 8.5 or higher needs to be installed. For NSF files made with IBM Notes 9 it is recommended to install IBM Notes 9. Intella supports all NSF files that can be processed by the installed IBM Notes version. Make sure that Intella has exclusive access to the NSF file; it cannot be open in a Notes client or other application at the same time. Only NSF files containing emails are supported by Intella, all other types are not supported. Make sure to use a default Notes installation and user configuration. A “corporate” Notes installation is often problematic for indexing, e.g. because of installed plugins interfering with access to the NSF file, the installation being tied to the corporate identify management system, etc.
Intella 1.9 contains experimental support for indexing Notes deletion stubs. Extraction of deletion stubs is disabled by default. To enable it, add the following line to the case.prefs file: NotesIndexDeletionStubs=True
Tip: The IBM Notes tool “nupdall.exe” can be used to convert older NSF files to NSF files that can be processed by IBM Notes 8.5 and higher.
Intella supports DBX files created by the following versions of Microsoft Outlook Express: 4.0, 5.0, 6.0. Intella has been tested on Thunderbird Mbox files.
Intella has been tested on Thunderbird Mbox files.
Intella supports MS Exchange EDB files of Exchange versions 2003, 2007 and 2010.
7.1.2. Notes on cellphone formats
When indexing Cellebrite, MicroSystemation or Oxygen cellphone reports, each report should be in its own subfolder. Any additional files that were produced together with the XML report, such as audio, video and image files, should have the same relative location to the XML file as the exporting application produced them. These two requirements are crucial for correctly linking the binary files with the XML report. Finally, no other evidence files should be placed in these folders, as they will be ignored.
A folder with the XML report and its related files can in principle be indexed straight away. However, most XML reports will often only contain the external numbers related to the calls and messages, i.e. the number of the phone itself is not in the report. This has valid technical reasons (e.g. it cannot be guaranteed that the current SIM card was used for these calls and messages), but it makes analysis of the communication a lot harder. Also Intella functionalities like message deduplication require this information. When the number is known by the investigator, e.g. obtained from the network provider, it may be specified through a separate text file:
Create a text file named after the XML report. For example, if the report is called “report.xml”, the text file should be named “report.numbers.txt”.
Put it in the same folder as the XML report.
Store the phone’s own number in this file. When the XML report holds information about multiple phones, enter the number of each phone on a separate line, like this:
number1number2<…>The first line will be used for the first phone found in the report, the second line for the second phone, and so on.
When indexing XRY’s XML reports, we recommend using the Extended XML report introduced in XRY 6.4. This new format solves many issues with the encodings of dates and other fields. Furthermore the older XML format did not support exporting binary items. To get binary items with the Extended XML report, you need to select the “Export media files and manifest” option.
Important: The XML formats used by these cellphone extraction vendors are often evolving over time and are not fully documented. While we strive to extract all information from these reports as completely and correctly as we can, we can only offer this functionality on a best-effort basis. We recommend that you verify any results that you may rely on in your report with the original cellphone extraction software.
7.1.3. Common file locations
MS Outlook PST and OST files are typically located in the following folder:
Windows Vista, Windows 7 and Windows 8: *
C:Users<username>AppDataLocalMicrosoftOutlook
Windows 2000 and XP:
C:Documents and Settings<username>Local SettingsApplication DataMicrosoftOutlook
MS Outlook Express DBX files are typically located in the following folder:
Windows 2000 and XP:
C:Documents & Settings<username>Local SettingsApplication DataIdentities{<arbitrary string>}MicrosoftOutlook Express
IBM Notes NSF files are typically found in the following folder:
Version 7.x:
C:Program FilesLotusNotesData
Version 8.x:
C:Program FilesIBMLotusNotesData
Version 9.x:
C:Program FilesIBMNotesData
7.2. Adding sources
Adding sources is done with the Add New Source wizard.
7.2.1. Note on source locations
Important: Assuming that Intella Node is installed on different computer than the one running Intella Connect, it is possible to have Evidence reside on computer which is running Connect. You will need to use network path instead of local path to be able to index evidence which does not reside on local disk with Intella Node. To be precise, you will need to use network path when adding new source and choosing path to evidence.
7.2.2. Note on case locks
Intella Node will lock the case before indexing starts, but as soon as the Intella Node has indexed the case and user clicks on Finish sources management button, it releases it so Connect can share it.
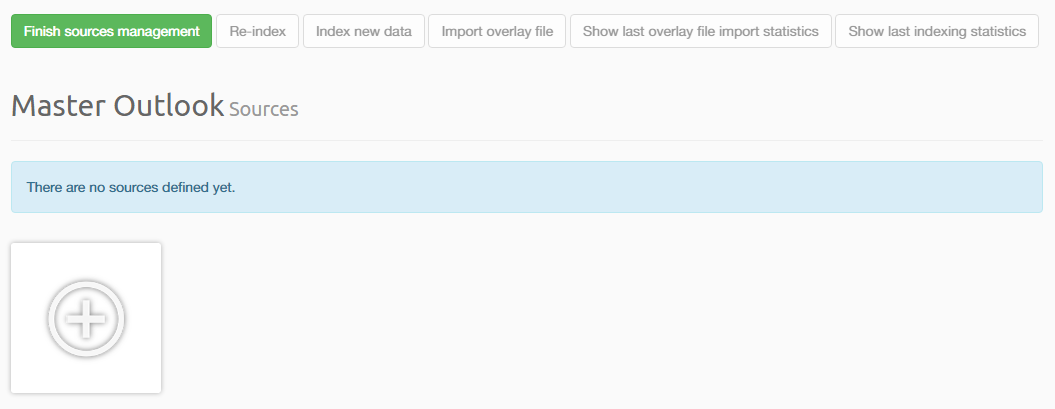
You can start the wizard by pressing (+) icon on the empty source slot on the Case Sources management page:
7.2.3. Adding a File or Folder source
Follow these steps to add a Folder source to Intella:
Source Type
Select “File or Folder” source type and click
Next.Specify File or Folder
Select the folder or file from the tree that you want to index, or enter the folder or file name in the text field above the tree. When the “Include subfolders” checkbox is selected, files in all subfolders (and sub-subfolders, etc.) will also be indexed. When the “Include hidden folders and files” checkbox is selected, hidden files and folders will be indexed as well.
Note: Folder trees containing many items may take some time to be displayed. Please be patient.Click
Nextto continue.Proceeding steps
The last steps in the definition of a source type are almost the same for all types. They are described in the section Last steps in a source definition.
7.2.4. Adding a load file source
Tip: An experimental set of load file templates is available on request that can be used to export items and re-import them in another case, effectively creating a subset of the original case. Contact us at http://support.vound-software.com/ for more information.
Follow these steps to add a load file to an Intella case:
Source Type
Select “Load file” source type and click
Next.Specify File
Type the file name and location of the load file that you wish to investigate. Note that you can also select a load file from the tree. If the load file comes with an Opticon image file then you should specify it in the “Opticon image file” field. Specify the load file format: “Concordance/Relativity” or “Comma Separated Values”. You can use a previously saved import template. Click
Nextto continue.Formatting options
On the “Formatting options” page you can set the file encoding and delimiter settings for:
- Column delimiter – the character that separates the columns.
- Text qualifier – the character that marks the beginning and end of each field.
- New line – the character that marks the end of a line inside a text field.
- Multi-value delimiter – the character that separates distinct values in a column. Currently it can be used with the “Tags” column only.
- Use absolute path – select this option when the load file uses absolute paths rather than relative paths.
You can click “Detect Encoding” button in case you are not sure about what encoding to use.
Intella will validate the load file using these settings and display the validation result in the status line. When the file can be validated successfully, the number of columns and records found in the load file will be displayed. When validation fails, a reason will be given in this line.
At the bottom of the panel a “Data preview” is shown. It can be used to make sure that you have specified the correct parameters for the load file. Additionally the “Image preview” panel will show the first image associated with the selected table record. It can be used to ensure that the Opticon file is correctly loaded.
Click
Next.Column mapping and date formats
On this screen you can define the mapping of some essential load file fields. For each column you can select a column name from the drop-down list. The fields have the following meaning:
- Document ID – the unique identifier of the record.
- Parent document ID – the unique identifier of the parent record.
- File folder & Email folder – fields that are used to reconstruct the original location of the record. You can specify either two separate columns for emails and loose files or just a single column for any type.
- Extracted text – the extracted or OCRed text of the document. Select the “Extracted text column is a link to an external file” checkbox when the column contains a link to the text file rather than the text itself.
- Native file – the path to the native (original format) file of the document. Select the “Extract text and metadata from native files” checkbox when you want to extract the text and metadata from the native file. Note that Intella will replace any original metadata from the load file with the new metadata extracted from the native file. The option is turned off by default.
You can specify date and time formats in the second part of the screen.
Email metadata options
Specify which columns should be used to load the email metadata information from. In order to load a date into separate date and time columns use the “XXX date and time are separate columns” checkbox.
Loose files and tags options
You can specify the loose files and attachments metadata mapping on this page. Remarks:
- The Size column should contain the size of the document in bytes.
- The MIME Type column should contain a correct mime type of the document, e.g. “application/pdf”.
- The File Extension column can be used for loose file identification instead of or in addition to the MIME Type column. When the MIME type is not present, the file extension will be used to derive the MIME type.
- The Tags column should contain a list of tags separated by the character specified in the “Multi-value delimiter” field on the “Formatting options” page. All found tags will be imported into the current case. If the tag doesn’t exist it will be created automatically.
- When you select the “Use the following column and value to identify emails” checkbox, then you can specify a column and some value to tell Intella that this record represents an email message.
- This may be useful in situations where your load file has no correct MIME type information, but you still want to distinguish emails from loose files.
- An example is a load files conforming to the U.S. Department of Justice load file delivery standard: you will want to specify the column “EPROPERTIES” and value “Email” to correctly import emails.
Validation
Intella will automatically validate the load file and the Opticon image file. All found errors will be shown in the “Data preview” table. For each error you will see:
- The line number where the error was detected.
- The field name and value that failed to validate.
- An error description.
It is highly recommended to resolve all errors before importing the load file.
Proceeding steps
The last steps in the definition of a source type are almost the same for all types. They are described in the section Last steps in a source definition.
Important notes on load file importing
- There are several aspects to be aware of when importing a load file into an Intella case:
- All paths in the load file to external resources should be relative to the load file, unless the “Use absolute paths” checkbox is selected.
- Imported images will be added as child items, treated similarly as embedded/attached items from regular sources. They can be viewed in the “Thumbnail” tab in the Previewer.
- Custom fields (e.g. “Custodian”) that are not supported in Intella will be shown in the Previewer’s “Raw data” tab only. No new custom column will be created. Such a feature may be added in a future release.
- The original load file record identifiers cannot be used in a subsequent load file export. Such a feature may be added in a future release.
- Imported images cannot be directly used in a subsequent load file export; the images can be exported as separate items only. Such a feature may be added in a future release.
You can save the specified load file import options as a template for later usage on the last page “Completed Source Definition”. All import templates are stored as XML files in the “<Intella System Folder>import-templates” folder.
7.2.5. Adding a Hotmail Search Warrant Result source
Important: This source type is still in an experimental stage. We welcome any feedback; please visit our support portal at http://support.vound-software.com/.
Follow these steps to add a Hotmail Search Warrant Result to Intella:
Prepare evidence files
The evidence files you have received may consist of a folder containing a “Click Here.html” file and some legal files related to the search warrant, with a subfolder for each account involved. It may also be that you have only one of those account subfolders, recognizable by a “Folders.html” and “Messages” file in this folder. In case you have received a ZIP file or some other type of archive file, please unpack this archive file first.
Source Type
Select “Hotmail Search Warrant Result” source type and click
Next.Specify File
Select the folder holding the Hotmail Search Warrant Result files that you wish to investigate: click Open to browse for folders. Select the top-level folder of the provided file collection and click Open. Click Next to continue.
Proceeding steps
The last steps in the definition of a source type are almost the same for all types. They are described in the section Last steps in a source definition.
7.2.6. Adding a Disk Image source
Follow these steps to add a Disk Image source to Intella:
Source Type
Start the Add New Source wizard from the Sources menu. (Sources > Add New...). Select “Disk Image” and click Next.
Specify Files
Specify the location of one or more image files: click Add… to browse for image files. Select the image file and all its parts and click Add. All selected files will be listed in the disk image list. Alternatively, one can select a single image part and then click Find Parts. Intella will then try to find the related image parts that belong to that same multi-volume image (see below) and add them to the list. Files of a multi-volume image should be listed in the correct order. Select rows and use the Move Up and Move Down buttons to put files in the correct order.
Select files and folders to process
Indicate which files and folders should be processed by selecting a pre-defined profile or creating a custom one. See below for detailed instructions.
Proceeding steps
The last steps in the definition of a source type are almost the same for all types. They are described in the section Last steps in a source definition.
Important: A single disk image source should only contain the files relating to a single conceptual image. Files relating to a different image should be entered as a separate source.Important: Due to limitations in the indexing framework it is not possible to include or exclude “compound” file types such as the newer MS Office file formats (based on ZIP) or the older MS Office file formats (based on OLE). Please use filtering by file extension instead. This shortcoming will be addressed in a future Intella version.
Filtering disk image content
A disk image often contains a lot irrelevant files, such as executables, DLLs. These files add to the processing time and disk space that the case will consume. It is possible to define a set of rules to filter out unnecessary files and folders, to save processing time and disk space. On the “File types and locations page” you can choose either to index all the data by selecting “Index all files and folders” check box, or use a specific disk image indexing profile. There are several built-in profiles:
- All supported files. Index all file types supported by Intella. “Supported” means that Intella can do something meaningful with it besides detecting the file type, i.e. it can extract text, metadata and/or embedded items from the file, or display it as an image. All executables for example are not hashed and cached with this profile.
- All supported files, exclude system files. Index all file types supported by Intella and exclude three system folders: “Windows”, “Program Files” and “Program Files (x86)”.
- Mail stores. Index only mail store files: PST, OST, NSF, Mbox, etc.
- Mail stores, exclude system files. Index only mail store files. Also exclude the three system folders listed above.
You can also adjust any index profile to your needs. To create a new profile, type a new name in the “Use index profile” box and click the Save button.You can delete any profile by selecting it first and clicking the Remove button.
The first section on this page defines the rules on which files should be included or excluded. You can filter files by type and by file name. If you select “Include selected entries”, then only the listed files and file types will be indexed. Otherwise, the listed entries will be excluded. Note that you use wildcard names such as “*.txt” to filter all files that end with ”.txt”.
A single “File name” entry can contain only a single file name definition; you cannot enter several file names in a row such as “*.txt, *.exe”. You should add two separate entries to the list in this case.
The second section on this page defines a list of locations that should be included or excluded. If you select “Include selected entries” then only the listed locations will be indexed. Otherwise, the listed locations will be excluded from indexing. You can adjust the folder selection on the next screen called “Select Folders”.
All index profiles are stored in XML format in the “<Intella System Folder>index-profiles” folder and can be used in all local cases.
Supported disk image formats
The Disk image source type supports EnCase E01, Ex01, L01, Lx01 and S01 files. Password-protected files are supported and indexed without manual interaction, except for FTK-encrypted files.
DD images are supported, but when a Folder source is used, they need to use the .dd file extension in order to be detected and processed as DD images. Because of potential issues with DD image detection, we recommend using the Disk Image source directly. This is also required when you want to index a multi-volume DD image.
Supported file systems and partition types
The following file systems have been tested: FAT16, FAT32, NTFS, Ext2/Ext3, HFS/HFS+ and ISO 9660. Other file systems such as EXT4, ExFAT, YAFFS2 and ISO 13346 (UDF) may work but have not been tested yet.
MBR and GUID partition tables (GPT) partitions are supported. Apple Partition Maps (APM) have been tested but results were mixed. When Intella fails to index such an image, we recommend mounting it manually and indexing the mounted drive using a “File or Folder” source.
Multi-volume files
When using a Folder source to index multiple image files, Intella will rely on the following file name convention to determine which files together make up a single image:
7.2.7. Adding an IMAP account source
Important: The IMAP standard is implemented in many different ways. Furthermore some mail servers may throttle the network connection during mass downloads. We tested Intella on several IMAP servers with good response. However, we cannot guarantee that Intella is able to create IMAP account sources for every IMAP server. Specifically, retrieval of emails through Outlook 365’s IMAP connection gave incomplete results.Tip: We recommend using a mail client to download the entire mailbox and indexing the resulting PST or Mbox file instead, rather than using Intella to download the mailbox. This way a copy of the mailbox is created outside of the Intella case. This results in a cleaner and better auditable workflow, allowing e.g. cross-validation of the investigation results with other forensic tools or indexing with future Intella versions.
Follow these steps to add an IMAP Account source to Intella:
Source Type
Select “IMAP account” source type and click
Next.Specify Account
Enter the settings for the target email account, e.g., “mail.my-isp.com” with the username and password. Select the “use secure connection (SSL)” checkbox if you want or need a secure connection to the mail server. This is recommended, because without a secure connection your password will be sent as plain text. Click Next to continue.
Select Folders
In the next step, Intella will contact the specified email server to retrieve the mail folder tree. If you selected a secure connection and the server uses a certificate that cannot be validated automatically, a dialog will appear that asks you whether the certificate should be accepted. Once connected, after you accept the certificate if applicable, Intella will display the folder tree of the target mail account. You can then select the folders that you want to make searchable by placing a check in the box next to the desired folders. When you want to index subfolders, you will need to select them; otherwise they will be ignored. The wizard has two convenient buttons for selecting and deselecting all folders. Click Next to continue.
Proceeding steps
The last steps in the definition of a source type are almost the same for all types. They are described in the section Last steps in a source definition.
7.2.8. Adding MS Exchange EDB Archive
- Specify EDB file
Type or select the EDB file that you wish to investigate.
- Select mailboxes
Select the EDB mailboxes that you wish to investigate.
Proceeding steps
The last steps in the definition of a source type are almost the same for all types. They are described in the section Last steps in a source definition.
7.2.9. Last steps in a source definition
The following final steps are the same for all source types.
Source Name and Time Zone
In the Source Name and Time Zone sheet you are asked to enter a name for the source. The name will be shown in the list of sources in the Sources panel and functions purely as a label for your reference.
Furthermore a suspected system base time zone can be entered. This setting indicates the time zone of the system from which the evidence file(s) were obtained. By entering this time zone, all dates associated with items from this source will be displayed in that time zone, rather than the time zone of the investigator’s system. This often makes it easier to correctly interpret those dates, e.g. determine whether a given timestamp falls inside regular business hours. By default the local time zone is used for new sources. Time zones supporting Daylight Savings Time (DST) are marked with an asterisk (*).
Click
Nextto continue.Items
Intella makes the indexing of certain complex file types optional. You can disable this to improve indexing performance at the cost of fewer results.
- Select Index mail archives if you want to extract all emails and attachments from mail archives like PST and NSF files. Subsequent processing of documents and archives found in the attachments are still subject to the next two options.
- Select Index chat message if you want to index chat messages inside Skype SQLite databases, Pidgin accounts and Bloomberg XML dumps. This also controls what happens with Skype, WhatsApp messages etc. in cellphone reports.
- Select Index archives if you want Intella to index files inside archives such as ZIP and RAR files.
- Select Index content embedded in documents if you want to extract images and other binary items embedded in Microsoft Office, OpenOffice and PDF documents. This will make these items separately searchable and viewable.
- Select Index databases to enable the indexing of all tables in SQLite databases.
- Select Index Windows registry to make all keys and values in a Windows registry file searchable by full-text keyword search. When turned off, a limited amount of registry indexing necessary for populating the Insight tab will still take place. The overhead for this is negligible
- Select Index browser history to let Intella process the contents of web browser histories.
- Select Recover deleted emails and Notes deletion stubs to enable the processing of deleted emails from MS Outlook files (PST, OST) and deletion stubs in IBM Notes files (NSF).
- Select Extract text fragments from unsupported and unrecognized file types to enable heuristic string processing on all items whose type is not recognized by Intella (they are considered to be binary blobs) or whose type is not supported apart from type detection (e.g., executable files).
Options
This sheet provides additional options affecting the time needed for indexing.
Select Cache original evidence files to copy all evidence files into the case folder. Use this option if you want to create a self-contained case where the evidence files can be opened or exported even when they are not found in their original locations, for instance when the case is moved to another system).
When this option is turned on, additional processing time (especially for compression) and disk space is needed.
This setting has no effect on storing of the items extracted from these evidence files (e.g. the mails, attachments and other embedded items extracted from a PST file), as these are always stored in the case folder after extraction.
Select Analyze paragraphs to let Intella determine the paragraph boundaries and to let it build a database registering which paragraph occurs in which item and where. This enables various search and review options at the expense of additional processing time. The required storage space is negligible. For subsequent sources this setting is forced to be same as what has been used for the first source.
Click
Nextto continue.
Tasks
This sheet lets the user define post-processing steps that need to take place once all evidence files have been crawled and all indices have been build. See the Tasks section for more details.
Completed Source Definition
Finally you will be presented with a dialog to inform you that you have successfully defined a new source. You may optionally start indexing the source. Indexing is required to be able to search and explore the items in this source, but can be only performed on Intella Node. Once you click the Finish button, the indexing process will proceed according to the options you have selected.
Tip: Because the active indexing process prevents you from defining more new sources, you may wish to skip this part now (e.g., to define more new sources) and index the sources later by clicking the Re-index menu item in the Sources menu.Note: At any time except before the step “Completed Source Definition,” you can click the Cancel button to return to the Intella interface without having added a new source to the case.
7.3. Indexing
After defining a source, Intella Node will index it. During indexing it will inspect all items (emails, files etc.) that it can find in the source file(s), enabling Intella Connect to return instantaneous results during your investigation for relevant evidence.
WARNING: Having anti-virus software active during indexing can lead to certain items not being indexed. This will usually be restricted to the files that are blocked by the anti-virus software, but this cannot be guaranteed. Running anti-virus software may also affect indexing performance.
During indexing, you will see an overlay displaying various types of information:
- Statistics on indexing speed.
- Statistics on encountered file types.
- The amount of data that is being indexed and how much has been indexed already.
- The number of indexing steps to perform, which current step is being performed and (for some steps) a progress percentage.
You can stop the index process at any time by clicking the Stop button. Intella will finish processing the current item and then complete its case databases with the information that has been extracted thus far.
7.3.1. Re-indexing a case
There may be circumstances when you want to re-index the entire case, e.g. to use extraction features offered by a newer Intella Connect/Node version or fix a broken index. To rebuild the case index from scratch, use the Re-index option in the Case Sources Management view. Intella will remove all indices it has previously created and create new ones. In order for this to work, all evidence files have to be present at the location they had during the initial indexing.
7.3.2. Updating a case
Alternatively, there may be times when you want to update an index, e.g. in the following scenarios:
- Files and/or folders have been added to folders that have already been indexed.
- New sources have been defined but were not indexed immediately.
- The set of mailboxes to index in an EDB source has been extended.
- You interrupted indexing using the Stop button.
In these cases the “Index new data” option in the Case Sources Management view will scan all sources for new evidence items. Items that have already been indexed are not changed, also when their original evidence items are no longer available.
7.4. Post-processing
After indexing has completed, the case owner can opt to refine the indexing results in a number of ways. These steps are kept separate from indexing as they typically contribute considerably to the processing time and disk space usage and, depending on the case at hand, may not be needed.
7.4.1. Tasks
Intella allows for the definition of “tasks”. These are essentially compound processing steps such as searching for all items that match a certain keyword or keyword list and tag or export the results. These tasks can be defined and selected during source creation, which will run these tasks right after indexing.
Each task consists of a condition and an action. Currently the following conditions can be defined:
- A keyword search optionally combined with a date range search on all date fields.
- A keyword list search optionally combined with a date range search on all date fields.
- An MD5 list search optionally combined with a date range search on all date fields.
- An arbitrary Saved Search, which can combine all of Intella’s search facets.
- A tag, possibly assigned by one of the tasks executed earlier.
All items that match the defined condition have an action applied to them. The following actions can be defined:
- Tag all found items with one or more tags. The tag(s) can optionally be inherited by items in the same family hierarchy and/or by duplicates of the found items.
- Set custodian attributes.
- Flag all found items.
- Add a comment to all found items.
- Export all found items using an export template.
- Export the metadata of all found items to a CSV file. Use the “Configure” button to set CSV file name and path and to select the metadata fields that are to be included.
Tasks can be exported to a file so that they can be reused in other cases. These files are not self-contained, which means that when the task involves Keyword list, MD5 list or Saved Search, these lists will not be embedded in the task file. Keyword list, MD5 list or Saved Search are only referenced by filename, so in order for such task to be executed properly, the referenced Keyword list, MD5 list or Saved Search must already be present (uploaded) in case in which these tasks will be executed.
Tasks are executed in the order they have in the task list. This makes it possible to “pipeline” tasks, e.g. use one task to assign specific tags to a subset of the items and use aa subsequent task that is based on those tags.
7.4.2. Custodians
The Custodian attribute can be assigned to items after indexing. This can be used to represent the custodian of the evidence items. To enable automated assigning of multiple custodians in a folder source, the root folder should organize the evidence in subfolders, one subfolder for every custodian. If the evidence folder is structured in this way, the “Indexing Tasks” step in the Source Wizard will contain a “Custodians” tab that opens the settings panel for automated assigning of multiple custodians. By default the custodian names are set to equal the subfolder names. It is possible to alter the used custodian names in the table. This Custodian value will be assigned to all items obtained from the evidence files within the respective subfolder. For other types of sources, the “Indexing Tasks” tab contains a text field for setting a single custodian name. Besides the above method, the Custodian attributes can also be set or changed using the “Set Custodian” indexing task with an arbitrary condition, or edited manually in the Details’ right-click menu.