Intella Connect supports a number of exporting formats, each focusing on a different use case.
To export a collection of items that have been returned by a query, you can use the following procedure:
This opens the Export Wizard. This wizard lets you choose the export format and its settings and start the export process.
After pressing the Start Export button in the last step, a new export package will be created. You can manage export packages trough the Export view.
Administrator’s note: We strongly recommend that you do not use any MS Office applications on the server machine during exporting. Using these applications at the same time can result in these applications exiting suddenly and without warning, risking data loss on any opened documents.
The first wizard page lets you choose an export format:
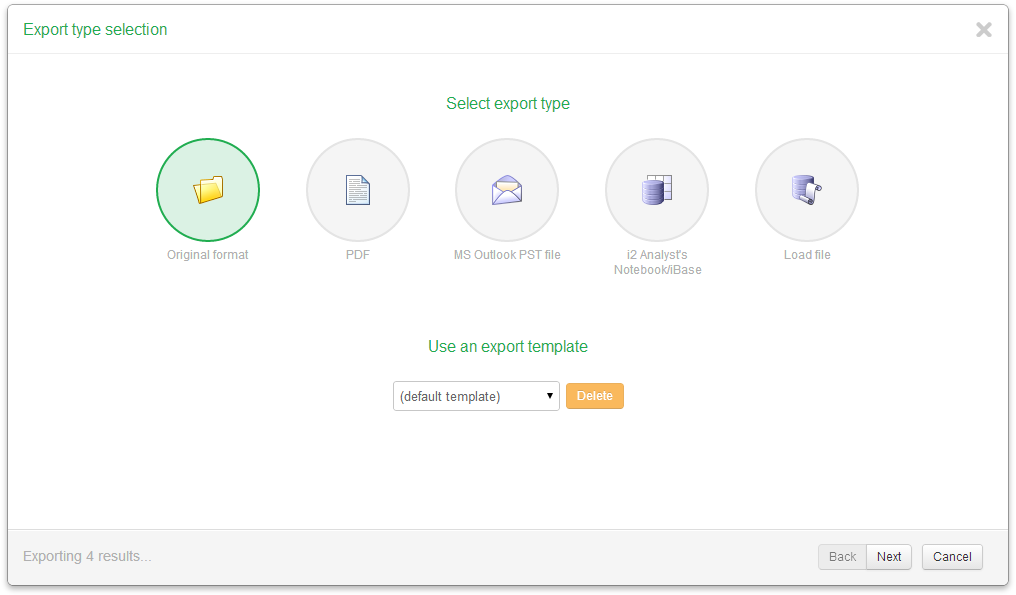
Only one format can be chosen per export run.
The current configuration can be stored as a user-named template in the last wizard sheet. In the first sheet all stored templates are listed in a drop-down list. Selecting one restores the state of the Export wizard to the one stored in the selected template.
Note: All templates, even those created by Intella 100, Intella 250, Intella Professional (Pro) or Intella TEAM Manager are automatically available across all cases on the same machine and user account.
Administrator note: Export templates are stored in the following folder:- Windows Vista, Windows 7 and Windows 8: C:\Users\<USERNAME>\AppData\Roaming\Vound\Intella\exporttemplates- Windows 2000, XP: C:\Documents and Settings\<USERNAME>\Application Data\Intella\export-templates
The first wizard sheet on PDF options lets you decide whether to export to individual PDF files, one for every selected item, or to export all items into one single concatenated PDF file. When exporting to a concatenated PDF, the resulting PDF can optionally be split in chunks of a given size. This is recommended for performance and stability reasons.
This wizard sheet consists of three sections:
File naming
By default, exported files will be named using the original evidence file’s name or the subject of an email. Alternatively, you can choose to number the files using consecutive numbers. These options can also be combined: a number followed by the file name or subject.
Load file naming offers more elaborate numbering style, whose parts can be further configured in the File Numbering section.
When using a numbering style, you can also define a prefix. Anything you type here will be added to the beginning of the filename. E.g. the prefix “export-” will result in the first email being named export-00000001.eml, when you combine it with consecutive numbering.
Using “Advanced” mode you can define a file name template that will be a base for exported file name. The template may include the following fields:
In order to insert any field in the template you can either type it manually or select the field from the drop-down list and press Add field.
File numbering
Using the “Start at” option you can define the number to start counting with. By default exporting will start counting at 1. A typical reason to use a different start number is when you want to combine the exported results with another set of already exported files.
Numbers are always 8 digits long.
“Folder”, “Page rollover” and “Box” are only relevant when using load file naming.
File grouping
Select the option “All in one folder” to put all exported files in one folder.
Select the option “Keep location structure” to preserve the original folder structure that the items have in the evidence files. A folder will be created for every source, in which the original folder structure of that source (as shown in the Location facet) will be recreated.
File name examples
On the right side you can see a live preview of how the exported file names would look based on the current settings, using items from your current item set as examples.
Note: when exporting a load file, this sheet is called “PDF or image rendering options”
For all types of items, you can indicate whether to include a basic item header, properties, raw data and comments in the PDF:
If you deselect “Include item metadata”, then the resulting PDF will not contain any additional information except for the actual item content (in its native form or as extracted text) and the headers and footers defined in the next sheet. Most of the options on this sheet will then be disabled.
For emails, the following information can optionally be included:
For loose files and attachments that are not emails, the following options are available:
The following file formats can be exported in their original view:
When you select “Skip Original View for”, you will also be able to define a list of item types that should be skipped for this. You can use this to e.g. prevent native view generation of spreadsheets, which often are hard to read in PDF form. An optional placeholder text can be added to make clear that original view generation has been skipped on purposes for this item.
Enter a file name to use for the generated PST.
Enter a display and folder name. After opening the exported PST file in MS Outlook you will see the names you entered. They help you to locate the PST file and its contents in MS Outlook.
Select the option “Keep location structure” to preserve the original folder structure during the export.
The resulting file can optionally be split into chunks of a given size. This is highly recommended for larger result sets that would make the PST grow beyond the default suggested file size, as Outlook may become unstable with very large PST files. The produced files will have a file size that is close to the specified maximum file size (usually smaller). The export report will list for every item to which PST it was added.
Item types that can be exported directly to a PST file
Besides emails, the following item types can be exported directly to a PST file:
Limitations: - iCal recurrence rules (RRULE property) are not exported. - PST Distribution lists are exported, but their list members are not.
These limitations may be removed in a future Intella release.
Please note that non-email items will be exported to a regular PST folder under the Mail section, so not in e.g. the Contact section.
How to export other item types to a PST file
Items such as Word and PDF documents cannot be exported directly to a PST file. As such items may be attached to an email, Intella can be configured to export the parent email instead.
You can choose to either include the top-level email parent or the direct email parent. An example would be an attachment contained within an email message within another email message. With the top-level parent selected all parent items of the attachment (both emails) would be included in the PST, one nested within the other. The second option exports the nested email to the PST. You can also choose to simply skip non-email attachments.
Although this option only mentions parent emails, it also applies to e.g. PDF files attached to a meeting request or any of the other exportable items. In this case, enabling this option will export the meeting request instead. This option may therefore be renamed in the future.
Note: Files in a folder source lack a parent email and therefore cannot be exported to a PST file, except for mail files like EML, EMLX and MSG files, or files of the types listed above.
How to export attached emails
The last setting controls what happens with emails that are selected for export and that also happen to be attachments. These are typically forwarded messages. Such emails can technically be exported to a PST without any restrictions, but the investigation policy may require that the parent email is exported instead, to completely preserve the context in which this email was found. That can be done by choosing the Replace with its top-level parent email option. Alternatively, use the Export attached email option to export the attached email directly to the PST.
At the moment the Analyst’s Notebook and iBase export does not provide any configuration options except.
Templates, import specifications and instructions are provided for Analyst’s Notebook and iBase. Please contact support@vound-software.com for more information.
You can select one of the following load file formats:
Each load file export consists of several parts:
The first part is mandatory; the others can be turned off.
The main load file name can be changed using the “File name” text field. It is also possible to specify the main file encoding when the Summation format is selected.
By selecting “Use custom date/time formats” you can override the date and time format used in the load file. Please see this document for the date/time format syntax details: http://docs.oracle.com/javase/7/docs/api/java/text/SimpleDateFormat.html
In order to control the quality of the exported images, you can set the “Image DPI” parameter. It defines the number of dots (pixels) per inch. A higher DPI setting results in higher quality images, but these will take more time to produce and consume more disk space.
It is also possible to adjust the TIFF compression type. Note that the image will be converted into black-and-white variant if one of the “Group Fax Encoding” compression type is selected.
Numbering with load files
The numbering used for load files differs from the other export formats. When exporting to a load file, every exported page has its own unique number. The number of the first page is usually used as a number of the document. Please note that pages are numbered only if image files are included in the export.
On the “Headers and footers” sheet you may choose a special field PAGE_NAME which is available only with load file export. This will put the current page name as it was configured on the “Naming and numbering” sheet.
Another difference is that by default all export files are grouped into folders and optionally boxes. The “Page rollover” option defines a maximum amount of pages that a folder can contain. The maximum number of folders in a box is fixed to 999. Additionally you can set a starting number for the page (“Start at”), folder and box.
By default, the page counter starts over when switching to the next folder, so the first page in the next folder will have the number “1”. This approach can be changed when using “Use transparent numbering in groups” option. When it is selected, the page counter will continue page numbering from the last page of the previous folder. In other words, page numbers will be unique among the entire export set.
Additionally, the “Advanced” numbering mode can be selected when exporting to a load file. In this case you will be able to set a custom file name templ ate. Please see the file naming and numbering section for details. Note that %num% means a page number, not a document number in this case. Also there are two new fields that can be used:
You can also use the %000group1% syntax to define the number of leading zeroes in the counter (similar to %000num% syntax). Thus, the default load file numbering schemes can be expressed using the following templates:
When using the “Advanced” mode it is important to set a file grouping: “All in one folder” or “Load file mode”. When “Load file” grouping mode is selected then the exported files will be grouped by folders and, optionally, boxes in exactly the same way as it is described above.
Field chooser The “Field chooser” sheet contains a table of the fields that will be included in the load file. By default the starting set of fields depends on the selected load file format.
The “Name” and “Comment” columns in this table are used only for managing the fields within Intella Connect and are not included in the load file. The “Label” column value is used as a column label in the load file. The “Type” column can be one of the following:
You can include an additional custom field by pressing the “Add custom field...” button. Next, enter the name, label and comment. Select one of the following types:
When exporting to a load file, all documents are grouped by their parent-child relationship. For example, an email and its attachments form a single group. The columns “RECORD_ID_GROUP_BEGIN” and “RECORD_ID_GROUP_END” denote the start and end page numbers of such a group.
When adding a date column as a custom field, it is possible to choose the way how the date is formatted: show date only, show time only or show full date and time. Note that you can add the same date field more than once and use different formatting options. For example, you can add two custom fields: DATE_SENT (“Sent” column, show date only) and TIME_SENT (“Sent” column, show time only).
In the table header on the left there is a selection icon. After clicking it you can choose between:
You can indicate whether you want to create an export report for this export. The report can be formatted as a PDF, RTF, CSV and/or HTML file.
For PDF, RTF and HTML reports you can also add a comment that will be displayed on the first page of the report.
Export reports link the original files to the exported files, by listing identifying information about the original item (e.g. source evidence file, MD5 hash) and linking to the exported file. Also the export report may contain information that is lost during export, such as the evidence file’s last modification date; like any copy, the export file has the date of export as its last modification date.
Note: You can find the error notifications at the end of the PDF and RTF report or in the last column of the CSV report.
Not all items are inherently exportable to the chosen export format(s). Examples are:
A file inside an encrypted ZIP file may be known to Intella but it cannot be exported to Original Format if Intella could not decrypt the ZIP file. Exporting to PDF is possible though, with the information that is known.
When using the default PST export settings, Intella will try to replace nonexportable items with their parent email. If there is no parent email, the item is skipped.
Folder results are always skipped.
Note: All skipped items are listed in the export report.
The number of hits per search query can be exported by right-clicking in the Searches list in the upper-right corner and selecting “Export queries as...” CSV/XLS. This produces a CSV/XLS file with the following columns: