Besides keyword searching, the indexed items can be browsed by facets, which represent specific item properties.
Every facet organizes the items into groups (possibly hierarchical) depending on a specific item property.
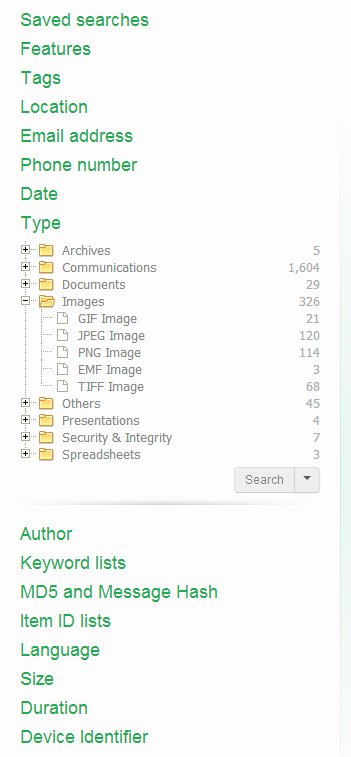
Clicking on a facet in the facets panel will open a list of all values of the selected facet right below the facet name. In the example below, the Type facet has a list of file types as values.
To search for items that match with a facet value, select the facet value and click the Facet search button.
Note: It is possible to select more then one facet value with holding down the Ctrl key when selecting.
The Saved Searches is a list of previous sets of searches that the user has stored.
When search results are displayed in the Cluster Map and the Searches list, the Save button beneath the Searches list will be shown.
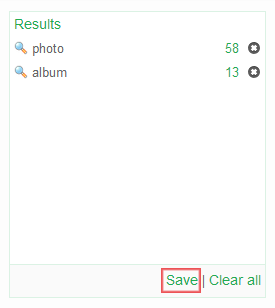
When the user clicks this button, a dialog opens that lets the user enter a name for the saved search. After clicking on the OK button, the chosen name will appear in the list in the Saved Searches facet.
Click on the name of the saved search and then on the Restore button to bring the Cluster Map and the Searches list back into the state it had when the Save option was used.
The “Replace current results” checkbox controls what happens with the currently displayed searches when you restore a saved search. When turned on, the Cluster Map and Searches list will be emptied first. When turned off, the contents of the saved search will be appended to them.
When the ‘Combine queries’ checkbox is selected, searches contained in the selected saved search in Saved Searches facet will be combined to search for items matching any of the contained search (Boolean OR operator). The items will be returned as a single set of results (one cluster).
The Features facet allows you to identify items that fall in certain special purpose categories:
Encrypted: all items that are encrypted. Example: password-protected PDF documents. If you select Encrypted and click the search button, you will be shown all items that are encrypted.
Note: Sometimes files inside an encrypted ZIP file are visible without entering a password, but a password still needs to be entered to extract the file. Such files cannot be exported with Intella if the password has not been provided prior to indexing. In this case both the ZIP file and its encrypted entries will be marked as Encrypted, so searching for all encrypted items and exporting those will capture the parent ZIP file.
Decrypted: all items in the Encrypted category that Intella was able to decrypt using the specified access credentials.
Unread: all emails that are marked as “unread” in the source file (PST/OST only). Note that this status is not related to previewing in Intella.
Empty document: all items that have no text while text was expected. Example: a PDF file with only images.
Has Duplicates: all items that have a copy in the case, i.e. an item with the same MD5 or message hash.
OCRed: indicates whether the item has been OCRed after indexing.
Tagged: all items that are tagged.
Flagged: all items that are flagged.
Commented: all items that have a comment.
Previewed: all items that have been opened in Intella’s previewer.
Opened: all items that have been opened in their native application.
Exported: all items that have been exported.
Note: In cases in which multiple users have worked, i.e. shared cases or cases with imported Work Reports, the Previewed, Opened, Exported, Commented, Tagged and Flagged nodes shown in the Facet panel will have sub-nodes, one node for each user.
Tags are labels defined by the user to group individual items. Typically used tags in an example are for example “relevant”, “not relevant” and “legally privileged”. Tags are added to items by right-clicking in the Details panel and choosing the Add Tags... option. Tags can also be added in the Previewer.
To search for all items with a certain tag, select the tag from the Tags list and click the Search button below the list.
When tags have been added by different users in the same case, the tag node will have sub-nodes for each individual user. These sub-nodes can be used to search for all items that have been tagged with that tag by that user.
This facet represents the folder structure inside your sources. Select a folder and click Search to find all items in that folder.

When “Search subfolders” is selected, the selected folder, all items in that folder, and all items nested in subfolders will be returned, i.e. all items in that entire sub-tree.
When “Search subfolders” is not selected, only the items nested in that folder will be returned. Items nested in subfolders will not be returned, nor will the selected folder itself be returned.
When your case consists of a single indexed folder, then the Location tree will show a single root representing this folder. Selecting this root node and clicking Search with “Search subfolders” switched on will therefore return all items in your case.
When your case consists of multiple mail files that have been added separately, e.g. by using the PST and NSF source types in the New Source wizard, then each of these files will be represented by a separate top-level node in the Location tree.
This facet represents the names of persons involved in sending and receiving emails. The names are grouped in seven categories:
Most emails typically only have a From header, not a Sender. The Sender header is often used in the context of mailing lists. When a list server forwards a mail sent to a mailing list to all subscribers of that mailing list, the message send out to the subscribers usually has a From header representing the conceptual sender (the author of the message) and a Sender header representing the list server sending the message to the subscriber on behalf of the author.
This facet lists phone numbers observed in phone calls from cellphone reports as well as phone numbers listed in PST contacts and vCard files.
The “incoming” and “outgoing” branches are specific to phone calls. The “All Phone Numbers” branch combines all of the above contexts.
This facet lets the user search on date ranges by entering a From and To date. Please note that the date entered in the To field is considered part of the date range.
Besides start and end dates, Intella lets the user control which date attribute(s) are used:
The Date facet will only show the types of dates that actually occur in the evidence data of the current case.
Furthermore it is possible to narrow the search to only specific days or specific hours. This makes it possible to e.g. search for items sent outside of regular office hours.
This facet represents the file types (Microsoft Word, PDF, JPEG, etc.), organized into categories like Documents, Spreadsheets, etc. To refine your query with a specific file type, select a type from the list and click “Search”.
Note that you can search for both specific document types like PNG Images, but also for the entire Image category.
This facet represents the name(s) of the person(s) involved in the creation of documents. The names are grouped into two categories:
To refine your query by a specific creator or contributor name, select the name and click the Search button.
In the Keyword List facet you can load keyword list, to automate the searching with sets of previously determined search terms.
A keyword list is a text file in UTF-8 encoding that contains one search term per line. Note that a search term can also be a combination of search terms, like “Paris AND Lyon”.
Once loaded, all the search terms (or queries) found in the keyword list are shown in the Keyword Lists facet. They are now available for search.
When the ‘Combine queries’ checkbox is selected, multiple keywords selected from a specific keyword list will be combined to search for items matching any of the selected terms (Boolean OR operator). The items will be returned as a single set of results (one cluster). If the checkbox is not selected, the selected terms will be searched separately, resulting in as many result sets as there are selected queries in the list.
Tip: Keyword lists can be used to share search terms between investigators.
Intella can calculate MD5 and message hashes to check the uniqueness of files and messages. If two files have the same MD5 hash, Intella considers them to be duplicates. Similarly, two emails or SMS messages with the same message hash are considered to be duplicates. With the MD5 and Message Hash facet you can:
Specific MD5 or message hash
You can use Intella to search for files that have a specific MD5 or message hash. To do so, enter the hash (32 hexadecimal digits) in the field and click the Search button.
List of MD5 or message hashes
The hash list feature allows you to search the entire case for MD5 and message hash values from an imported list. Create a text file (.txt) with one hash value per line. Use the Add... button in the MD5 Hash facet to add the list. Select the imported text file in the panel and click the Search button below the panel. The items that match with the MD5 or message hashes in the imported list will be returned as a single set of results (one cluster).
Tip: Install a free tool such as MD5 Calculator by BullZip to calculate the MD5 hash of a file. You can then search for this calculated hash in Intella to determine if duplicate files have been indexed.
In the Item ID Lists facet you can load a list of item IDs, to automate the searching with sets of previously determined item IDs.
An item ID list is a text file in UTF-8 encoding that contains one item ID per line.
Once loaded into the case, you can select the list name and click Search. The result will be a single result set consisting of the items with the specified IDs. Invalid item IDs will be skipped.
This facet shows a list of languages that are automatically detected in your items.
To refine your query with a specific language, select the language from the list and click the Search button.
Important: If Intella cannot determine the language of an item, e.g. because the text is too short or mixes multiple languages, then the item will be classified as “Unidentified”.When language detection is not applicable to the item’s file type, e.g. images, then the item is classified as “Not Applicable”.
This facet groups items based on their byte size.
To refine your query with a specific size range, select a value from the list and click the Search button.
This facet reflects the duration of phone calls listed in a cellphone report, grouped into meaningful categories.
This facet groups items from cellphones by the IMEI and IMSI identifiers associated with these items. Please consult the documentation of the forensic cellphone toolkit provider for more information on what these numbers mean.
Facet values can be included and excluded. This allows filtering items on facet values without these values appearing as individual result sets in the Cluster Map visualization.
To include or exclude items based on a facet value, select the value and click on the arrow in the Search button. This will reveal a drop-down menu with the Include and Exclude options.
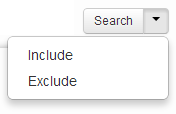
Including a facet value means that only those search results will be shown that also match with the chosen included facet value.
Example: The user selects the facet value “PDF Document” and includes this facet value with the drop-down menu of the Search button in the facet panel. The Searches panel in the Cluster Map shows that “PDF Document” is now an included term. This means that from now on all result sets and clusters will only hold PDF Documents. Empty clusters will be filtered out.
See the image on the right side for an example: the “Enron” search term resulted in 1,606,638 items, but after applying the PDF Documents category with its 22,167 items as an inclusion filter, only 6,325 items remain.
When multiple includes are used, the results are filtered for all items that are in at least one of the include sets, i.e. it is like filtering with the union of all includes.
Excluding a facet value means that only those search results will be shown that do not match with the chosen excluded facet value.
Example: The user selects the facet value “PDF Document” and excludes this facet value with the drop-down menu of the Search button in the facet panel. The searches panel in the Cluster Map shows that “PDF Document” is excluded. As long as this exclusion remains, all result sets and clusters will not hold any PDF Documents. Empty clusters will be filtered out.Note: Excludes are often used to filter out privileged items before exporting a set of items, e.g. by tagging items that match the privilege criteria with a tag called “privileged”.
In this scenario it is important to realize that when exporting an email to e.g. Original Format or PST format, it is exported with all its attachments embedded in it. The same applies to a Word document: it is exported intact, i.e. with all embedded items. Therefore, when an attachment is tagged as “privileged” and “privileged” is excluded from all results, but the email holding the attachment is in the set of items to export, the privileged attachment will still end up in the exported items.
The solution is to also tag both the parent email and its attachment as “privileged”. The tagging preferences can be configured so that all parent items and the items nested in them automatically inherit a tag when a tag is applied to a set of items. When filtering privileged information with the intent to export the remaining information, we recommend that you verify the results by indexing the exported results as a separate case and checking that there are no items matching your criteria for privileged items.