5. Intella Connect Dashboard
The Intella Connect Dashboard is the administrative part of Intella Connect and enables the administrator to share cases, define users, do Remote indexing management, view the activity stream from shared cases and modify the general settings of Intella Connect.
Clicking on the user’s name in upper right corner allows user to change the password or log out from Intella Connect:
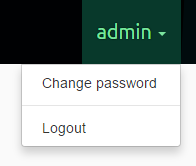
To change password, select Change password from the menu.
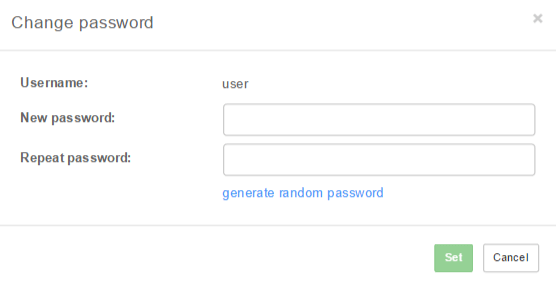
Once the password fields are filled in, click on the Set button to change the
user’s password. After changing the password, you will be asked to log in with new password.
Note: Passwords can be generated by clicking on thegenerate random passwordlink.
The left-side menu divides the administrative part into the following parts:
5.1. Cases
This part shows the list of cases prepared by the Intella desktop product. For each of the cases it also shows its status, which can be:
not shared: the case is not shared.
shared: the case is currently being shared and accessible to reviewers.
indexing: the case is being indexed.
sources managed: the case sources are being managed.
locked: the case is currently used by another Intella process, e.g. the Intella desktop application.
Note: A case can also be without a status, which means that it is not available. The reason for this can be that the directory where the case files used to be, is no longer accessible.
Clicking on a case shows its details on the right side, along with a set of buttons depending on status of the case:
- Share: shares the case, which will be accessible via the URL shown in the
Case URLfield in the case details. - Authorizations: allows to assign users to various roles.
- Stop sharing: stops sharing of the case.
- Delete case: removes the case from the list and optionally also from the disk.
- Sources: opens up Case Sources management page where new sources can be added and (re)indexed.
- Finish managing sources: finish managing sources.
5.1.1. Creating new case
Creating a new case in Intella Connect is straightforward.
After pressing Create case button located at the bottom of the cases list the Create case dialog will be shown.

Please populate the form with case name, case description (optional) and desired absolute path to the case folder.
Optionally you can specify also Optimization folder. The optimization folder can be used to speed up indexing by distributing certain database files during indexing across the case folder drive and the optimization folder drive.
Important: Assuming that Intella Node is installed on different computer than the one running Connect, it is possible to have Case and Optimization folders reside on computer which is running Connect. You will need to use network path instead of local path to be able to index evidence which does not reside on local disk with Intella Node. To be precise, you will need to use network path when creating case (Case folder field and Optimization folder field are the ones, which will need network path).
After you’ve entered all data, press Ok button. You will be presented with Case Sources management page
of newly created case where you will be able to add and index newly added sources.
5.1.2. Adding an existing case to the list
If you have existing case on the disk which is accessible to Intella Connect,
then you can manually import it to the available cases list. In order to do
that you will have to provide a path to the Case Folder (parent folder
of a case.xml file).
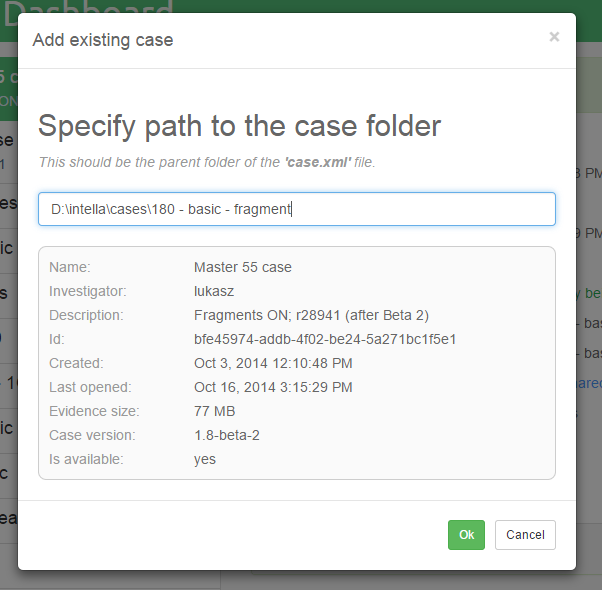
Click on the Add case button located at the bottom of the cases list. In the
modal window, please type in the absolute path to the case folder. It’s the
best to copy and paste it directly from Windows Explorer window. The server
will then analyze provided path and if the case is found in that location, it
will render basic details about the case. This is presented on the image
below. If provided path is invalid, then appropriate message will be shown.
Intella Connect can also be configured to add cases automatically. For more information, see Automatic case discovery section.
5.1.3. Deleting an existing case from the list
Click on the Delete case button located at the bottom of the selected case details panel.
In the modal window, leave the checkbox empty if the case should only be removed from cases list.
Check the checkbox if the case should be removed from cases list as well as from disk.
5.1.4. Case Sources management
You will be presented with this part each time new case is created or after
Sources button in the case details panel is clicked.
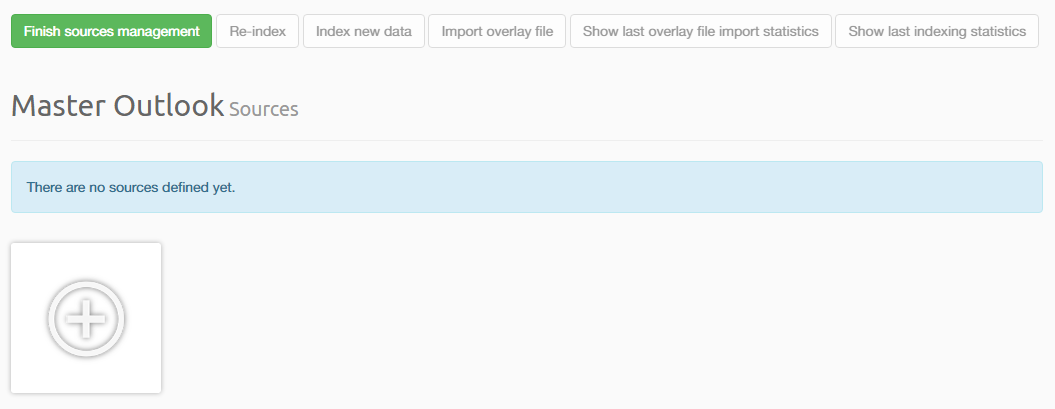
Using this view it’s possible to:
- Add new sources.
- Re-Index whole case.
- Index new data.
- Import overlay file.
- See overlay file import statistics.
- See latest indexing statistics.
5.2. Remote indexing
Intella Connect can make use of unlimited number of remote Intella Nodes to perform remote indexing. For installing and setting up an Intella Node please see Installing and starting Intella Connect/Node section.
Note: One Intella Node license is needed for each running Intella Node instance.
5.2.1. Managing Intella Nodes
Using this view it’s possible to add/edit/remove remote Intella Nodes that can be used to perform remote indexing.
Make sure that remote Intella Node server is properly running and is directly accessible via network on particular IP and port.
Detected host name and port which can be used when adding new Intella Node can be found on the Intella Node’s local status page.
The IP address that is being detected by Intella Node can be just one of addresses on which that computer can be reached and it might not be always the best one to use. There are few examples that come to mind:
- your computer can have multiple networking interfaces, such as 1Gb/s TP (twisted-pair) ethernet network card and WI-FI network card. If you would connect both of those to different routers or switches, then your computer will be assigned two IP addresses and you can be reached by either of those. In this case you might want to use IP address assigned to the cable-connected network card rather than WI-FI as it might be faster. It could happen, however, that the IP address shown as detected is the one from your WI-FI network card.
- a router or switch to which your computer is connected can be configured to have multiple subnets. That means that the IP address and network mask will depend on the interface to which you are connected on that router or switch. Not much to do here unless you are also network administrator and you understand how the router was configured and how the computer is connected.
- your computer can be reachable on multiple IP addresses and ports even if you have just one network interface connected in your computer. For example: localhost:9999 or 127.0.0.1:9999 (also known as loop-back interface, which points to your own computer), 192.168.1.109:8082 (your local network on your directly connected router), 192.168.0.159:8081 (your company network on your second hop router), 85.74.198.115:80 (your public address). In this case you might want to use IP address which will make least hops on the route to server.
Please note that these are only simple scenarios and there can be much more complex network topologies and configurations. It really depends on what network you have and how it is built and configured. The detected IP address is being read from system configuration, it is not an algorithm that would detect your network and perform speed and reliability measurements to determine what exact address to use. It is meant to be a hint rather than anything else. When in doubt about which IP address to use, please consult your IT/network administrator.
When you have gathered all relevant data (host, port) you can add new remote Intella Node by clicking
on the plus sign when hovering mouse over UNUSED remote remote Intella Node slot or by clicking on the
button Add Intella Node.
The Add Intella Node dialog will be shown.
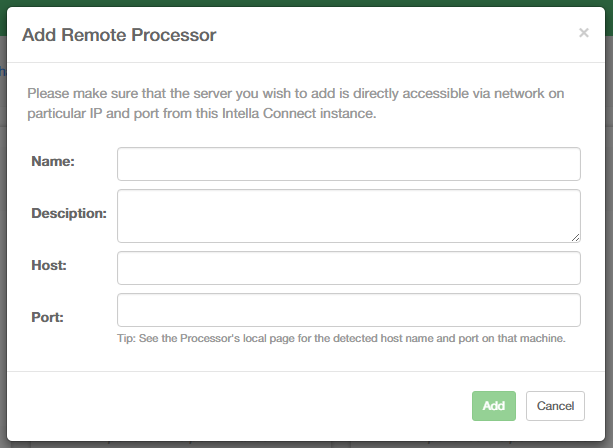
Enter name, description, host and port. After pressing Add the Intella Node will show up in the remote
Intella Nodes list with status Connecting... which indicates that there is a check being made whether
remote Intella Node is up and running and is reachable.
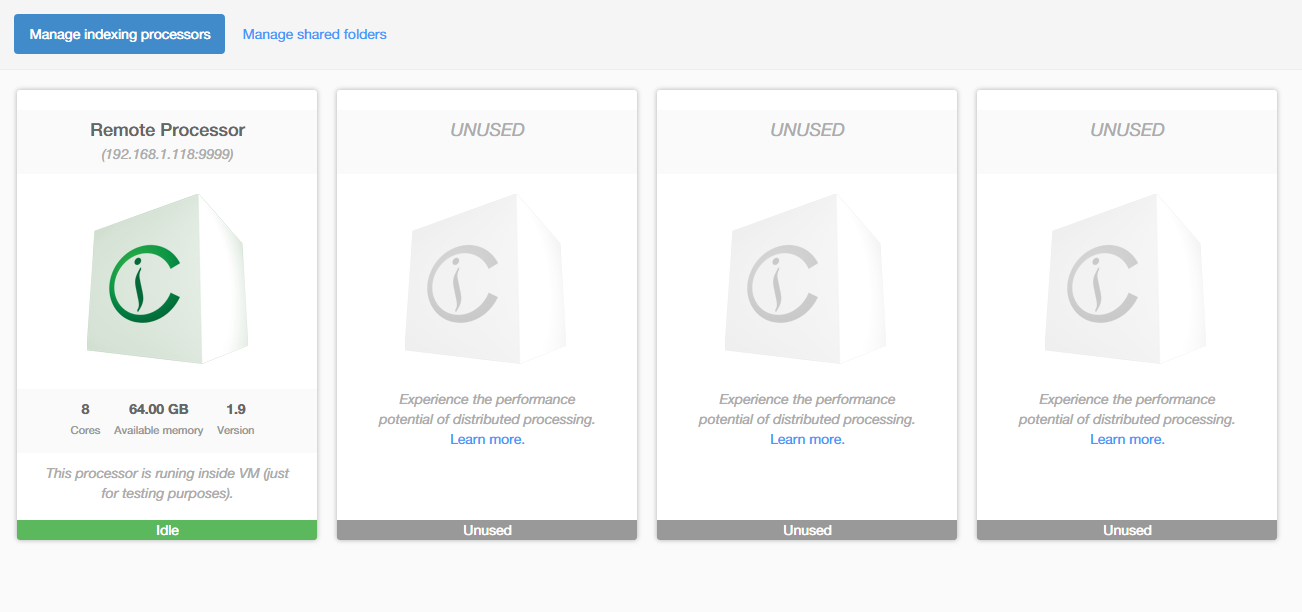
If all entered data were correct and remote Intella Node server was reachable the status of the newly added Intella Node should be Idle which indicates that Intella Node is ready to be used for remote indexing. Connection error status indicates that server is not reachable. If that happens you should check whether:
- Remote Intella Node is properly running which can be done by opening it’s local page.
- Entered data (host, port) were correct.
- Remote Intella Node server is reachable from Intella Connect Server.
5.2.2. Manage shared folders
Shared folders management is actually a way of logically organizing shared folders that are based on UNC paths.
Each defined folder represents specific type of location:
- Evidence location - folder where evidence resides.
- Cases location - folder where cases reside.
- Optimization location - folder used for optimization.
When such Shared folders are defined, the user is able to access them in a file selection tree under Shared folders branch next to Local Server disks.
Note: Folders that represent Evidence location will be shown only when adding new sources, folders representing Cases location will be shown when creating new case and folders representing Optimization folder will be shown when selecting optimization folder.
To add a new shared folder, click Add shared folder
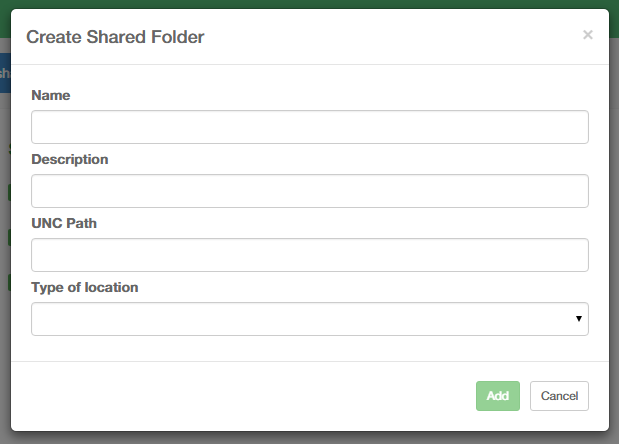
Enter name, description, UNC path and select type of the location that folder represents. After pressing Add Remote folder will be added
to the list of the Remote folders.
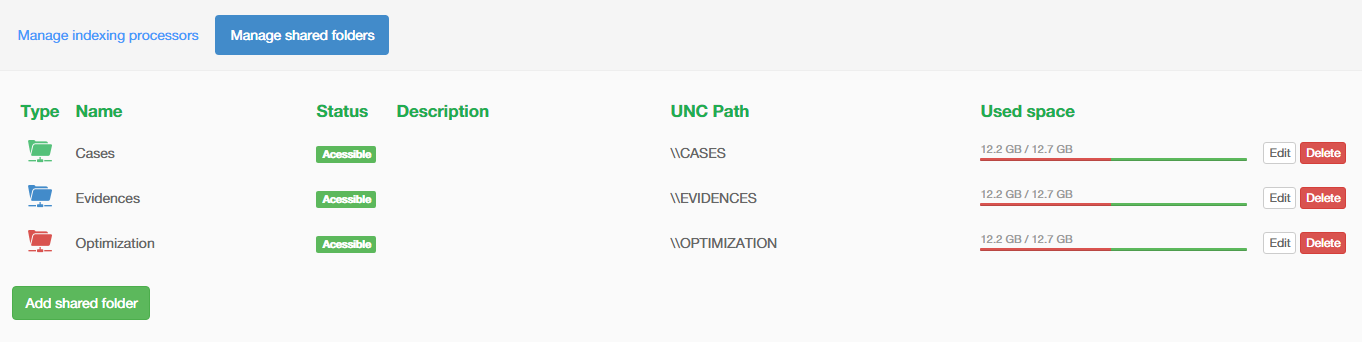
You can see Shared folders in action on this particular screenshot:
Note that only Shared folder “Cases” representing Cases location is shown when specifying Case location in order to prevent selecting folders representing other locations (Evidence location, Optimization location).
5.3. User management
This part is explained in the User management section.
5.4. Activities stream
This part shows the activities and actions performed on a case by the reviewers that have logged in on it.
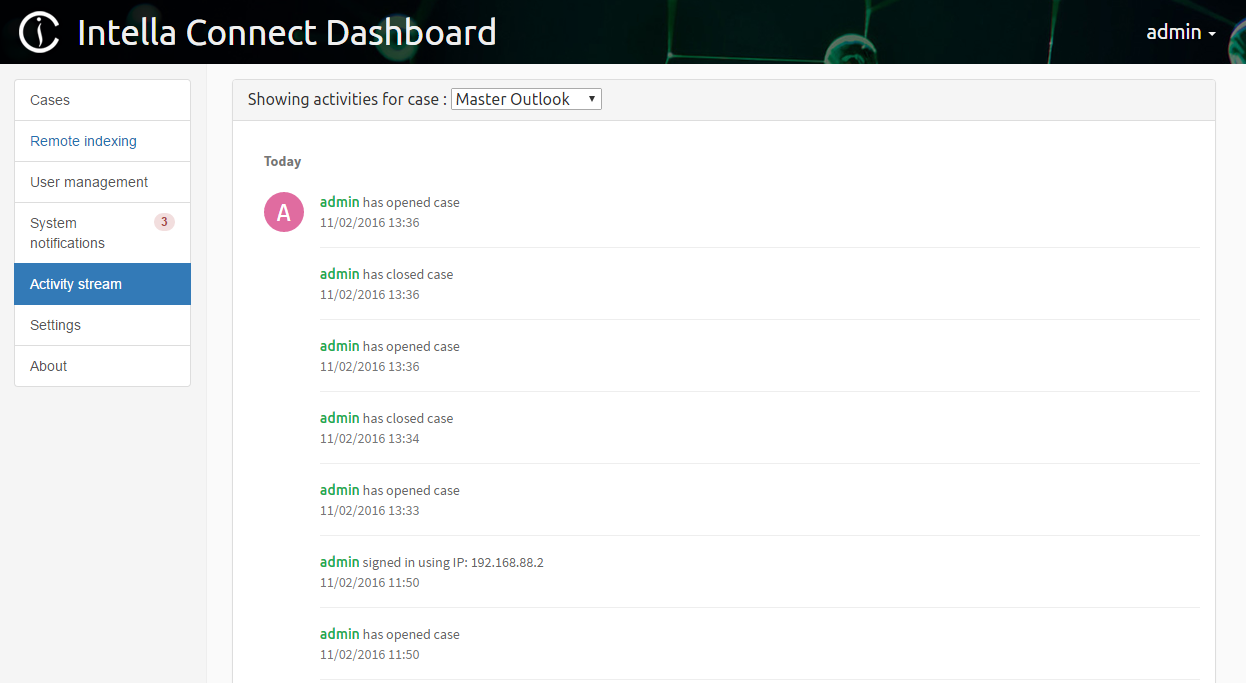
- Single activity entry is composed of:
- the creator name (the user that performed the activity)
- the message (description of the activity)
- the date (the date and time the activity happened)
It is possible to view older activities by clicking on the
more activities button.
Note: In order to prevent too much information to appear in the Activity stream those events are not shown:- queries executed by reviewers- events related to exchanging instant messages
5.5. Settings
This part lets the administrator configure Intella Connect. It is divided into three parts.
5.5.1. General settings
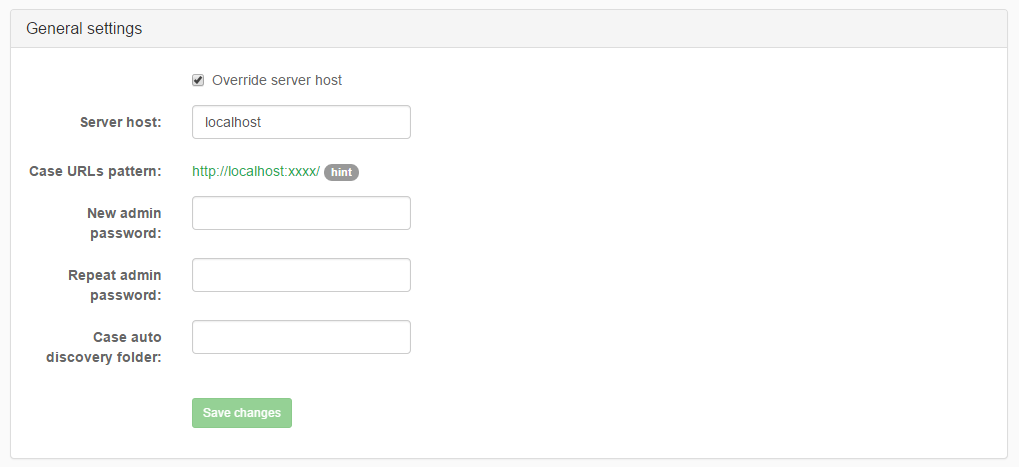
Changing server host
By using the checkbox Override server host and text field
Server host it is possible to define the Case URL on which a shared
case will be shown as accessible. The Case URL pattern is only
informative and shows what the Case URL may look like.
Note: Overriding the server host only changes the Case URL to be in the form, which is described by theServer hostfield. Depending on your network infrastructure such a Case URL might still not be accessible due to the router configuration. For example, when you own a certain domain name, settingServer hostfield to your domain name will make Case URL point to your domain, but it might still happen that your browser will not be able to connect to that URL. If that is the case, contact your network administrator to resolve this issue.
Changing default admin password
The admin password can be changed using the password fields
New admin password and Repeat admin password. The passwords entered
into those two fields must match in order to eliminate typographical
errors.
5.5.2. Automatic case discovery
Letting Connect automatically find cases on disk
The last option allows you to make Connect to automatically look for cases available in a specified local disk folder. To enable this feature, simply enter an absolute path to the folder that might contain case folders.
Connect will check this folder every 15 minutes to find any new cases
(judged by the presence of a case.xml file) and automatically add them
to the available cases list. It will also scan the disk each time that you
change and save this path.
For performance’s sake, Connect scans files three levels deep starting from the root (provided folder).
To turn off this feature simply change the path to a blank value and press Save changes.
Note: Disks are usually the main bottlenecks in hardware setups that we are usually dealing with. Adding a case usually happens rarely, so we do not recommend sacrificing even a tiny bit of a reviewing performance for it. Therefore we don’t encourage you to make use of this option unless it’s absolutely critical to your workflow. You can always consider switching it on and off depending on requirements.
5.5.3. SSL support
Intella Connect supports protecting your setup with a secure HTTPS communication layer. The details on how to set it up is a part of a separate guide available here: SSL guide.
5.5.4. Branding
Intella Connect can be partially or fully branded with a custom logo of your choice. The process of setting this up is pretty straightforward. It’s just the matter of uploading:
- a login page logo that will be shown on the application’s login page
- a header logo that will be shown in various places inside the application’s User Interface.
You can find more details on this topic in Branding section.
Note: This feature will be enabled only for users having extended Intella Connect license. Please contact your sales representative for details.
5.6. About
This part shows information about the Intella Connect version that is used.