4. Views
The case review interface has four views that the user can switch between:
- Dashboard view (default) - allows user to get an overview of the case.
- Search view - used for searching, investigating data and reviewing results.
- Review view - allows for a simplified, cost effective review of items grouped into batches.
- Exports view - for managing exported results.
- Report view - used for generating reports, such as detailed statistics about the keywords in a keyword list or user activity on a case.
Note
Views are shown based on whether user has sufficient permissions so it might happen that not all of them will be shown.
The desired view can be selected in the header:

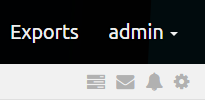
Note also the Secondary Navigation which shows actions associated with the selected view (on the left) and toolbar with (on the right) icons for accessing:
- Tasks side panel
- Instant Messaging side panel
- Activities side panel
- Preferences modal window
4.1. Dashboard view
The Dashboard view is the default view that Intella Connect will display when the case is opened. It allows the user to see an overview of the case, particularly the kind of data which is contained in it, overall progress of the investigation as well as individual activities of other investigators.
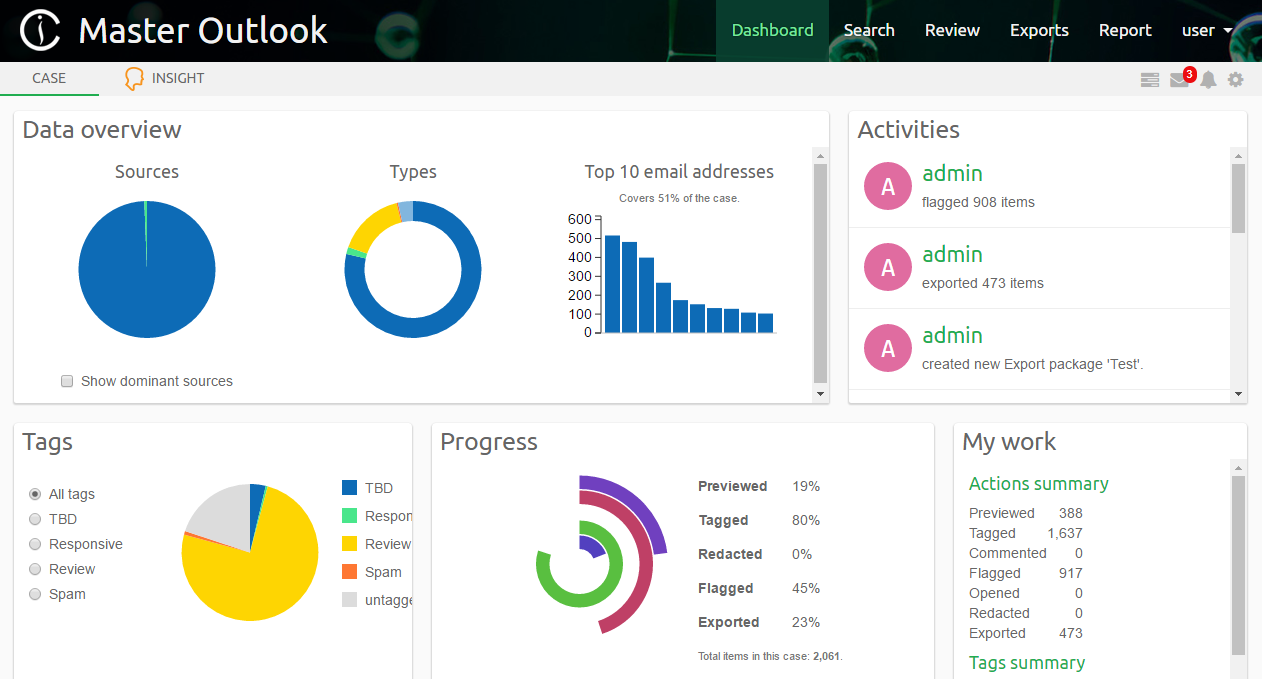
Dashboard view interface consists of the following panels:
- Data overview - shows data sources that have been indexed, types of items and top 10 email addresses in this case.
- Tags - shows all tags that have been applied to items or, when a particular tag is selected, the items tagged per user.
- Progress - shows how many items have been previewed, tagged, redacted, flagged or exported.
- Reviewers - shows reviewers that are participating in investigation of this case. Reviewers that are currently logged in are shown as active.
- My Work - shows the actions performed by current user.
- Activities - contains records related to user activities like viewed items, tagging, flagging, exporting, etc.
- Alert box - shows notifications regarding the case and the data contained in it, such as exceptions or the existence of encrypted items.
The Secondary Navigation Bar allows to switch between case dashboard and insight view.
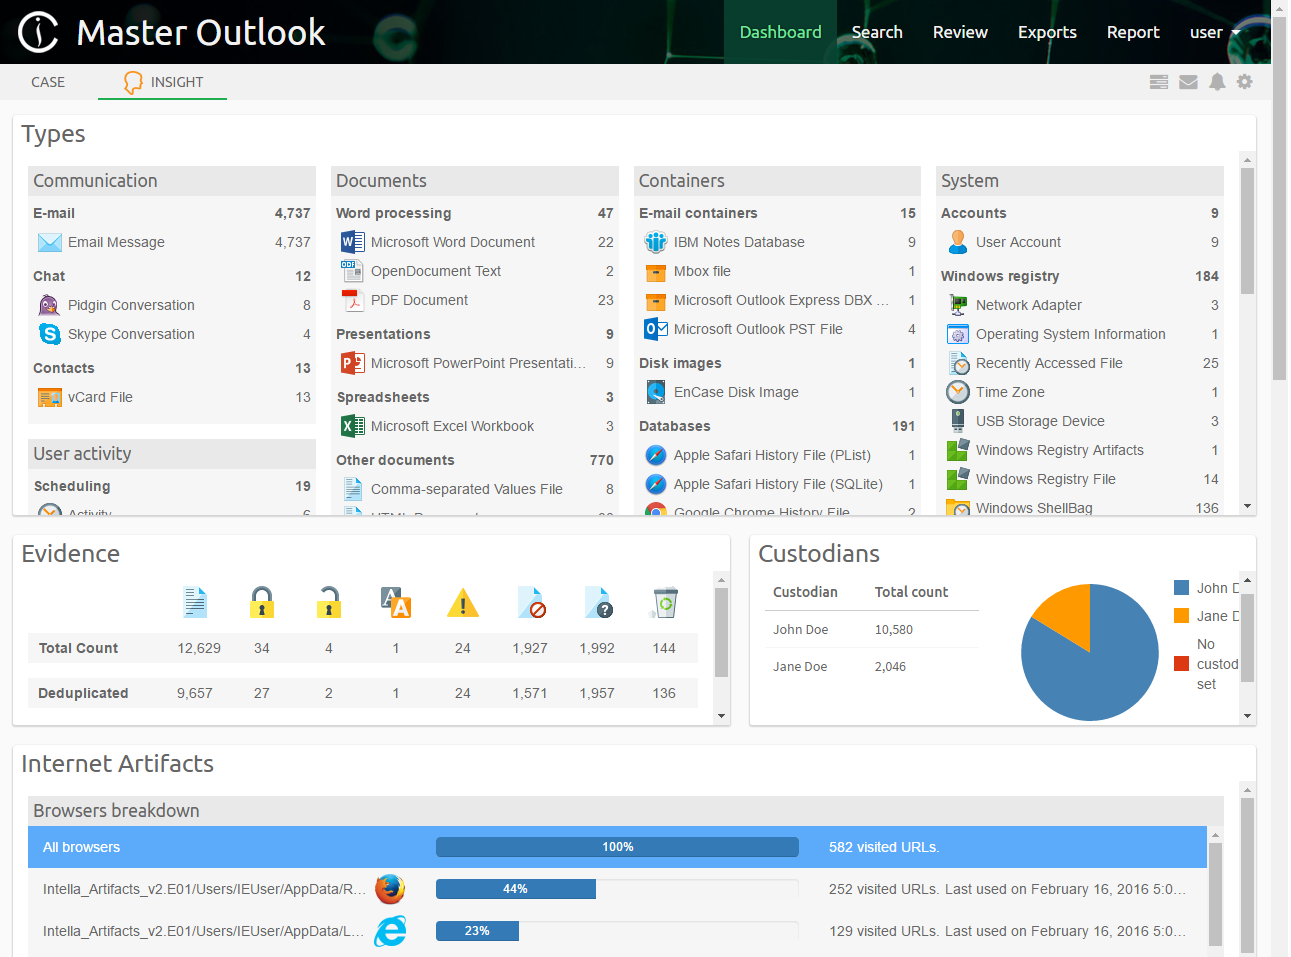
The Insight view shows notable aspects of the indexed evidence files and possible next steps to take. The overview given here can help an investigator get a grasp of the case’s contents, such as the encountered item types and their volumes, date ranges, web browser activity, etc. This will help formulating follow-up questions for further research. Most elements in this view can be clicked or double-clicked, which starts a search in the Search tab or opens a corresponding item in the Previewer.
Note
Boxes in Dashboards can be reordered and resized to accommodate user’s needs.
To learn more about this view please refer to the Insight view section.
4.2. Search view
The Search view allows users to search, investigate and review the results.
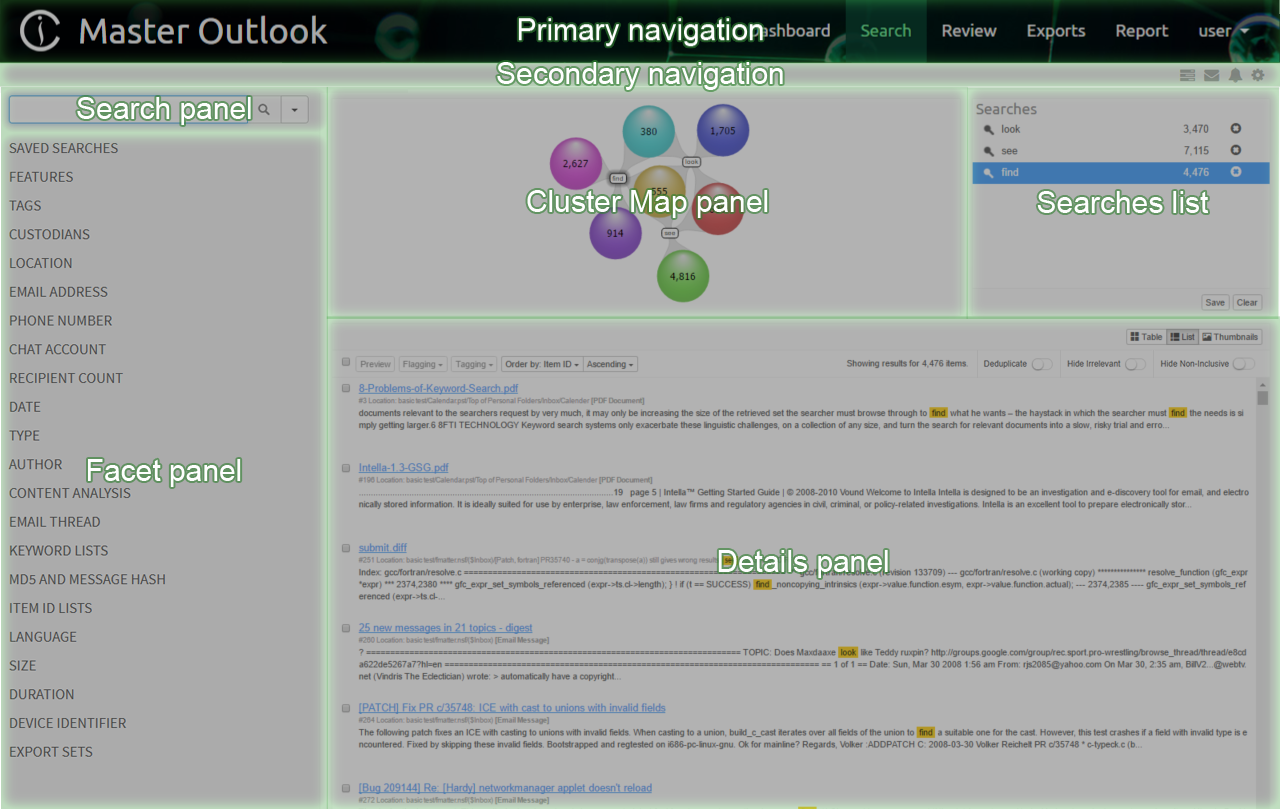
Search view interface consists of the following panels:
- Primary navigation - shows the case name, allows to switch between main views of the application, return to the user dashboard or to log out.
- Secondary navigation - for certain views a second level of navigation is required. Tabs located on the left allows to open a sub-view. On the right there are icons allowing to access other tools, such as Instant Messaging or Preferences windows.
- Search panel - the place to enter a word or phrase to search for.
- Facet panel - shows a list of facets for searching and filtering results.
- Cluster Map panel - shows how search results are connected to parts of the query.
- Searches list - shows user’s queries.
- Details panel - shows a list, table or thumbnail view of the results in a selected cluster.
When Intella Connect opens the case for the first time, the Cluster Map, Selections and Details panels will all be empty. The investigative work can be started by using either the Search panel or Facet panel.
The Search panel consists of:
- Search text field - to search for text, enter a query in this text field and click the Search button.
- Search button - to evaluate the currently entered query.
- Search drop-down button - the text that is being searched for can also be
included and excluded. This allows for filtering items on the text
without these queries appearing as individual result sets in the
Cluster Map visualization. Using
Set search optionsyou can limit keyword searching to specific item parts or attributes.

4.3. Review view
Intella Connect 1.9.1 introduces the new concept of “Batching and Coding” which greatly aids the workflow of a linear review of documents, making it a very easy and effective process. Coding is a process of applying taggings to items, guarded by user defined rules. A batch is simply a set of items grouped together, supplemented with some additional metadata (like name and status), which makes it very easy for users to refer to a particular subset of items in a case. It also helps to track which items have been coded in a context of given batch.
To learn more about these new features please refer to the Batching and Coding section.
Review View was designed to be a self-contained tool which allows users to stay focused while working on a linear review task. It constitutes of two kinds of subviews:
- Batches List View
- Coding View
Those subviews are accessible from the Secondary Navigation Bar as tabs (links) located on the left. The first tab is called “All batches” and it always points to the Batches List View. The presence of other tabs depends on the fact if currently logged in user has any batches assigned to him. If yes, then new tabs will be added to the Secondary Navigation Bar. In cases where large number of batches is assigned to the user some of tabs will be grouped together in a form of a drop-down list.
4.3.1. Batches List View
This subview offers a good overview of batches created in this case. It also the view selected by default when users clicks on the “Review” button in the main navigation.
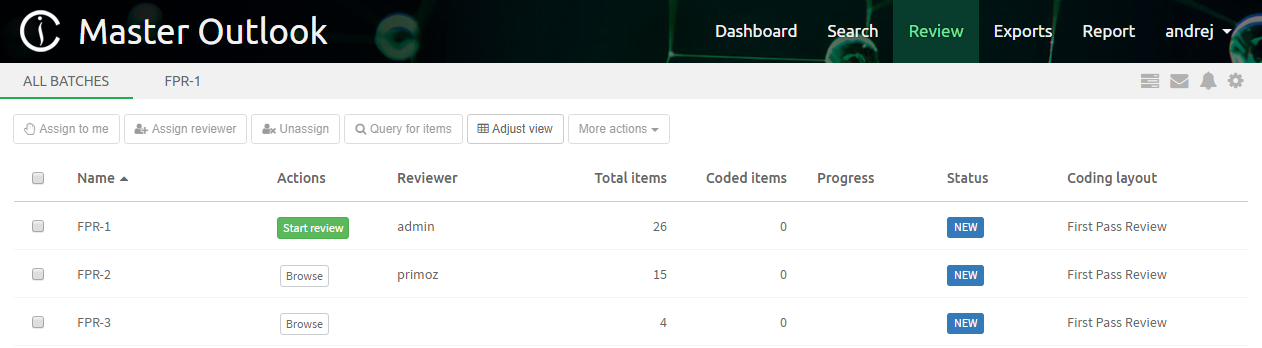
Batches are organized in a form of a table. Each column is sortable by clicking on its name. The first column allows user to select one or multiple rows. Please note that user may also use CTRL or SHIFT buttons while selecting more, to easily select more batches at once. Available columns are:
- Name - the name of the batch.
- Batches (or My Batches) - this column contains action buttons that can be easily used to perform most common actions on a single batch.
- Reviewer - lists the username of a user currently assigned to this batch. If empty, it means that no one is currently assigned to this batch.
- Total items - the count of items in the batch.
- Coded items - the count of items in the batch that were properly coded by reviewer who was at the moment assigned to the batch.
- Progress - a progress bar showing the percent of items that were properly coded in this batch.
- Status - it contains the current status of this batch. It can have one of several values:
- NEW - assigned right after batch was created.
- IN_PROGRESS - when batch is assigned to a reviewer and he has started coding it.
- IDLE - if batch was already IN_PROGRESS before, but someone has stopped working on it (batch was unassigned).
- COMPLETED - when all items inside the batch have been properly coded.
- ARCHIVED - when privileged user decided to Archive it. Batches in Archived mode are not deleted, but they can’t be coded no more.
- Coding layout - the name of the coding layout that is assigned to this batch.
- Created - the date of creation of this batch.
- Completed - the date when the last item in this batch has been coded and batch changed the status to COMPLETED.
Above the list users will find a set of buttons which allow to perform various actions on selected batches. Their presence and state are dependant on count and status of selected batches and also on users permissions. These are:
- Assign to me - allows user to assign one batch to himself if it hasn’t been assigned to anyone else. Users having CAN_CHANGE_BATCH_ASSIGNEE permission can perform this actions on multiple batches and even if they are assigned to other reviewers.
- Assign reviewer - allows users with CAN_CHANGE_BATCH_ASSIGNEE permission to assign multiple batches to multiple reviewers in one swift operation.
- Unassign - allows users with CAN_CHANGE_BATCH_ASSIGNEE permission to unassign reviewer from batch.
- Query for items - evaluates a query in the main search interface for items contained in selected batch.
- More actions / Archive - allows users with CAN_ARCHIVE_OR_DELETE_BATCH permission to set the status of selected batches to ARCHIVED.
- More actions / Delete - allows users with CAN_ARCHIVE_OR_DELETE_BATCH permission to permanently remove selected batches.
Note
Batches are not created from withing the Review UI but from the main Search UI. Please refer to the Batching and Coding section to learn how to create new batches.
4.3.2. Coding View
The second subview of the Review UI is the Coding View presented below.
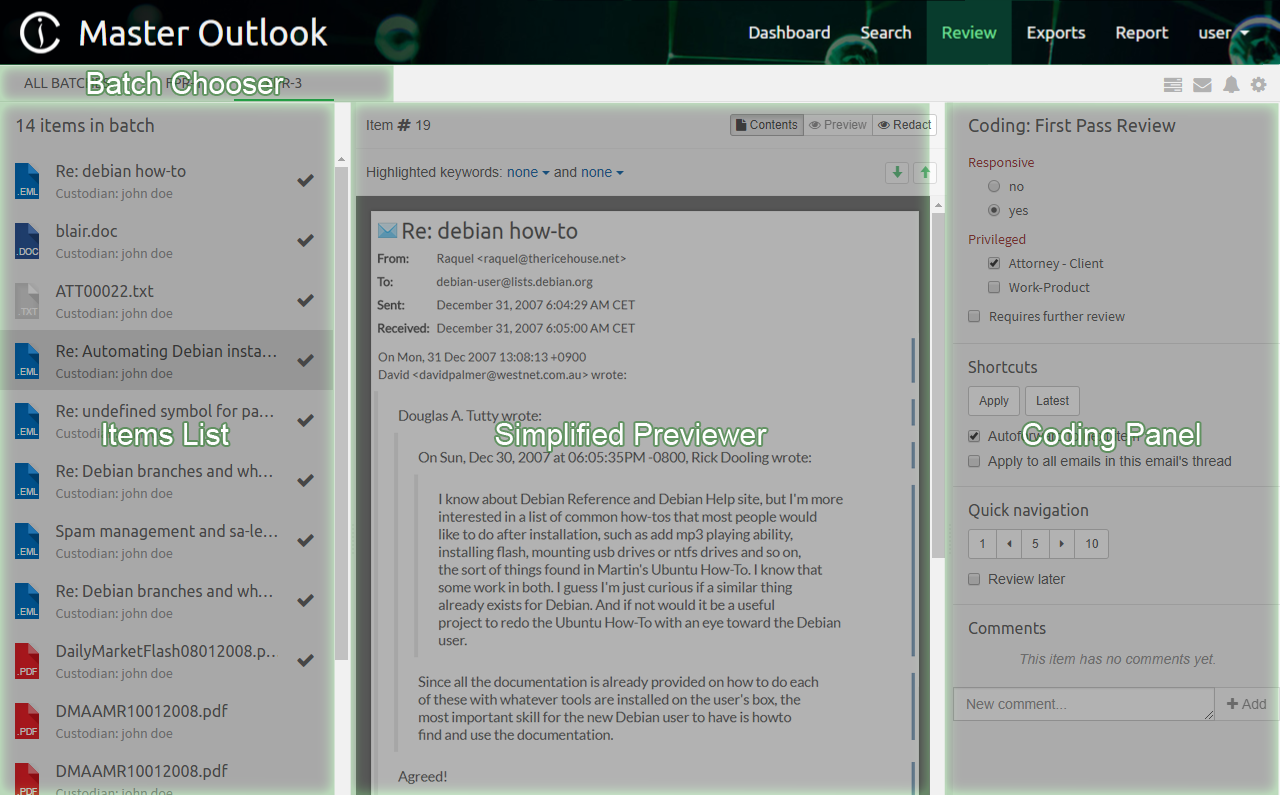
It consists of the three main UI parts:
- Items List - which lists all items that are a part of the batch being currently browsed.
- Simplified Previewer - which is a simplified counterpart of our standalone Previewer.
- Coding Panel - allowing users to apply a coding decision to the active item.
It’s important to understand that these tree components are closely tied together. The list on the left gives a nice overview of what kind of items this batch contains, and which one is currently reviewed (active). It also allows to quickly jump between items and it reflects the state of the coding for each item individually. Simplified Previewer makes it easy to evaluate the contents of the active item, see its native Preview (if the current item supports it) or redact it. The Coding Panel reflects the state of coding in a context of the active item.
Each of these components is described in more details in the Batching and Coding section.
4.4. Exports view
Initially, the Export view does not have any export packages. After exporting a collection of search results, the export package will appear in the Export view.
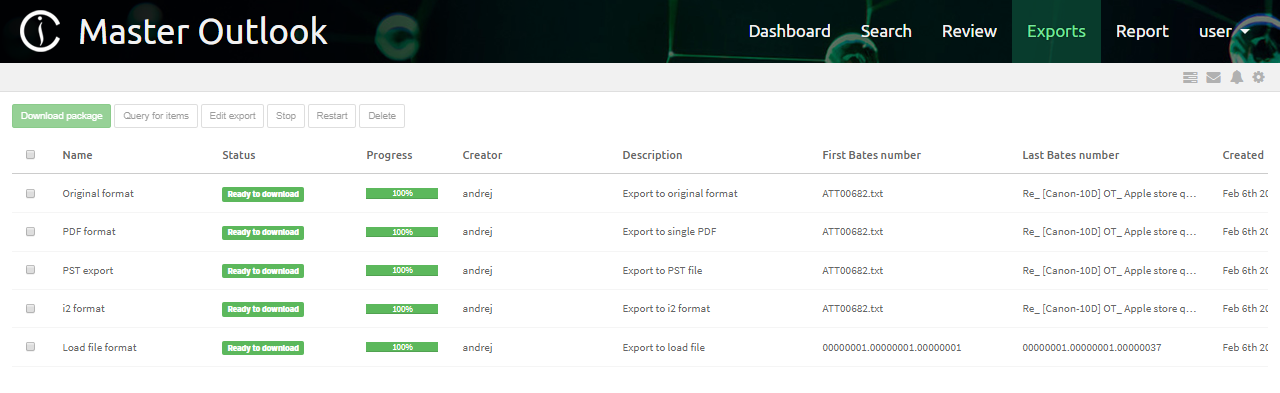
Selecting an export package shows the contents of the export package and additionally allows you to do the following actions:
- Download package - downloads the export package as a ZIP file into your browser’s download folder.
- Query for items - creates a query of all items contained in selected export package and adds it to searches list so that they can be reviewed in Search view.
- Edit export - allows changing the export package name and description.
- Stop - cancels creation of the export package.
- Restart - restarts creation of the export package.
- Delete - removes the export package.
4.5. Report view
The Report view is used for generating reports, such as detailed statistics about the keywords in a keyword list or user activity on a case.
It consists of following subviews:
- Keywords view - gives detailed statistics about the keywords in a keyword list.
- Activity view - gives detailed view about the activities performed by users logged into a case.
Default subview is the Keywords view.