10. Details panel
In order to inspect the contents of the Cluster Map visualization, the user can select a cluster or result set by clicking on it. Its contents will then be displayed in the Details panel below the map.
The Details panel contains a list of the items that can be presented in three modes:
- List view - can be selected by clicking on the list tab.
- Table view - can be selected by clicking on the table tab.
- Thumbnails view - can be selected by clicking on the thumbnails tab.
Note
Use Shift+? shortcut to show help menu with keyboard shortcuts associated with the currently selected view.
Actions that can be performed in all three views are:
- Deduplicate the results in the selected view by clicking on the deduplication icon.

- Removes all items marked as Irrelevant during indexing.

- Removes all items marked as Non-Inclusive during Email Threading.

- Double-click on the item to open it up in the previewer.
- Right-click on the selected item(s) to show a pop-up window with additional actions:
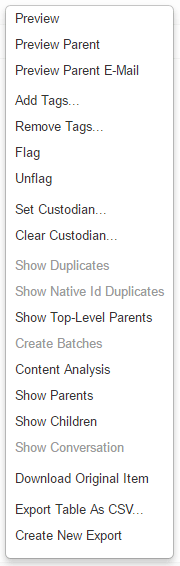
- For more information on:
- Create Batches action, see section Batching and Coding.
- Content Analysis action, see section Content analysis.
- Email Threading action, see section Email threading.
As query evaluation is processing intensive task all result sets shown in any of the result views are cached. Because memory space is limited, the number of cached entries is limited so they might be evicted in some point in time - in that case user will be presented with such message: Oooooppps! The results you have just seen here are no longer valid, therefore page refresh is needed. Please click here to refresh your results.
Note
Up to 1500 result sets can be cached by default - when this limit is exceeded the oldest result sets will be evicted and the user will be presented with the mesasge above.
Cache eviction policy can be tuned by changing following two properties inside [CASE]/prefs/case.prefs properties file:
- IdSnapshotsCacheSize - specifies the maximum number of result set entries the cache may contain (default: 1500)
- IdSnapshotsCacheMaxAgeInHours - specifies that each result set entry should be automatically removed from the cache once a fixed duration has elapsed after the entry’s was accessed last. (default: not set)
Note
If above two properties are not present, append them to the end of the case.prefs properties file.
10.1. List view
The List view displays the results as a typical search engine-like list:
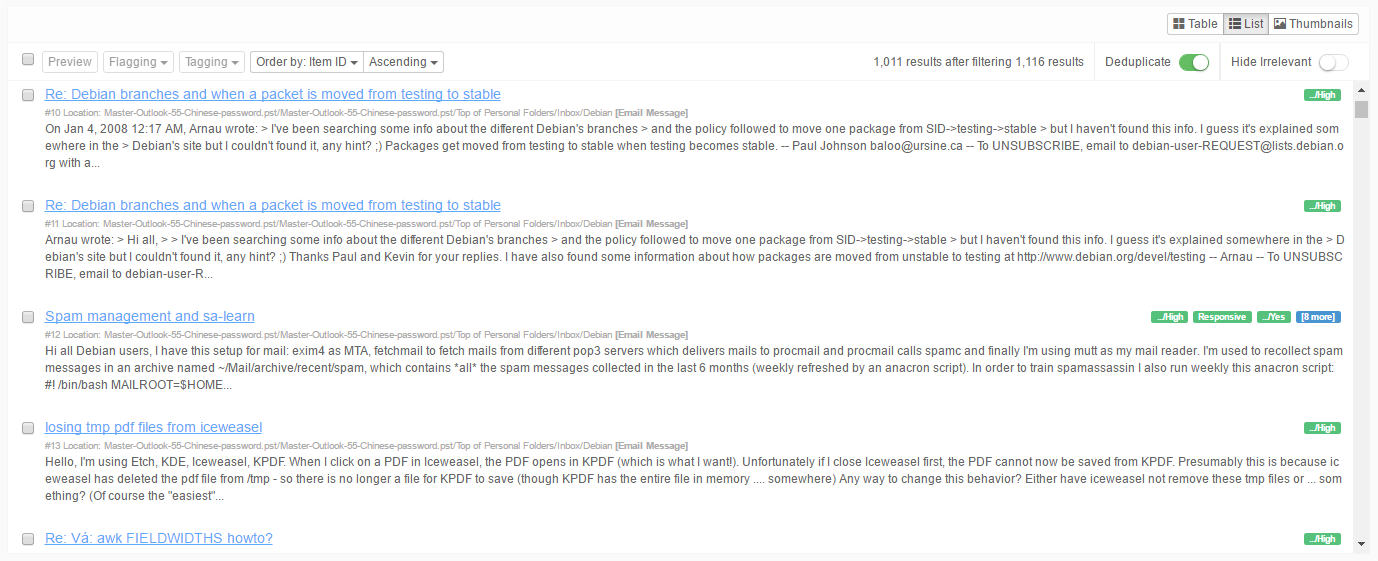
Each row represents a single item:

- This view shows basic information about the item:
- Flagging status.
- Item ID.
- Title or subject of the item.
- Tags, if any.
- Location of the item.
- Content summary, including text fragments with keyword hit highlighting.
- Buttons available in the toolbar are:
- Select-all checkbox - Select all items in list view.
- Preview - Preview the currently selected item.
- Flagging - Add/remove flags of the selected items.
- Tagging - Add/remove tags of the selected items.
- Order by [item attribute] - Order the list by a specific item attribute.
- Ascending/Descending - Sort order.

10.2. Hit Highlighting performance with List View
10.2.1. Foreword
Hit Highlighting is a very complex operation which can take considerable amount of hardware resources. It highly depends on following factors:
- The amount of text associated with an Item.
- The amount and complexity of keyword searches.
Intella Connect always puts feature richness and stability of a review on the pedestal, so that is why we have introduced Hit Highlighting into List View component. It allows quickly seeing the first occurrence of a hit accompanied with the nearest text, which gives a reviewer an additional context and often is enough to determine if an item is important or not. However, in few rare cases Hit Highlighting can have considerable and undesired influence on the server which can impact negatively the reviewing experience. Therefore we added a simple way to turn off Hit Highlighting in List View, which should relieve the server from additional workload and improve the reviewing speed.
10.2.2. Turning off Hit Highlighting completely
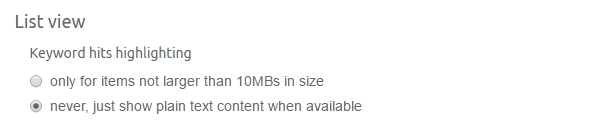
By default Hit Highlighting will only work for items of less than 10MBs in size. Depending on the nature of your data (especially when dealing with large files), you might want to turn it off entirely. To do that, please follow those simple steps:
- Click on the Settings gearbox icon placed in the Secondary Navigation Bar to open the Preferences window.
![]()
- Make sure to select the appropriate option to never show Hit Highlighting.
- Click OK to save your settings.
10.3. Table view
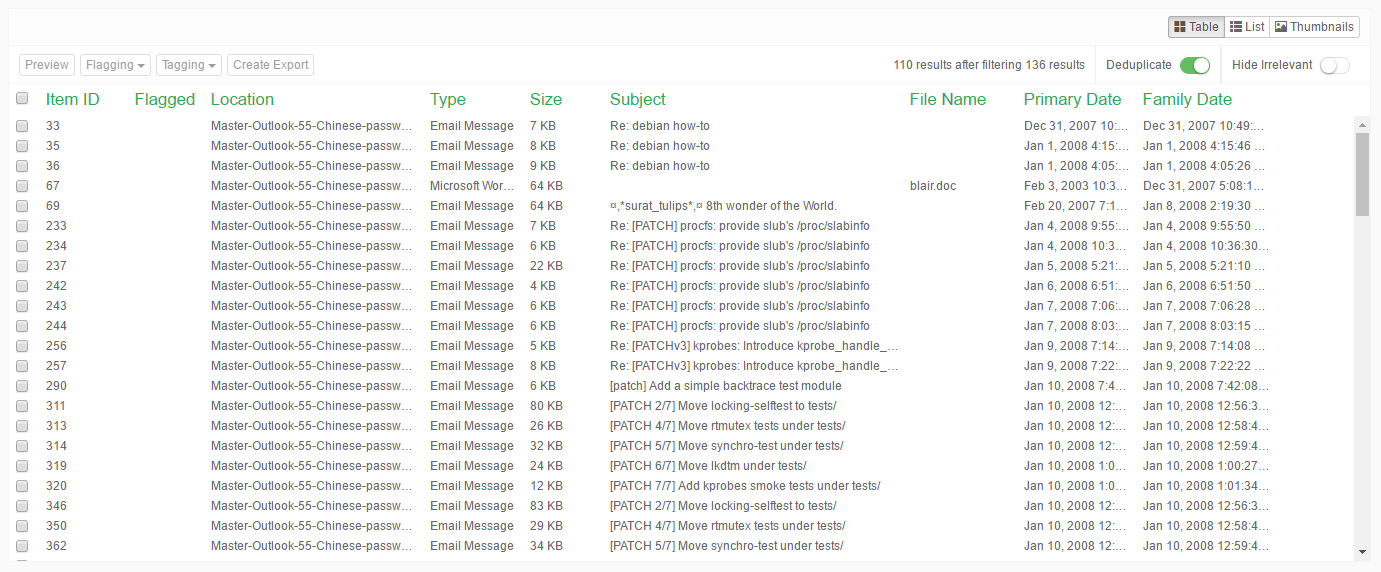
The Table view displays the results as a table in which each row represents a single item and the columns represent selected attributes such as title, date, location etc.
The set of attributes to display can be customized in Preferences which can be accessed by clicking on the gear icon in the Secondary Navigation Bar. 
Actions that can be performed in the Table view are:
- Click on a table column header to sort the table by that item attribute. Sorting by multiple columns can be achieved by holding the Ctrl button while clicking on the column names. Any additional clicked column will be added to the list of sorting criterions. When two items cannot be sorted using the values from the first column (because the values are identical), the second column will be used, and so on.
- The first column is used for items selection.
- Select one item to preview it by clicking on the preview button.

- Select one or more items to flag, tag or export the items.

- Select one item to preview it by clicking on the preview button.
10.3.1. Adding and removing columns
It’s possible to toggle visible table columns in Preferences’s Table view section by (de)selecting column names. The selected columns are stored: every time you connect to the case, these columns will be shown until you select a different set of columns.
This option is only available for the Table view. The following columns are available:
General columns:
- Certificate: The certificate with which an encrypted item could be decrypted.
- Contact name: The name of a contact encountered in a PST file or in a vCard file.
- Decrypted: Shows if an item is encrypted and Intella Connect was able to decrypt it.
- Direct Child IDs: The item IDs of the direct children of this item.
- Direct Parent ID: The ID of the item’s direct parent item.
- Document ID: The ID as imported from a load file. This ID is maintained for cross-reference purposes.
- Duplicates: Shows the number of duplicates of an item within the case.
- Embedded Image: Indicates whether the item is an embedded image extracted from an email, Microsoft Office, XPS or PDF document. See the Features facet section for a precise definition of this category.
- Encrypted: Shows if an item is encrypted.
- Exception: Shows if an item had one or more issues indexing properly.
- File Name: The name of a file in the file system, in an archive or used as an attachment name.
- Geolocation: The geolocation (longitude, latitude) of an item, if any.
- Has Geolocation: Indicates whether the item has geolocation information associated with it.
- Item ID: The ID used internally in Intella’s database to refer to this item.
- Language: The language of the item’s text. The language field is left blank when the language cannot be detected automatically. When the language could not be determined, e.g. because the text is too short or mixes various languages, the value shown will be “unidentified”. Item types that inherently do not have a language, e.g. images or archives, show the “not applicable” value.
- Location: Name of the location in the original evidence data where the item is stored. For example, an email in a PST file would have a location that would start with the folder and file name of the PST file, followed by the mail folder path inside that PST file.
- MIME type: The type of an item according to the MIME standard.
- Native ID: The native ID of the item. Currently only IBM Notes UNID (Universal Notes ID) are listed here. This column may be used for other native ID types in the future.
- Parent Document ID: The ID of a parent document as imported from a load file. This ID is maintained for cross-reference purposes.
- Password: The password with which an encrypted item could be decrypted.
- Recovered: Indicates whether the item has been recovered. See the Features facet section for the definition of the Recovered status.
- Size: The item’s size in bytes.
- Source: The name of the Intella Connect source that holds the item. Typically this is the root folder name or the name of the mail container file (e.g. PST or NSF file).
- Source Path: The path to the evidence, e.g. the PST or NSF file, or the root folder of a Folder source. This helps reviewing items when dealing with a lot of evidence files – the name of the evidence file and the derived source name may not hold enough information to easily discern the origin of the information.
- Subject: The subject of an email or document item – note that some document formats can have both a title and a subject.
- Title: The title of a document item.
- Top-Level Parent: Indicates whether the item is a top-level parent. Top-level parents are determined per the Show Parents settings, configurable with desktop versions of Intella.
- Type: The item’s human-readable type, e.g. “MS PowerPoint Document” or “Email Message”.
- URI: Uniform Resource Identifier, the identifier used internally by Intella Connect for the item in addition to the Item ID.
Email-specific columns:
- All Receivers: The combined list of To, Cc and Bcc agents.
- All Senders: The combined list of From and Sender agents.
- Attached: Whether or not this item is an attachment to an email, conversation or document.
- Attachments: Shows the file names of an email’s attachments.
- Bcc: The addresses in the Bcc header.
- Bcc Count: The total number of unique blind carbon copy email recipients (Bcc).
- Cc: The addresses in the Cc header.
- Conversation Index: The conversation index of the email extracted either from Thread-Index header or PR_CONVERSATION_INDEX property.
- From: The addressed in the From header.
- Has Attachments: Emails that are marked as having attachments.
- Has Internet Headers: Emails that have regular SMTP headers. When this is not the case, information about e.g. the sender, receiver and dates may still be obtained from other fields, depending on the source format.
- Message Hash: Shows the Message Hash for emails and SMS messages. This hash is used for deduplicating emails and SMS messages in a manner that works across different mail formats and phone data source types.
- Message ID: Shows the Message ID extracted from email messages.
- Recipient Count: The total number of unique email, chat and cellphone recipients.
- Sender: The addresses in the Sender header.
- Source IP: the determined source IP of the email.
- To: The addresses in the To header.
- Unread: Shows if an email item was unread at the time of indexing.
- Visible Recipient Count: The total number of unique visible email, chat and cellphone recipients (To, Cc).
Cellphone-specific columns:
- All Phone Numbers: phone numbers relevant to a phone call, regardless of whether it is an incoming or outgoing call, combined with phone numbers found in contacts.
- Chat Accounts: all instant messaging accounts (Skype, WhatsApp, but also SMS and MMS phone numbers) that have been used to send or receive a chat message.
- Chat Receivers: all instant messaging accounts used to receive a chat message.
- Chat Senders: all instant messaging accounts used to send a chat message.
- Duration: how long the phone call took.
- IMEI: The International Mobile Station Equipment Identity (IMEI) number of the phone from which the item was obtained.
- IMSI: The International Mobile Subscriber Identity (IMSI) associated with the item.
- Message Count: The number of messages in the chat conversation.
- Incoming Phone Numbers: phone numbers used for incoming phone calls.
- Outgoing Phone Numbers: phone numbers used for outgoing phone calls.
File and document-specific columns:
- Contributor: The name(s) of the contributor(s) of a document. These are typically authors that edited exiting documents.
- Creator: The name(s) of the creator(s) of a document item. These are typically the initial authors of a document.
- Empty document: Shows that the item has no text while text was expected. Example: a PDF file that contains only images.
- File extension: the file extension of a file, e.g. “doc”, “pdf”.
- Irrelevant: Indicates an item classified as “Irrelevant”.
- MD5 Hash: The MD5 hash that uniquely identifies the item.
- Page Count: the number of pages of the items as reported by the metadata present in the original evidence item. I.e., this is not a verified and is only possible for certain document formats that support such a metadata attribute.
Columns containing dates:
- Called: The date a phone call was made.
- Content Created: The date that the content was created, according to the document metadata.
- Content Last Modified: The date that the content of the item was last modified, according to the document-internal last modified date.
- Due: The due date of a task.
- Ended: The end date of an appointment, task or journal item.
- Family Date: The family date of the item. Family dates build on primary dates and also take the item hierarchy into account. The family date of an item is defined as the primary date of its top-level parent, i.e. all items in an item family have the same family date. Sorting on Family Date sorts by this date, but also puts attachments and nested items right behind their parent. This is strictly enforced, i.e. two item families with the same family date are not intertwined. This makes it possible to review items in chronological order while maintaining a sense of their context. Certain types of items are skipped when determining the family root, namely all folders, mail containers, disk images, load files and cellphone reports.
- File Created: The date a file was made, according to the file system.
- File Last Accessed: The date a file was last accessed, according to the file system.
- File Last Modified: The date of the last time the file was modified, according to the file system.
- Last Printed: The date a document was last printed, according to the document-internal metadata.
- Primary Date: The date that is the best match for the given item. Default or user-defined rules are used to pick the most appropriate date attribute based on the item’s type.
- Received: The date the item was received.
- Sent: The date the item was sent.
- Started: the start date of an appointment, task or journal item.
- Visited: The last visited date of an item obtained from a browser history or Windows registry.
Review-specific columns:
- Batches: The batches which the item is assigned to.
- Coded: The batches in which the item was coded.
- Comments: Shows if an item has reviewer comments. When this is the case, a yellow note icon is shown in the table. Hover over the icon to see a tooltip with the comments attached to the item.
- Custodian: The custodian associated with the item.
- Exported: Shows if an item has been exported.
- Flagged: Shows a column at the left side of the table that indicates if an item is flagged. Click the checkbox if you want to flag an item.
- Opened: Shows if an item has been opened in its native application.
- Previewed: Shows if an item has been opened in the previewer.
- Redacted: Indicates whether the item has been redacted.
- Tags: Shows the tags connected to an item.
Analysis-specific columns:
- Content Analyzed: Shows whether the item has been subjected to analysis by at least one of the Content Analysis categories.
- Email Thread ID: When the item has been subjected to email thread analysis, this shows the ID assigned to the email thread in which the item has been placed.
- Email Thread Name: When the item has been subjected to email thread analysis, this shows the thread name assigned to the email thread in which the item has been placed. Often this is the “root” of the subject line that is common between the emails in the thread.
- Email Thread Node Count: When the item has been subjected to email thread analysis, this shows the number of nodes in the email thread in which the item has been placed.
- Inclusive: When the item has been subjected to email thread analysis, this shows whether the item has been marked as inclusive.
- Missing Email Referent: When the item has been subjected to email thread analysis, this flag indicates that the threading process has detected that the email item is a reply to another email or a forwarded email, but the email that was replied to or that has been forwarded is not available in the case.
- Non-Inclusive: When the item has been subjected to email thread analysis, this shows whether the item has been marked as non-inclusive.
- OCRed: Shows whether an OCR method has been applied on this file.
- Threaded: Shows whether the item has been subjected to email thread analysis.
Additionally, columns related to entities extracted during Content Analysis:
- Credit card numbers
- Social security numbers (SSNs)
- Phone numbers
- Person names
- Organizations (e.g. company names)
- Locations (e.g. city and country names)
- Monetary amounts
- Time (words and phrases related to the hours, minutes, weekdays, dates, etc.)
- Skin tone (sub-categorized as Weak, Medium and Strong based on the presence of human skin colors, applies only to images)
- column for each Custom regular expression
Tag groups (optional) - These columns are created for every top-level tag with sub-tags. If selected, the corresponding column shows the tags within that part of the tag tree. The column will be named after the top-level tag.
Export (optional) - When items have been exported using the export set functionality, a column will be made available for every export set, holding the export IDs within that export set.
Custom Columns (optional) - The custom columns are created during the load file import.
10.4. Thumbnails view
The Thumbnails view displays the thumbnails of the images detected within a selected cluster. This includes images embedded in e-mail attachments and images inside documents.
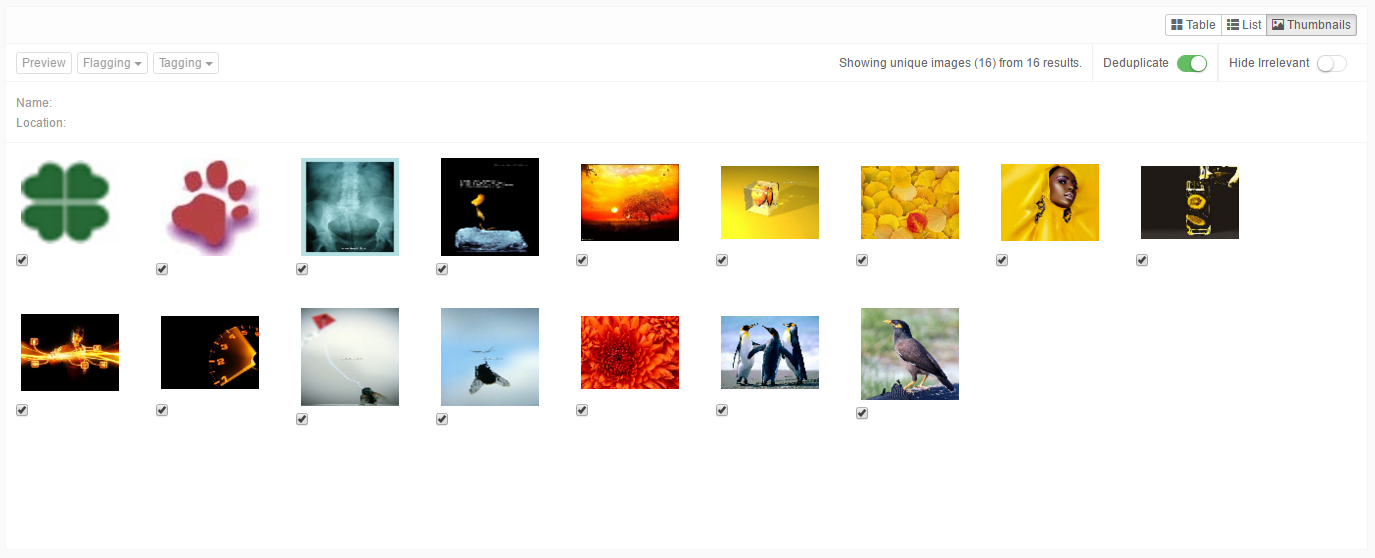
Actions that can be performed in the Thumbnails view are:
- Hover over the thumbnails with your mouse pointer to see a summary of the information associated with the image.
- You can flag an image with the checkbox below the thumbnail.
- When you double-click a thumbnail, the image will open in the previewer.
10.5. Content analysis
To start the content analysis procedure, select one or more items in the Details view and select “Content Analysis” in the context menu. This will open a dialog like the one below:
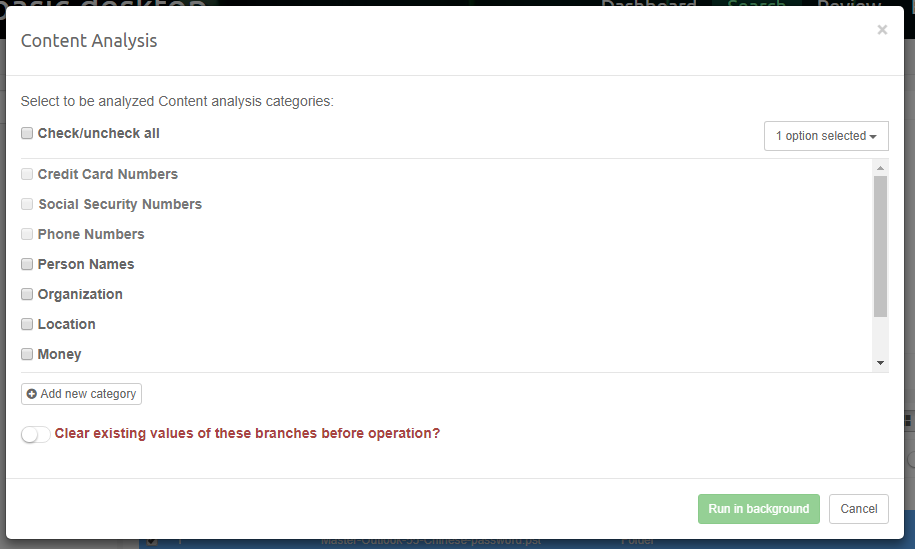
Select the desired categories of entities in the list by clicking the checkboxes and click the “Run in background” button. This will start the process as a Background Task and once it’s done results of analysis will appear in the Content Analysis facet. If you are interested in tracking the progress of the analysis, navigate to Background Tasks panel in Preferences.
Check the “Replace existing facet values” option selected if you want to clear the results of the previous analysis or keep it unselected to add new results to the existing content of the selected categories.
The items that have been analyzed can be found by using the “Content Analyzed” category in the Features facet.
There are some important caveats and disclaimers concerning Content Analysis:
- Content analysis is a heuristic procedure based on typical patterns and correlations that occur in natural language texts. Therefore, the quality of the output may vary within a broad probability range.
- Content analysis works best on English texts. The quality of the output may be poor on texts in other languages.
- Content analysis works best on texts containing properly formulated natural language sentences. Unstructured texts (e.g. spreadsheets) usually lead to poor quality of the output.
- Content analysis is both CPU- and memory-intensive. For adequate performance, please make sure that your computer meets the system requirements and that no other processes are taxing your system at the same time. In our experiments the amount of time needed for processing an entire case was roughly similar to the amount of time it took to index the case.
- Skin tone analysis is based on a colorimetry method that is proven to be good for detection of pictures exposing natural variations of human skin colors under various light conditions. However, the output may include photos of other objects colored similarly, for example sandstone walls, some ceramic sculptures, etc. On the other hand, the algorithm may miss some skin photos if the amount of the skin tone pixels is too small or if the skin has an unnatural tint, for example due to wrong white balance or exposure settings of the camera.
Custom Content Analysis categories and Regular Expression search
Along with the predefined categories for built-in entity types such as Person names, Organizations, etc., it is possible to define custom Content Analysis categories populated by scanning the text of selected items for specific text patterns. The text patterns are defined using IEEE POSIX regular expressions syntax. See http://pubs.opengroup.org/onlinepubs/9699919799/basedefs/V1_chap09.html for documentation on this syntax. This provides an effective and versatile mechanism for extracting user-defined entities, such as national passport numbers, bank account information etc.
To create a new custom category, click the “Add new category” button in the Content Analysis window. In the dialog that opens, enter name of the new category and a regular expression that defines the pattern to search for. Click the “Regex Assistant” button to open the Regular Expression Assistant window. This is where you can test your expression on a custom text fragment, choose one from the examples library and get quick help on the regular expression syntax.
Once the new custom category has been created, it can be selected in the Content Analysis dialog and populated by analysis of the selected item set, just like the other (predefined) categories.
To edit a custom category, hover mouse pointer over it and click the Edit button. In the dialog that appears, edit the name and/or the regular expression of the category.
To delete a custom category, hover mouse pointer over it and click the Delete button.