10. SSL setup - guide
10.1. Preface
In order to enable usage of the HTTPS protocol in Intella Connect, you need to supply it with a valid Java keystore. Keystore is considered valid when:
- it contains exactly one Private and Public Key pair
- the certification chain belonging to this Key pair is trusted by embedded Java Runtime Environment
Starting with version 2.2, Intella Connect can guide you through the process of creating a valid keystore and manage as many of them as you wish.
Note
Versions predating 2.2 required user to manually create keystores. Guides for doing so are still available in Appendices section.
Note
SSL 3.0 is no longer supported, to protect against the POODLE attack.
10.2. Overview of the SSL settings UI
Keystores can be managed in a dedicated Settings section labeled SSL. This UI allows to create and manage as many keystores as you wish. That feature comes handy if you need to create new keystores for other domains or Intella Connect/Node servers. The following screenshot illustrates a situation where administrator created two keystores: SSL for 2018 and SSL for testing.
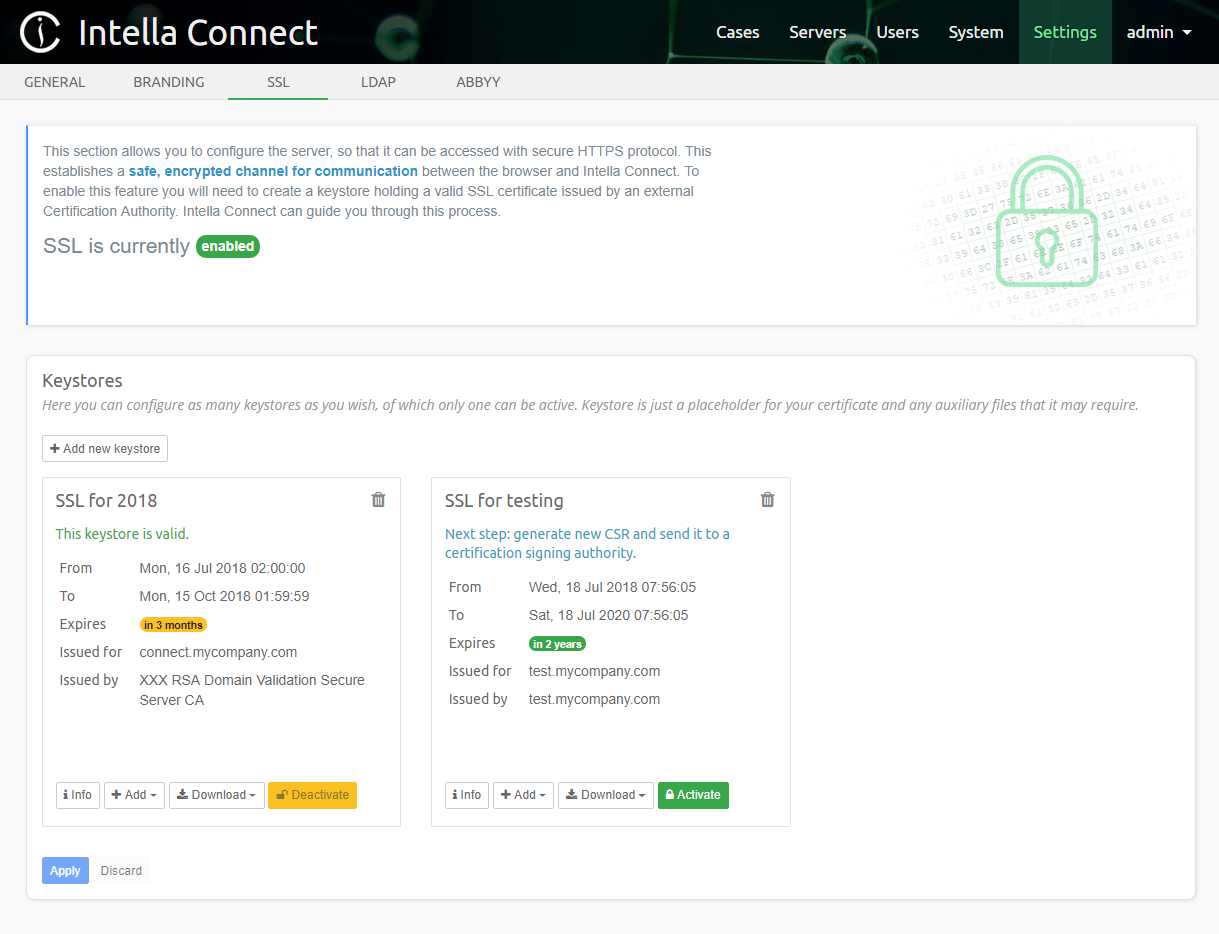
The top panel with a green padlock informs you that the SSL integration is enabled. When SSL is not active, the message would change to disabled and the padlock would be red.
The panel labeled Keystores contains a list of current keystores available in this Intella Connect instance. It also offers button Add new keystore which opens a simple wizard. Each keystore is represented by a card listing basic information about it. Concretely:
- name - a human friendly name of the keystore. It must be unique, meaning that you can’t have two keystores with the same names.
- status - helper message informing you if the keystore is valid, or what steps are needed in order to make it valid.
- From and To - represents a date range for which the SSL certificate in this keystore was issued
- Expires - gives you a quick overview of how much time left before the SSL certificate in this keystore expires
- Issued for - the domain for which the SSL certificate is issued
- Issued by - the name of the Certification Authority which signed the SSL certificate. For self-signed certificates that will be the same value as the Issued for field.
Besides that information each card will also contain buttons which allow you to run certain actions on given keystore.
Note
It’s very important to remember that each action performed in this UI (ex. creating new keystore, adding certificates, setting as active, etc.) will not be saved unless you click Apply button at the bottom of panel. This works exactly the same as other Settings sections.
10.3. Creating a new keystore
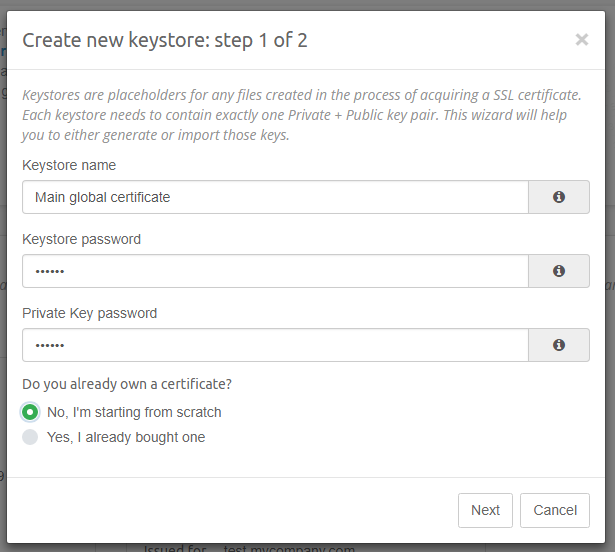
To start the process click on the Add new keystore button. This will open a two-steps wizard. While the goal is to create a keystore, the wizard must first establish if you are already in possession of a valid SSL certificate. This is illustrated below:
Fields:
- Keystore name - unique identifier (and also a human friendly name) for the keystore. This value must be provided and has to be unique.
- Keystore password - each keystore is protected with a password. Please choose a strong password and make sure you don’t lose it, because it cannot be recovered. This value is required.
- Private Key password - Private Key is the most valuable part of the keystore, so it should be protected with a separate password. This value is required.
- Do you already own a certificate? - please select Yes… if you already have a valid SSL certificate and you wish to install it. Selecting No… will cause a brand new Private and Public Key pair, and self-signed certificate to be generated.
- Do you know the Private Key used to generate your certificate? - if you selected Yes… in the previous question, then you will be asked if you know your Private Key. Having the Private Key is mandatory to properly import an existing certificate (see note below).
Note
Remember that having a Private Key is required just when creating a keystore for an existing SSL certificate. This is often causing confusion with people who already paid for an SSL certificate and think that they can now just import it to Intella Connect. Remember that “an SSL certificate” is technically just your Public Key signed by someone of trust. In order for the server to perform decryption it must apply the Private Key on the data coming through the secure HTTPS channel. That’s why having a SSL certificate is just a part of the equation, and you must also have the Private Key. Most certification providers offer a shortened procedure of certificate creation by keeping the Private Key in their possession if they also host the website when the certificate is used. This is sometimes causing confusion for our clients because the existing certificate cannot be used unless you also receive the Private Key from the provider.
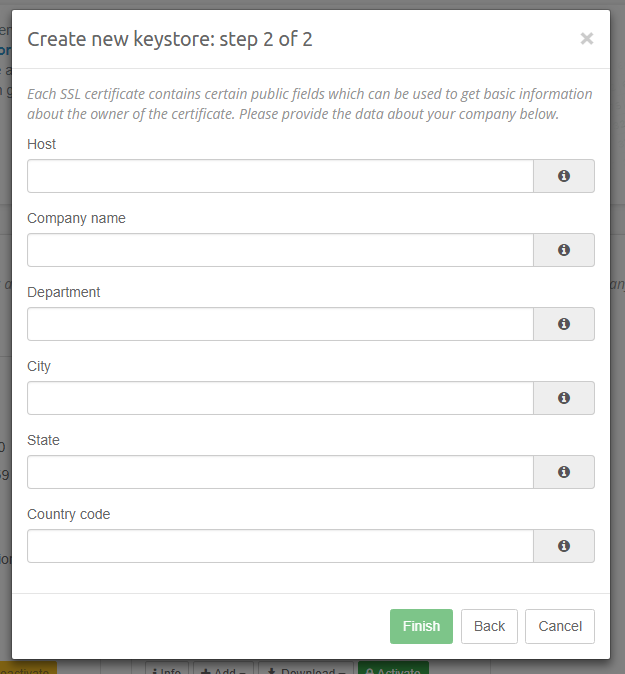
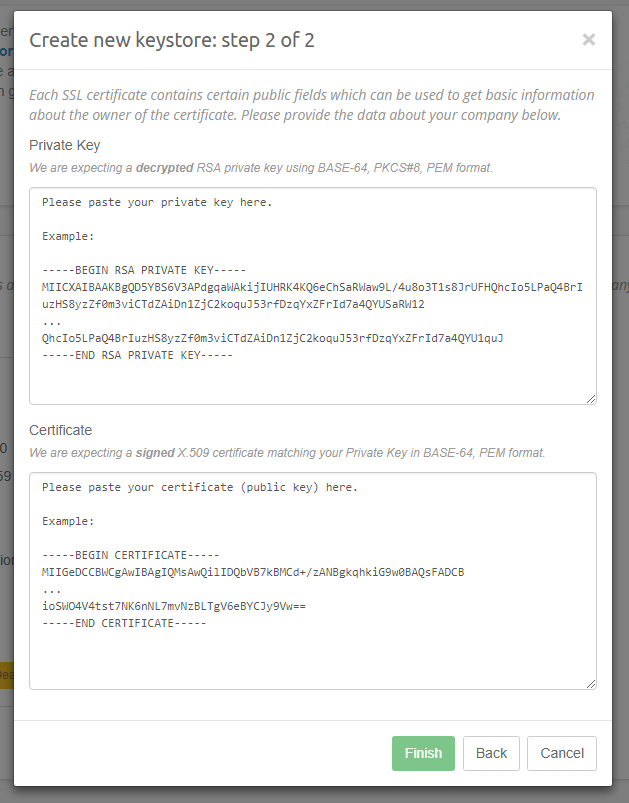
The next step depends on the fact if you choose to import an existing certificate. If you decided to create new keystore from scratch, then you will be asked to provide a domain and some information about your company. That data will become a part of your self-signed certificate. In the process we are also generating a RSA 2048 Private Key for you which will be placed into the new keystore. However, if you chose to use an existing SSL certificate, you will be asked to provide this certificate along with a Private Key which was used to generate it. Both variants along with fields definitions are listed below:
Fields:
- Host - specifies the host (usually domain) under which Intella Connect will be accessible. Please make sure that you specify the proper value here and take your internal networking rules under consideration. Your certificate will only be valid when you access Intella Connect with this exact host. A typical value would be something like connect.mycompany.com or review-mycompany.com. Using IPs is allowed but not recommended. This field is required.
- Company name - a human-readable name of your company. This field is required.
- Department - Optional department name.
- City - Optional name of the city in which your company/branch is located.
- State - Optional name of the state.
- Country code - Optional country code. Use “US” for United States of America.
Fields:
Private Key - This field is required and represents the Private Key that was used to generate the SSL certificate which you wish to import. It must have the following characteristics:
- it must use RSA algorithm
- it cannot be encrypted
- it must be of PKCS#8 format
- it must be expressed as PEM
- it cannot be binary format and must use Base64 encoding
Certificate - This field is required and represents the SSL certificate which you wish to import. It must have the following characteristics:
- it must match the Private Key you supplied earlier
- it must be of X509 format
- it must be expressed as PEM
- it cannot be binary format and must use Base64 encoding
After you properly fill in all required fields the Finish button will be activated. Once clicked, a new keystore card will be added to the list. You can now use additional action buttons to modify the state of your keystore.
Note
We recommend to Apply your changes as soon as you create any new keystore. Accidental loss of your settings (for instance, by navigating out of SSL settings and ignoring the warning about unsaved changes) will make it impossible to retrieve contents of this keystore in case you’d need it in future.
10.4. Actions
Each keystore in the list is represented by a separate card. There are several action buttons located on those cards:
- Trash icon - permanently deletes the keystore from file system and the database. This action requires a confirmation through a modal window to prevent accidental damage.
- Info - opens a modal window which allows to inspect keystore contents
- Add > Trusted chain certificate - opens a modal window which allows to add a trusted chain certificate. This allows to build up the certification chain. You should use that feature to add intermediate and root certificates belonging to your Certification Authority (certificate provider). CAs usually include two or more such certificates.
- Add > Signed SSL certificate - opens a modal window which allows to add your SSL certificate. This is the certificate which was issued for your domain in reply to a Certification Signing Request (CSR).
- Download > Keystore - downloads the current contents of the keystore. That file can be opened by a
keytoolutility or any other third party software capable of managing Java Keystores. - Download > New CSR - generates and downloads new Certification Signing Request. This file is very often requested by a Certification Authority because it contains information needed to create a new certificate. You can create as many of those CSRs as you need and each invocation of this action will create a new one. Those files are not useful anymore once you get a SSL certificate in response and can be discarded.
- Activate - sets the current keystore as active. Intella Connect allows only one keystore to be active and certificate stored in this keystore will be used to handle HTTPS traffic. For this change to take effect, a server restart is required.
- Deactivate - if keystore is already active, then this button will allow to deactivate it. Deactivating a keystore will disable SSL integration. For this change to take effect, a server restart is required.
Once again please remember that changes made to a keystore are not immediately saved. To persist them you need to click the Apply button. In a case when server restart is required, appropriate message will be shown.
10.5. Inspecting keystore contents
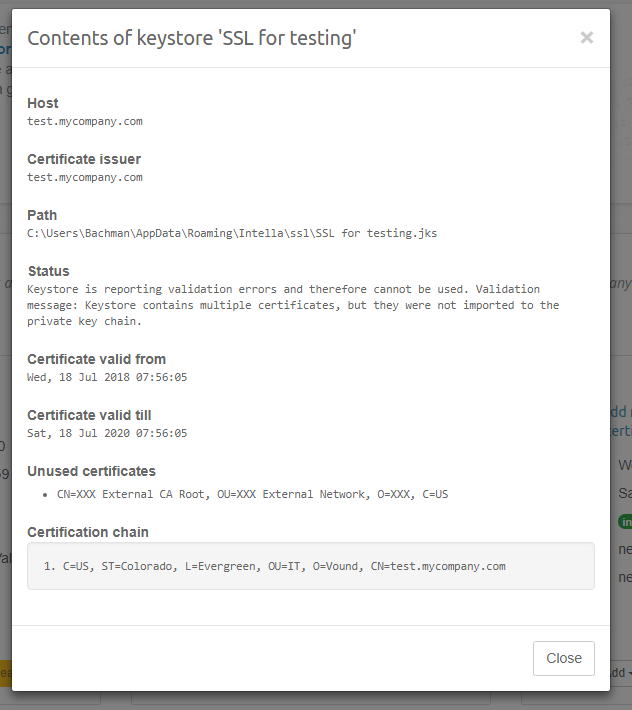
Opening this view will allow you to inspect contents of your keystore to understand the details of it and troubleshoot certification issues. Most of information available relates directly to the certificate associated with the Private Key stored in this keystore. It will present to you a screen similar to the one illustrated below:
Fields:
- Host - this matches the Common Name (CN) value of the certificate. This is the same value that you entered when creating new Keystore.
- Certificate issuer - represents the signer of your certificate.
- Path - shows the location of this keystore in file system. This value can change to a file in a temporary directory, if you have unsaved changes in your keystore.
- Status - this field can give you some insights into what the status of your keystore is. It will inform you if it is valid and active. In case of any validation issues, they will be listed here too.
- Certificate valid from and Certificate valid till - describes validity timeframe of your certificate
- Unused certificates - list of trusted certificates which are present in your keystore, but are not a part of the certification chain. This field will be hidden if you have valid certification chain. If you see any entries here then this is a good indication that you haven’t imported every certificate received from your CA or that your CA is not trusted by Java Runtime Environment.
- Certification chain - shows a list of certificates forming a certification chain. The first entry is the root of the chain, while the last one is your own certificate.
10.6. Recipes for managing a keystore
Below we describe in details few most typical scenarios for managing a keystore.
10.6.1. Creating a keystore with a new certificate
- Click on Add new keystore and enter required information. Select No, I’m starting from scratch when asked if you want to add existing certificate. Click Next.
- Enter required information in the next form. Make sure to use host which is appropriate to your domain / networking requirements. Click Finish.
- Press Apply to save this keystore (makes sure you won’t lose your keys).
- Press Download > New CSR to download new Certification Signature Request.
- [Outside of Intella Connect] Present this file to your CA (Certification Authority). They will ask you to confirm that you are the owner of the domain. In the end you will be granted with: your certificate and a set of intermediate, trusted certificates.
- For each intermediate certificate, press Add > Trusted chain certificate. Then open certificate file with a text editor, copy its contents and paste them into the form. Press Add button. If the certificate is of correct type, the modal window will be closed and you will see a confirmation message. If it’s not of proper format, please convert it to X509 certificate in PEM format encoded with Base64, then retry.
- Press Add > Signed SSL certificate. Again, open the file containing your SSL certificate with a text editor and proceed just like in step 6.
- Your keystore should report Keystore is valid. message.
- Press Activate to set this keystore as active.
- Press Apply to save your changes. Restart Intella Connect and navigate to your host with HTTPS protocol.
10.6.2. Creating a keystore for an existing certificate
- Click on Add new keystore and enter required information. Select Yes, I already bought one when asked if you want to add existing certificate. Then select Yes, I can provide both Private Key and a certificate (signed Public Key). Click Next.
- Obtain contents of your Private Key in PKCS#8 PEM format encoded with Base64 and copy it to clipboard. Then copy it to the Private Key field.
- Obtain contents of your SSL certificate in X509 PEM format encoded with Base64 and copy it to clipboard. Then copy it to the Certificate field. In case you see any errors act accordingly, but make sure the formats of files are correct and that the Private Key matches the Certificate. Click Finish.
- Press Apply to save this keystore (makes sure you won’t lose your keys).
- For each intermediate certificate, press Add > Trusted chain certificate. Then open certificate file with a text editor, copy its contents and paste them into the form. Press Add button. If the certificate is of correct type, the modal window will be closed and you will see a confirmation message. If it’s not of proper format, please convert it to X509 certificate in PEM format encoded with Base64, then retry.
- Press Add > Signed SSL certificate. Again, open the file containing your SSL certificate with a text editor and proceed just like in step 6.
- Your keystore should report Keystore is valid. message.
- Press Activate to set this keystore as active.
- Press Apply to save your changes. Restart Intella Connect and navigate to your host with HTTPS protocol.
10.6.3. Renewing an existing certificate in a keystore
- Press Download > New CSR to download new Certification Signature Request.
- [Outside of Intella Connect] Present this file to your CA (Certification Authority). They will ask you to confirm that you are the owner of the domain. In the end you will be granted with: your certificate and a set of intermediate, trusted certificates.
- [You can skip this step if intermediate certificates are the same as the ones already stored in keystore] For each intermediate certificate, press Add > Trusted chain certificate. Then open certificate file with a text editor, copy its contents and paste them into the form. Press Add button. If the certificate is of correct type, the modal window will be closed and you will see a confirmation message. If it’s not of proper format, please convert it to X509 certificate in PEM format encoded with Base64, then retry.
- Press Add > Signed SSL certificate. Again, open the file containing your SSL certificate with a text editor and proceed just like in step 3.
- Your keystore should report Keystore is valid. message.
- Press Activate to set this keystore as active.
- Press Apply to save your changes. Restart Intella Connect and navigate to your host with HTTPS protocol.
10.7. Enabling HTTPS support on Intella Node
When Intella Connect is using HTTPS protocol, it can still communicate with Nodes using plain HTTP. However, if your network is open to public access, we advise to setup HTTPS on Intella Node servers too. This section describes how to do it. Before reading it you should also get acquainted with keystores database format.
Note
If you configure Nodes to use HTTPs then you’ll need to set on the Use HTTPs switch when adding or updating them. See ‘Intella Nodes’ section in Intella Connect Dashboard reference.
Since instances of Intella Node do not have graphical user interface in which configuration could be performed, manual changes to configuration files will be required to enable SSL. Keystore database supporting both Intella Connect and Intella Node is the same, therefore it’s advised to first setup SSL on Intella Connect server and then copy relevant pieces to Intella Node’s configuration files. Here are the necessary steps:
Configure a valid SSL keystore in Intella Connect, like described in the rest of this guide.
Locate the folder containing the keystore database, for example:
C:\Users\ConnectUserAccount\AppData\Roaming\Intella\sslShutdown Intella Node and locate the same folder on the Intella Node server, for example:
C:\Users\NodeUserAccount\AppData\Roaming\Intella\sslUsing text editor, open file
ssl-keystores.xmlon Intella Connect and copy one of its entries reflecting the keystore you created for Intella Node, for example:<keystore name='Keystore for Node' file='Keystore for Node.jks' password='Aywut0nB66XLOAyOiuHh4g' privateKeyPassword='bnfxJErKVntHYCPkzzkbnA' active='false'/>Edit the same file on Intella Node server and paste this line into the XML document. Make sure to change the value of active attribute from false to true. This will make the keystore active.
Locate the keystore file on Intella Connect server and copy it to the Intella Node server, for example:
C:\Users\NodeUserAccount\AppData\Roaming\Intella\ssl\Keystore for Node.jksStart Intella Node server. It should now be available using HTTPS protocol.
The final step is to enable Use HTTPS switch when adding or editing Node server in Intella Connect’s user interface.

This will allow for both servers to communicate using secure HTTPS protocol.
10.8. Verifying if HTTPS works correctly
To verify if your connection is secure try navigating to the host you selected when creating the certificate and specifying https as a protocol, for instance: https://connect.mycompany.com . You should be able to see the Lock icon in the web browser’s address bar, which is a proof that you are using a secure connection. You can also use tools built-in into your browser to inspect details of your certificate.
Note
When HTTPS is enabled and working fine, then your server will no longer respond to requests made using plain HTTP protocol.
10.9. Troubleshooting issues with SSL
Before a certificate is trusted, browser must verify that the certificate comes from a trusted source. This verification process is called path validation. This involves processing public key certificates and their issuer certificates in a hierarchical fashion until the certification path ends at a trusted certificate. Typically this is a root CA certificate. If there is a problem with one of the certificates in the path, or if it cannot find a certificate, the certification path is considered a non-trusted certification path. A typical certification path includes a root certificate and one or more intermediate certificates.
If the browser shows certificate warning, please verify certificate chain by reading the keystore using 3rd party tool. See references section of Wikipedia article on keystore.
10.10. Advanced: keystores database
Keystores database is very simple and consists of one XML file which lists keystore records. It is located in the following directory:
C:\Users\ConnectUserAccount\AppData\Roaming\Intella\ssl
Note: please substitute ConnectUserAccount with the account name under which you are running Intella Connect.
The XML index file is called ssl-keystores.xml. You can edit this file manually, but you should only do so when the server is not running.
Its structure should be self explanatory, however few comments are justified:
- active attribute on keystore tags is a boolean variable representing which keystore is used by Intella Connect. It’s only allowed for one keystore
- file attribute on keystore tags represents the keystore file located in the same ssl directory. This should never be modified.
- password and privateKeyPassword attributes use proprietary encryption algorithm, which is not disclosed
Keystore index file can be saved and reloaded multiple times during the lifespan of the server.
10.11. Advanced: backwards compatibility
Intella Connect/Node versions predating 2.2 were using three preferences for managing the keystore file:
- KeystorePath
- KeystorePass
- KeyPass
When Intella Connect 2.2 (and newer) starts, it will check for occurrences of those preferences and migrate the underlying keystore to the new database format. After the migration is finished, it will set the SslKeystoreMigrated=true preference, and during the next restart the migration will not be performed. This mechanism guarantees that configuration for versions predating 2.2 will not be affected (you can still start the old Intella Connect instance if needed).
If for some reason, you’d like to redo the migration, then you should set all three preferences listed above manually and remove SslKeystoreMigrated entirely.
Note
Preferences are stored in: C:\Users\ConnectUserAccount\AppData\Roaming\Intella Connect\prefs\user.prefs
10.12. Advanced: Using Self Signed certificates
Note
We discourage the usage of Self Signed certificates. Those should only be used if there is specific reason to do so.
If for some reason you would like Intella Connect/Node runtime environment to accept a custom trusted certificate
(usually a self-signed one) you can do that by adding it to the cacerts file of bundled Java Runtime Environment.
It should be enough to add it to the x64 variant of JRE, but you must do that for both Intella Connect and Node in
order for them to communicate properly. You will also have to do that after upgrading (or reinstalling) Intella
Connect/Node because each version uses independent JRE. The password for cacerts file is the default one set by
JRE: changeit.
The cacerts file is available in this location (make sure %%INTELLA_CONNECT_INSTALLATION_DIRECTORY%% points
to your Intella Connect/Node installation directory):
%%INTELLA_CONNECT_INSTALLATION_DIRECTORY%%\jre\lib\security\cacerts
10.13. Advanced: Modifying supported protocols and cipher suites
If your security policy requires it, you may alter the way in which client and server communicate by specifying supported protocols and ciphers used. Intella Connect by default will not use SSLv3, relying on TLS instead. If you override disabled protocols, please make sure to add SSLv3 to the list.
The two settings that you can add to Intella’s Preferences are:
- ServerDisabledSslProtocols - a white-space separated list of DISABLED protocols. Defaults to “SSLv3”. Supported values are: SSL, SSLv2, SSLv3, TLS, TLSv1, TLSv1.1, TLSv1.2
- ServerEnabledSslCipherSuites - a white-space separated list of ENABLED cipher suites. Defaults to an empty string, which results in supporting a vast stack of around 80 common cipher suites. Supply your own list if you need to have more fine grained control over which ciphers to exclude.
More details about both protocols and cipher suites can be found here: http://docs.oracle.com/javase/7/docs/technotes/guides/security/StandardNames.html
Please note that at the time of writing this manual, specification requires to support following ciphers:
- TLS_EMPTY_RENEGOTIATION_INFO_SCSV
- SSL_DHE_DSS_WITH_3DES_EDE_CBC_SHA
You can learn more about recommended cipher suites in this online reference: http://nvlpubs.nist.gov/nistpubs/SpecialPublications/NIST.SP.800-52r1.pdf
10.14. FAQ
- I received a ZIP from my certificate provider. How do I know what’s inside there?
- You should checkout documentation of your provider, as that is usually explained well there. A rule of thumb is that you usually receive at least two files. Certificates usually have some random name with a “crt” extension (because they are generated), whereas intermediate certificates have human friendly name. The latter often contain “root” or “ca” in the file name.
- How should I configure ports?
- By default web browsers will try to connect to port 443 when HTTPS protocol is used. Therefore it’s best to change Intella Connect’s port to that value.
- How do I manually disable SSL?
- You need to manually set all active attributes in keystores database to false. This is described in this section.
- I’m using different key/certification formats. What should I do?
- Intella Connect’s UI only supports formats described in this guide. However, you can still create your Java Keystore by other means
(including
keytoolutility or third party applications) and later import it to the database. This can be done by manually modifying the database or by leveraging backwards compatibility mechanism built into Intella Connect, which imports keystore based on filepath and credentials.