9. Sources
Sources are one of the key concepts of Intella Connect. They represent the locations where items such as emails, documents and images can be found. Sources are explicitly defined by the user, providing full control over what information is searched.
9.1. Source types
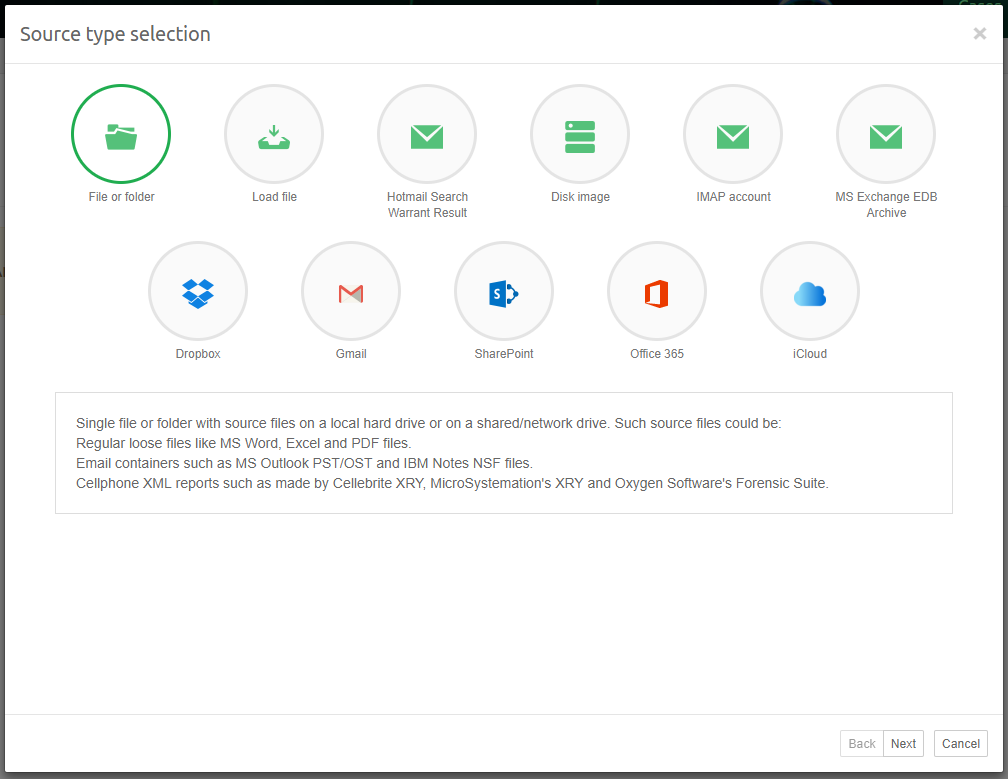
Intella Connect distinguishes between various types of sources:
File or Folder: A single file or folder with source files on a local hard drive or on a shared/network drive. Such source files could be:
- Regular loose files like MS Word, Excel and PDF files.
- Email containers such as MS Outlook PST/OST and IBM Notes NSF files.
- Cellphone XML reports such as made by Cellebrite XRY, MicroSystemation’s XRY and Oxygen Software’s Forensic Suite.
- Even large containers like EDB files and disk images can be indexed this way, together with many other files in one go. The downside of doing this is that any EDB- or disk image-specific configuration options are not available this way
Load file: a Concordance, Relativity or CSV load file.
Hotmail Search Warrant Result (experimental): a collection of files in HTML and other formats, provided by Microsoft pursuant to a search warrant.
Disk Image: one or more disk images in E01, Ex01, L01, Lx01, S01, AD1, VHD, VMDK or DD format.
MS Exchange EDB Archive: a single MS Exchange EDB file.
IMAP account: an email account on an IMAP email server.
Dropbox: all files stored in a personal Dropbox or DropBox for Business account.
Gmail: a Gmail email account.
SharePoint: the complete contents of a SharePoint instance.
Office 365: the complete contents of an Office 365 account, incl. the Outlook, OneDrive and SharePoint services of that account.
iCloud: The complete contents of an iCloud account, incl. iCloud Drive, Mail, Calendar, Contacts, and other services.
9.1.1. Notes on mail formats
Intella Connect/Node supports PST and OST files created by the following versions of Microsoft Outlook: 97, 98, 2000, 2002, 2003, 2007, 2010, 2013 and 2016. Make sure that Intella Connect/Node has exclusive access to the PST or OST file; it cannot be open in Outlook or other application at the same time. Intella Connect/Node will try to recover the deleted items from the file. Recovered items will be placed in a special folder named “<RECOVERED>”. Furthermore, Intella Connect/Node may encounter items outside the regular root folder. Any such items are placed in a special folder called “<ORPHAN ITEMS>”. There is limited ability to recover deleted emails from OST 2013 files, this is being worked on.
To index NSF files, IBM Notes 8.5 or higher needs to be installed. For NSF files made with IBM Notes 9 it is recommended to install IBM Notes 9. Intella Connect/Node supports all NSF files that can be processed by the installed IBM Notes version. Make sure that Intella Connect/Node has exclusive access to the NSF file; it cannot be open in a Notes client or other application at the same time. Only NSF files containing emails are supported by Intella Connect/Node, all other types are not supported. Make sure to use a default Notes installation and user configuration. A “corporate” Notes installation is often problematic for indexing, e.g. because of installed plugins interfering with access to the NSF file, the installation being tied to the corporate identify management system, etc.
Intella Connect/Node 2.0 contains experimental support for indexing Notes deletion stubs. Extraction of deletion stubs is disabled by default. To enable it, add the following line to the case.prefs file: “NotesIndexDeletionStubs=True”
Tip
The IBM Notes tool “nupdall.exe” can be used to convert older NSF files to NSF files that can be processed by IBM Notes 8.5 and higher.
Intella Connect/Node supports DBX files created by the following versions of Microsoft Outlook Express: 4.0, 5.0, 6.0.
Intella Connect/Node has been tested on Thunderbird Mbox files.
Intella Connect/Node supports MS Exchange EDB files of Exchange versions 2003, 2007 and 2010.
9.1.2. Notes on cellphone formats
When indexing Cellebrite, MicroSystemation or Oxygen cellphone reports, each report should be in its own subfolder. Any additional files that were produced together with the XML report, such as audio, video and image files, should have the same relative location to the XML file as the exporting application produced them. These two requirements are crucial for correctly linking the binary files with the XML report. Finally, no other evidence files should be placed in these folders, as they will be ignored.
The folder should reside in the file system, i.e. not in a ZIP file or disk image, as quick random access is needed to be able to process the files linked from this report.
A folder with the XML report and its related files can in principle be indexed straight away. However, most XML reports will often only contain the external numbers related to the calls and messages, i.e. the number of the phone itself is not in the report. This has valid technical reasons (e.g. it cannot be guaranteed that the current SIM card was used for these calls and messages), but it makes analysis of the communication a lot harder. Also, Intella Connect functionalities like message deduplication require this information. When the number is known by the investigator, e.g. obtained from the network provider, it may be specified through a separate text file:
Create a text file named after the XML report. For example, if the report is called “report.xml”, the text file should be named “report.numbers.txt”.
Put it in the same folder as the XML report.
Store the phone’s own number in this file. When the XML report holds information about multiple phones, enter the number of each phone on a separate line, like this:
number1number2<…>The first line will be used for the first phone found in the report, the second line for the second phone, and so on.
When indexing XRY’s XML reports, we recommend using the Extended XML report introduced in XRY 6.4. This new format solves many issues with the encodings of dates and other fields. Furthermore, the older XML format did not support exporting binary items. To get binary items with the Extended XML report, you need to select the “Export media files and manifest” option.
Important
The XML formats used by these cellphone extraction vendors are often evolving over time and are not fully documented. While we strive to extract all information from these reports as completely and correctly as we can, we can only offer this functionality on a best-effort basis. We recommend that you verify any results that you may rely on in your report with the original cellphone extraction software.
9.1.3. Notes on IBM Sametime dumps
When indexing an IBM Sametime dump, each dump and its related files should be in its own subfolder. This should be file system folder, i.e. not a ZIP file or disk image, as quick random access is needed to be able to process the files linked from this report.
9.1.4. Notes on disk image formats
Important
Intella will NOT recover deleted files and folders from unallocated or slack space.
Important
Intella will only extract deleted file content from NTFS file systems. For all other supported file systems only file and folder metadata will be extracted.
Important
The recovered content may contain data blocks that didn’t belong to the original file. Additional verification may be required.
If the “Recovery deleted emails, files and Notes deletion stubs” option is turned on then Intella will try to recover deleted files and folders using the information extracted from the Master File Table (MFT). The content of the deleted files will only be extracted from NTFS partitions where it’s possible. For all other supported file systems only the metadata will be extracted.
When indexing a disk image Intella will scan all the MFT entries. Those entries which are marked as unallocated will be reported as deleted items. Additionally, for NTFS file systems, Intella will analyze the allocation status of all the data blocks referred by the MFT entry. The entire content of the deleted file will be extracted if any of the following conditions is true:
- there is at least one unallocated data block referred by the MFT entry or
- the MFT entry has only resident data. That means the entire file content is located inside the MFT and therefore can be extracted.
In all other cases only the metadata will be reported.
Any deleted item recovered from a disk image can be one of three types, depending on how many data blocks are available:
- Recovered entire file content. All the data blocks are unallocated or the file has only resident data. The entire file content has been extracted.
- Recovered partial file content. Some of the data blocks are allocated to other live files. Please see the “MFT Deleted File - Overwritten Blocks” raw data field for the number of such blocks. The entire file content has been extracted.
- Recovered file metadata. None of the data clusters are unallocated or recovery is not possible. Only the metadata has been extracted.
You can find those three types in the Feature facet under the Recovered category.
The following raw data fields items are available for recovered items:
- MFT Allocated. “True” for regular files, “False” for deleted files.
- MFT Resident. “True” if the file has only resident data, “False” otherwise.
- MFT Deleted File - Total Blocks. The total number of data blocks.
- MFT Deleted File - Overwritten Blocks. The number of data blocks which are allocated to other live files. Such data blocks are considered as overwritten.
- MFT Deleted File - All Blocks Available. “True” if all the data blocks are available (unallocated), “False” otherwise.
9.1.5. Common file locations
MS Outlook PST and OST files are typically located in the following folder:
Windows Vista, Windows 7, Windows 8/8.1 and Windows 10:
C:Users<username>AppDataLocalMicrosoftOutlook
Windows 2000 and XP:
C:Documents and Settings<username>Local SettingsApplication DataMicrosoftOutlook
MS Outlook Express DBX files are typically located in the following folder:
Windows 2000 and XP:
C:Documents & Settings<username>Local SettingsApplication DataIdentities{<arbitrary string>}MicrosoftOutlook Express
IBM Notes NSF files are typically found in the following folder:
Version 7.x:
C:Program FilesLotusNotesData
Version 8.x:
C:Program FilesIBMLotusNotesData
Version 9.x:
C:Program FilesIBMNotesData
9.1.6. Notes on cloud sources
Each of the supported cloud services (Dropbox, Gmail, SharePoint and Office 365) provides a so-called REST API for data retrieval. Access to a cloud service via this API often requires an authorization token, rather than or in addition to a username and password. Each cloud service provides a web portal where users can register the client application (in this case: Intella) and obtain the authorization token.
Depending on what the REST API supports, Intella Connect/Node uses read-only data operations wherever possible, as to minimize changes to server-side data. Nevertheless, access may be visible to the cloud service and to the account holder, e.g. due to the presence of an authorization token in the server settings, access logging, altered metadata, etc.
9.1.7. Notes on document length
The indexing of a document text for keyword search can consume a considerable amount of RAM. With multiple documents being processed in parallel, this carries the risk of one of Intella’s processes running out of memory. To combat this, Intella Connect/Node imposes a maximum length to the document text. This way, typically problematic textual files such as large server logs and database dumps in CSV format can be processed without terminating the indexing abruptly.
The maximum length is set to 50M (52,428,800) characters. Any text beyond that point is skipped. Consequently, the document will not be returned when using query terms that only occur after this point. Affected documents can be located using the “Exception Items” category, “Truncated text” branch in the Features facet.
The limit can be adjusted on a case-specific basis via the case.prefs file. For example, alter or add the following line to set the limit to 100M characters: “ItemTextMaxCharCount=100M”
A future Intella Connect/Node version will make this configurable via the user interface. The limit can also be adjusted globally via the IntellaNode.l4j.ini file: “-Dintella.itemTextMaxCharCount=100M”
9.2. Adding sources
Adding sources is done with the Add New Source wizard. It can be opened by pressing (+) icon on the empty source slot on the Sources page. The first page of the wizard allows to select the type of the new source, which is illustrated below:
9.2.1. Note on source locations
Important
When providing paths to evidence make sure to use locations which are accessible for both Intella Connect as well as selected Intella Node on which indexing operation will be performed.
9.2.2. Files and Folders
Follow these steps to add a File or Folder source to Intella:
Source type
Select “File or Folder” source type and click “Next”. A folder tree will be displayed next.
Specify file or folder
Select the folder or file from the tree that you want to index, or enter the folder or file name in the text field above the tree. When selecting a folder, all files in the selected folder will be indexed. When the “Include subfolders” checkbox is selected, files in all subfolders (and sub-subfolders, etc.) will also be indexed. When the “Include hidden folders and files” checkbox is selected, hidden files and folders will be indexed as well.
Note
Folder trees containing many items may take some time to be displayed. Please be patient.
Click “Next” to continue.
The last steps in the definition of a source type are almost the same for all types. They are described in the section Last steps in a source definition.
9.2.3. Load files
Tip
The built-in export and import templates “Intella Standard Relativity Export (All Columns)” and “Intella Standard Relativity Import” can be used to export items and re-import them in another case, effectively creating a subset of the original case. Please note that not all metadata fields are supported.
Follow these steps to add a load file to an Intella case:
Source type
Select “Load file” source type and click “Next”.
Import load file
- Select the import operation: New Data or Overlay. When New Data is selected, Intella Connect will import new items to the case. An Overlay operation is used to import tags, comments and tag columns into existing items.
- Add the file name and location of the load file that you wish to investigate; use the tree component to browse for the file. If the load file comes with an Opticon image file, then you should specify it in the “Opticon image file” field.
- Specify the source name.
- Specify the custodian. If the custodian information is stored in one of the columns, then leave the text field empty and use the column chooser on the “Map fields” page instead.
- Specify the time zone. By entering the time zone, all dates associated with items from this load file will be displayed in that time zone, rather than the time zone of the investigator’s system.
- You can use a previously saved import template.
- Click “Next” to continue.
Configure delimiters
On the “Configure delimiters” page you can set the file encoding and delimiter settings for:
- Column delimiter – the character that separates the columns in the load file.
- Text qualifier – the character that marks the beginning and end of each field.
- New line – the character that marks the end of a line inside a text field.
- Multi-value delimiter – the character that separates distinct values in a column. Currently it can be used with the “Tags” column only.
- Escape character – the character that is used for escaping a separator or quote.
- Strict quotes – sets if characters outside the quotes are ignored.
- Use absolute path – select this option when the load file uses absolute paths rather than relative paths.
You can click the Detect button when you are not sure about the encoding used in the load file.
You can specify date, time and number formats in the right part of the screen. The Size unit option allows to change the way how the Size field is imported.
Intella Connect will validate the load file using these settings and display the validation result in the status line. When the file can be validated successfully, the number of columns found in the load file will be displayed. When validation fails, a reason will be given in this line.
The “Load file preview” table can be used to make sure that you have specified the correct parameters for the load file. Additionally, the “Image preview” panel will show the first image associated with the selected table record. It can be used to ensure that the Opticon file is correctly loaded. The “Text preview” shows the raw text of the load file and can be used to check the delimiters.
Click “Next”.
Map fields
Overlay options: this is only used when Import operation is set to Overlay. See the “Importing an overlay file” section for details
External files:
- Select the “Load native files” checkbox if you want to import original format files associated with the load file into the case. Specify the column containing the paths to the native files. When the native files are imported, you will be able to use functions such as Preview tab and Open in External Application.
- If you select the “Extract type information from native files” check box, then Intella Connect will analyze the native files and import the type information into the Mime Type and Type columns. This option may be useful in case the load file does not have any type information such as File Extension.
- Select “Load extracted text” when you want to import the extracted or OCRed text of the document. Select the “Extracted text column is a link to an external file” checkbox when the column contains a link to the text file rather than the text itself. Select “Analyze paragraphs” to let Intella Connect determine the paragraph boundaries and to let it build a database registering which paragraph occurs in which item and where (see section Last steps in a source definition for more details). When the extracted text is imported, it will be shown in the Contents tab of the Previewer.
Field mapping – You can see the Field chooser in the bottom part of the panel. The table on the left shows all fields in the load file (“Load file field”) and the Intella columns they are mapped to. In the table on the right you can see the list of all Intella columns available for mapping. To map a column:
Select one of the load file fields on the left.
Select one of the columns on the right.
Click the left arrow button. That will move the selected column from the right to the left table.
Click the right arrow button to remove the selected mapping.
When the load file contains a field that cannot be mapped to any existing columns, then you can create a tag or custom column and map the field to it. Click the “Add” button to add a new column to the right table. Click the “Remove” button to remove the selected column. Note that a tag or custom column can only be removed if there is no data in the case associated with it. Tag columns should only be used for importing tag-like data where the number of unique values is not high. In all other cases custom columns should be used instead.
Click the “Clear all” button to remove all the selected columns from the right table. Click the “Save template” button to save the current settings as an import template which can be reused later. Select the “Extract text and metadata from native files” checkbox when you want to extract the text and metadata from the native file. The button with a gears icon can be used to adjust the processing options. See Last steps in a source definition section for more details about the processing options. Note that Intella Connect will replace any original metadata from the load file with the new metadata extracted from the native file. The option is turned off by default.
It is highly recommended to resolve all errors by clicking the “Check for errors” button before importing the load file. That will let Intella Connect validate the load file using the entered settings. Among other things, it will check each row and ensure that:
The Document ID is unique and not empty.
The Parent ID refers to an existing record.
Native and extracted text paths are correct.
Date and time fields can be parsed using the selected date and time formats.
The MD5 field contains a valid MD5 hash.
Number fields such as File Size and Page Count contain a valid number.
Boolean fields such as Encrypted and Decrypted contain either “true” or “false”.
The Source IP field contains a valid IP address.
Select the “Skip error records” checkbox to instruct Intella Connect to skip items with errors during import.
Note
Date and time values (separate columns) will be merged into one column.
Important notes on load file importing
There are several aspects to be aware of when importing a load file into an Intella case:
- All paths in the load file to external resources should be relative to the load file, unless the “Use absolute paths” checkbox is selected.
- The original load file record identifiers will be imported into the “Document ID” and “Parent Document ID” columns and can be used in a subsequent load file export.
- Imported images can be viewed in the “Image” tab in the Previewer.
You can save the specified load file import options as a template for later usage on the last page using the button Save Template. All import templates are stored as XML files in the “<Intella Home Folder>import-templates” folder.
9.2.4. Hotmail Search Warrant Results
Important
This source type is still in an experimental stage. We welcome any feedback; please visit our support portal at http://support.vound-software.com/.
Follow these steps to add a Hotmail Search Warrant Result to Intella:
Prepare evidence files
The evidence files you have received may consist of a folder containing a “Click Here.html” file and some legal files related to the search warrant, with a subfolder for each account involved. It may also be that you have only one of those account subfolders, recognizable by a “Folders.html” and “Messages” file in this folder. In case you have received a ZIP file or some other type of archive file, please unpack this archive file first.
Source type
Select “Hotmail Search Warrant Result” source type and click “Next”.
Specify file
Select the folder holding the Hotmail Search Warrant Result files that you wish to investigate in the folder tree. Make sure to select the top-level folder of the provided file collection. Click “Next” to continue.
The last steps in the definition of a source type are almost the same for all types. They are described in the section Last steps in a source definition.
9.2.5. Disk Images
Follow these steps to add a Disk Image source to Intella:
Source type
Select “Disk image” source type and click “Next”.
Select disk image file
Select disk image file in the folder tree. List of supported image types is displayed underneath the tree. You can add more parts in the next step. Press “Next”.
Specify disk image files
You can specify here additional parts of your disk image: click “Add…” to go back to “Select disk image file” page to do so. Select another file and click “Next”. All selected files will be listed in the disk image list. Alternatively, one can select a single image part and then click Find Parts. Intella will then try to find the related image parts that belong to that same multi-volume image (see below) and add them to the list. Files of a multi-volume image should be listed in the correct order. Select rows and use the Move Up and Move Down buttons to put files in the correct order.
Select files and folders to process
Indicate which files and folders should be processed by selecting a pre-defined profile or creating a custom one. See below for detailed instructions.
The last steps in the definition of a source type are almost the same for all types. They are described in the section Last steps in a source definition.
Important
A single disk image source should only contain the files relating to a single conceptual image. Files relating to a different image should be entered as a separate source.
Important
Due to limitations in the indexing framework it is not possible to include or exclude “compound” file types such as the newer MS Office file formats (based on ZIP) or the older MS Office file formats (based on OLE). Please use filtering by file extension instead. This shortcoming will be addressed in a future Intella Connect version.
Filtering disk image content
A disk image often contains a lot irrelevant files, such as executables, DLLs. These files add to the processing time and disk space that the case will consume. It is possible to define a set of rules to filter out unnecessary files and folders, to save processing time and disk space.
On the “File types and locations page” you can choose either to index all the data by selecting “Index all files and folders” check box, or use a specific disk image indexing profile. There are several built-in profiles:
- All supported files. Index all file types supported by Intella Connect. “Supported” means that Intella can do something meaningful with it besides detecting the file type, i.e. it can extract text, metadata and/or embedded items from the file, or display it as an image. All executables for example are not hashed and cached with this profile.
- All supported files, exclude system files. Index all file types supported by Intella Connect and exclude three system folders: “Windows”, “Program Files” and “Program Files (x86)”.
- Mail stores. Index only mail store files: PST, OST, NSF, Mbox, etc.
- Mail stores, exclude system files. Index only mail store files. Also, exclude the three system folders listed above.
You can also adjust any index profile to your needs. To create a new profile, type a new name in the “Use index profile” box and click the Save button. You can delete any profile by selecting it first and clicking the Remove button.
The first section on this page defines the rules on which files should be included or excluded. You can filter files by type and by file name. If you select “Include selected entries”, then only the listed files and file types will be indexed. Otherwise, the listed entries will be excluded. Note that you use wildcard names such as “*.txt” to filter all files that end with “.txt”.
A single “File name” entry can contain only a single file name definition; you cannot enter several file names in a row such as “*.txt, *.exe”. You should add two separate entries to the list in this case.
The second section on this page defines a list of locations that should be included or excluded. If you select “Include selected entries” then only the listed locations will be indexed. Otherwise, the listed locations will be excluded from indexing. You can adjust the folder selection on the next screen called “Select Folders”.
All index profiles are stored in XML format in the “<Intella Home Folder>index-profiles” folder and can be used in all local cases.
Note that search results can also be filtered after indexing, using the Hide Irrelevant filter option in the Details tab.
Supported disk image formats
The Disk image source type supports EnCase E01, Ex01, L01, Lx01 and S01 files. Password-protected files are supported and indexed without manual interaction, except for FTK-encrypted files.
DD images are supported, but when a Folder source is used, they need to use the .dd file extension to be detected and processed as DD images. Because of potential issues with DD image detection, we recommend using the Disk Image source directly. This is also required when you want to index a multi-volume DD image
Supported file systems and partition types
The following file systems have been tested: FAT16, FAT32, NTFS, Ext2/Ext3, HFS/HFS+ and ISO 9660. Other file systems such as EXT4, ExFAT, YAFFS2 and ISO 13346 (UDF) may work but have not been tested yet.
MBR and GUID partition tables (GPT) partitions are supported. Apple Partition Maps (APM) have been tested but results were mixed. When Intella fails to index such an image, we recommend mounting it manually and indexing the mounted drive using a “File or Folder” source.
Multi-volume files
When using a Folder source to index multiple image files, Intella Connect will rely on the following file name convention to determine which files together make up a single image:
image1.e01            (first volume of image 1)
image1.e02            (second volume of image 1)
image1.e03            (third volume of image 1)
…
image2.e01            (first volume of image 2)
image2.e02            (second volume of image 2)
image2.e03            (third volume of image 2)
…
image2.e99            (99th volume of image 2)
image2.eaa            (100th volume of image 2)
image2.eab            (101st volume of image 2)
…
9.2.6. MS Exchange EDB Archives
Important
Processing an EDB archive may require to adjust memory settings. Please see the “Memory settings” section for detailed instructions.
The currently supported MS Exchange versions are 2003, 2007 and 2010.
Follow these steps to add a MS Exchange EDB Archive source to Intella:
Source type
Select “MS Exchange EDB Archive” source type and click “Next”.
Specify EDB file
Specify the location of the EDB file you wish to investigate either by typing it’s location or by selecting it in the folder tree. Click “Next” to continue.
Select mailboxes
Check all mailboxes that you wish to process. Click “Next” to continue.
The last steps in the definition of a source type are almost the same for all types. They are described in the section Last steps in a source definition.
When an EDB source has been added and not all mailboxes were selected, it is still possible to index additional mailboxes in that EDB file at a later stage. To do that, the following steps should be performed: 1. Click on the “Edit” button for the respective source on Sources page. 2. Indicate which mailboxes should be processed. Note that you cannot unselect or remove already processed mailboxes. Click OK. 4. Use the “Index new data” button option to index the new mailboxes.
9.2.7. IMAP accounts
Important
The IMAP standard is implemented in many ways. Furthermore, some mail servers may throttle the network connection during mass downloads. We tested Intella Connect on several IMAP servers with good response. However, we cannot guarantee that Intella Connect can create IMAP account sources for every IMAP server.
Tip
We recommend using a mail client to download the entire mailbox and indexing the resulting PST or Mbox file instead, rather than using Intella Connect to download the mailbox. This way a copy of the mailbox is created outside of the Intella case. This results in a cleaner and better auditable workflow, allowing e.g. cross-validation of the investigation results with other forensic tools or indexing with future Intella Connect versions.
Follow these steps to add an IMAP Account source to Intella:
Source type
Select “IMAP account” source type and click “Next”.
Specify account
Enter the settings for the target email account, e.g., “mail.my-isp.com” with the username and password. Select the “use secure connection (SSL)” checkbox if you want or need a secure connection to the mail server. This is recommended, because without a secure connection your password will be sent as plain text. Click “Next” to continue.
Select folders
In the next step, Intella Connect will contact the specified email server to retrieve the folder tree of the target mail account. You can then select the folders that you want to make searchable by placing a check in the box next to the desired folders. When you want to index subfolders, you will need to select them; otherwise they will be ignored. The wizard has two convenient buttons for selecting and deselecting all folders. Click Next to continue.
The last steps in the definition of a source type are almost the same for all types. They are described in the section Last steps in a source definition.
9.2.8. Dropbox accounts
A Dropbox source reconstructs the entire folder tree in a Dropbox account and downloads current and past revisions of the files in the account.
The official Dropbox REST API used by Intella Connect limits this to a maximum of 10 revisions per file. All revisions except for the last one have their file names decorated with the revision identifier. Furthermore, additional Dropbox-specific metadata is retrieved for both files and folders. These are displayed in the Previewer’s Raw Data tab and are subject to full-text indexing.
Intella Connect uses the OAuth2 (Open Authorization) protocol to access the account. Prior to defining the source, the investigator needs to obtain an OAuth2 token for the account.
Follow these steps to obtain a Dropbox OAuth2 token for a given account:
- Login to Dropbox with the account owner’s credentials.
- Go to https://www.dropbox.com/developers/apps.
- Click Create app to register Intella Connect on Dropbox.
- Choose between Dropbox API and Dropbox Business API.
- Select the requested access permissions:
- For the Dropbox API choose Full Dropbox.
- For the Dropbox Business API choose Team auditing.
Name your application. Through trial and error, you need to find a name that is globally unique, i.e. not used elsewhere on the Dropbox site.
Click Create app. The application is now ready.
Note
If no more than 500 users will access the application, it is not necessary to Apply for production.
Upon creation of the application, a details page is displayed. In the OAuth2 section on the details page, make sure that you select Allow implicit grant and click the Generate button to generate an OAuth2 token.
Copy the generated token and save it to a file on your computer, so Intella can import it later.
Next, follow these steps to add a Dropbox source to Intella:
Source type
Select “Dropbox” source type and click “Next”.
Connect to Dropbox
Open the OAuth2 token in a text editor. Copy the file’s textual content into the Oath2 Token field in the wizard. Click Connect to Dropbox.
A connection will be established and the token will be validated. If the token validation is successful, basic information about the account such as the account owner’s name and email address will be shown beneath the token field.
Note the Help button above the token field. Clicking it will display the steps required to create the OAuth2 token.
Click Next to continue.
Select files or folders
Besides indexing of the entire account, it is also possible to index specific files or folders only. The next wizard sheet shows the folder tree of the account. Nested folders are loaded on demand when the parent folder is expanded. Click the checkboxes of the desired files or folders. Selecting a folder automatically marks all nested elements as selected.
Click Next to continue.
The last steps in the definition of a source type are almost the same for all types. They are described in the section Last steps in a source definition.
9.2.9. Gmail accounts
A Gmail source reconstructs the mail collection in a Gmail account. Optionally, the set of retrieved emails can be restricted to a certain date range.
Benefits of using the Gmail source over the generic IMAP source are: faster performance, more accurate data representation (e.g. folders vs. Gmail’s Labels, threads), and a read-only data connection ensuring that no data is altered on the server.
Intella Connect uses the OAuth2 (Open Authorization) protocol to access the account. Prior to defining the source, the investigator needs to obtain an OAuth2 token for the account. The token will be downloaded as a JSON file, which Intella can use to access the account.
Follow these steps to obtain a Gmail OAuth2 token for a given account:
- Login to Gmail with the account owner’s credentials
- Go to API Manager: https://console.developers.google.com/apis/library.
- Choose the Library option and then select Google Apps APIs > Gmail API.
- Click Create project.
- The Create Project page shows up. Name your project, answer the remaining questions and click Create.
- Upon creation of the project, you are redirected back to the Library. Click Enable to allow connecting to Gmail through the created API project.
- Choose the Credentials option in the API Manager.
- Next, the Credentials page shows up. Select Create credentials and choose OAuth Client ID.
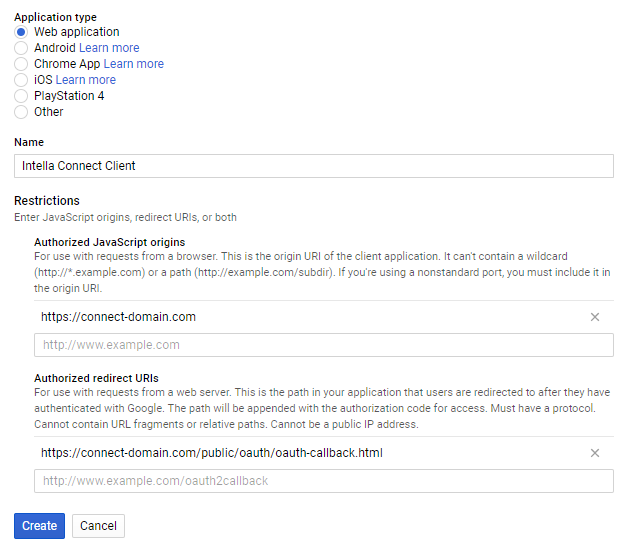
- To create your OAuth client ID, first click Configure consent screen. Name your product (e.g. Intella) and click Save. There is no need to fill in the remaining options.
- Once the consent screen has been configured, you are redirected back to Create Client ID page. Select “Web Application” as application type and enter a client name (e.g. Intella Connect), JavaScript origins and redirect URI like shown on the image below. Click Create.
Note
Replace the “connect-domain.com” with the domain Intella Connect is available on or use “localhost” if you are accessing it locally.
- On the Credentials page, you can see the created OAuth client ID. Click the Download JSON button on the right to save your client ID on your computer, so Intella can import it later.
Next, follow these steps to add a Gmail source to Intella:
Source type
Select “Gmail” source type and click “Next”.
Connect to Gmail
Click the Select button and select the JSON file saved above in the file chooser that opens. Alternatively you can also drag and drop this file directly to the file upload box. Click Connect to Gmail.
A connection will be established and the token will be validated. A browser window will automatically open, through which Gmail will request permission to continue. If the token validation is successful, basic information about the account such as the account owner’s email address and the total number of emails will be shown beneath the OAuth2 File field.
Note the Help button above the upload box. Clicking it will display the steps required to create the OAuth2 file.
Click Next to continue.
Configure download
Select whether all email messages are to be downloaded or whether a date filter is to be applied. If so, enter the desired date range.
The end date is included, so that emails on that day are also retrieved. Both the start and end dates are optional, making it possible to enter a half-open date range, e.g. “all emails since May 1st, 2015”.
Click Next to continue.
The last steps in the definition of a source type are almost the same for all types. They are described in the section Last steps in a source definition.
9.2.11. Office 365
The Office 365 source types allows for retrieving both user account and user groups. For each user account, used to access Office 365, the source can retrieve data from Outlook, OneDrive and SharePoint. For each user group, the source retrieves titled conversations containing emails.
For Outlook, the source retrieves all folders (both standard and user-defined) and all emails therein. For OneDrive, the source retrieves all folders and all files.
Prior to defining an Office 365 source, the investigator needs to obtain a client ID token for the account. Follow these steps to obtain an Office 365 client ID for a given account:
- Go to https://manage.windowsazure.com/ and login using the Office 365 admin credentials.
- Click the Active Directory tab and click the active directory created for the Office 365 tenant.
- On the tenant configuration dashboard, choose the Applications tab.
- On the bottom toolbar, click the Add button.
- A modal dialog opens. Click Add an application my organization is developing.
- Enter the name of the application, select Native client application and click Next.
- Enter a valid (non-physical) Redirect URI for the application, e.g. “http://localhost/intella”. Click the Complete button and the application will be ready in a couple of seconds.
- The welcome screen is opened. Select the Configure tab.
- The Client ID key will be used by Intella Connect to connect to Office 365, so save it somewhere on your PC.
- Now, the created application must be granted read permissions. Click Add application.
- Select the Microsoft Graph application and add it to the Selected list on the right. Click the Complete button.
- You are redirected back to the Configure tab and Microsoft Graph in the table of applications. Click the Delegated permissions drop-down list and tick all Read and Sign in permissions. To ensure absolute source data protection, ensure all write permissions are unchecked.
- Finally, do not forget to Save your changes, otherwise Azure AD will ignore them.
Next, follow these steps to add an Office 365 source to Intella:
Source type
Select “Office 365” source type and click “Next”.
Connect to Office 365
Enter the username, password and client ID obtained above. Click Connect to Office 365.
A connection will be established and the credentials will be validated. If credentials validation is successful, basic information about the account such as the tenant name and location will be shown beneath the configuration fields.
Note the Help button at the top of the screen. Clicking it will display the steps required to create the client ID.
Click Next to continue.
Select items
The next screen shows the available accounts. Select the accounts that you wish to retrieve.
Selective indexing of part of the account data is not possible at this moment.
Click Next to continue.
The last steps in the definition of a source type are almost the same for all types. They are described in the section Last steps in a source definition.
9.2.12. iCloud
The iCloud source type is used for indexing the contents of an iCloud account, such as emails, photos and notes.
Prior to defining an iCloud source, the investigator must obtain the Apple ID and password used by the account owner. When the account has been configured to use two-factor authentication (2FA), iCloud additionally sends a verification token. The verification token is sent only if a valid phone number is set for the Apple ID. Hence, the investigator needs to have access to one of the physical device (an iPhone or an iPad) associated with the account, including the passcode to unlock the device.
Intella supports the retrieval of the following data from an iCloud account:
- Contacts
- Emails
- iCloud Drive
- Reminders
- Calendar
- Event notifications
- Photos
- Account settings
- “Find my phone” data
- Notes
Follow these steps to add an iCloud source to Intella:
Source Type
Select “iCloud” source type and click “Next”.
Connect to iCloud
Enter the Apple ID and password of the account. Click Connect to iCloud.
When this account requires two-factor authentication, Intella will extend the form with an option to choose the verification delivery method: SMS or Idmsa.
Both methods are equally capable of providing access to the account’s data. When the account is linked to an iPhone and/or iPad, the Idmsa method is recommended. When the account is linked to a non-Apple device (e.g. a cellphone or tablet from a different vendor), SMS is the only way to obtain the verification code. Even when using an Apple device, SMS can be selected as the preferred method for delivering the verification code. In that case, the registered device may receive multiple notifications from Apple’s identify management service (IDMSA). Such notifications should then be ignored and the code from the SMS message should be used.
Choose the desired delivery method and click Get Verification Code. A six-digit verification code will be either sent as an SMS or show up as a native iOS notification on the Apple device. The controls for choosing the delivery method will be replaced by a Verification Code field. Enter the received verification code in this field. Click Connect to iCloud.
When the credentials and the verification code are all valid, Intella will list some account info such as the Full Name of the account owner. Click Next to continue.
Select items
In the next step, the available iCloud services for this account are listed. The user can choose whether to retrieve one or more specific services, or whether to retrieve all account data.
The last steps in the definition of a source are almost the same for all types. They are described in the section Last steps in a source definition.
When Intella establishes a connection to iCloud using the account credentials, it will obtain a trust token. This token allows Intella to connect to iCloud at a later point in time without requiring the user to re-enter the credentials and perform any two-factor authentication steps. The trust token has a limited validity period. iCloud sources can be indexed and re-indexed during the validity period of the token. Once the token has expired, the source must be re-created; there is no way to refresh the token of an existing source.
Note
Documents in Keynote, Pages and Numbers format are converted by the iCloud web service to MS Word, MS PowerPoint, and MS Excel format respectively when they are retrieved by Intella. Processing of the documents in their native format may be added in a future release.
Note
The Notes branch currently lists Note items in a flat list; folders are not reported. This may be addressed in a future release.
9.2.13. Last steps in a source definition
The following final steps are the same for all source types.
Source name and time zone
In the Source Name and Time Zone sheet you are asked to enter a name for the source. The name will be shown in the list of sources in the Sources panel and functions purely as a label for your reference.
Furthermore a suspected system base time zone can be entered. This setting indicates the time zone of the system from which the evidence file(s) were obtained. By entering this time zone, all dates associated with items from this source will be displayed in that time zone, rather than the time zone of the investigator’s system. This often makes it easier to correctly interpret those dates, e.g. determine whether a given timestamp falls inside regular business hours. By default, the local time zone is used f7or new sources. Time zones supporting Daylight Savings Time (DST) are marked with an asterisk (*).
Click Next to continue.
Items
Intella Connect makes the indexing of certain complex file types optional. You can disable this to improve indexing performance at the cost of fewer results.
- Select Index mail archives if you want to extract all emails and attachments from mail archives like PST and NSF files. Subsequent processing of documents, archives and other items found in the attachments are still subject to the other options.
- Select Index chat message if you want to index chat messages inside Skype SQLite databases, Pidgin accounts and Bloomberg XML dumps. This also controls what happens with Skype, WhatsApp messages etc. in cellphone reports.
- Select Index archives if you want Intella Connect to index files inside archives such as ZIP and RAR files.
- Select Index content embedded in documents if you want to extract images embedded in emails, MS Office, OpenOffice, XPS and PDF documents. This will make these images separately searchable and viewable.
- Select Index databases to enable the indexing of all tables in SQLite databases.
- Select Index Windows registry to make all keys and values in a Windows registry file searchable by full-text keyword search. When turned off, a limited amount of registry indexing necessary for populating the Insight tab will still take place. The overhead for this is negligible.
- Select Index browser history to let Intella Connect process the contents of web browser histories.
- Select Recover deleted emails, files and Notes deletion stubs to enable the processing of deleted emails from MS Outlook (PST, OST) and MS Exchange (EDB) files, deleted files and folders from disk images and deletion stubs in IBM Notes files (NSF).
- Select Extract text fragments from unsupported and unrecognized file types to enable heuristic string processing on all items whose type is not recognized by Intella Connect (they are binary blobs) or whose type is not supported apart from type detection (e.g., executable files).
Options
This sheet provides additional options affecting the time needed for indexing.
Select Cache original evidence files to copy all evidence files into the case folder. Use this option if you want to create a self-contained case where the evidence files can be opened or exported even when they are not found in their original locations, for instance when the case is moved to another system).
When this option is turned on, additional processing time (especially for compression) and disk space is needed.
This setting has no effect on storing of the items extracted from these evidence files (e.g. the mails, attachments and other embedded items extracted from a PST file), as these are always stored in the case folder after extraction.
Select Analyze paragraphs to let Intella Connect determine the paragraph boundaries and to let it build a database registering which paragraph occurs in which item and where. This enables various search and review options at the expense of additional processing time. The required storage space is negligible. For subsequent sources this setting is forced to be same as what has been used for the first source.
Tasks
This sheet lets the user define post-processing steps that need to take place once all evidence files have been crawled and all indices have been build. See the Tasks section for more details.
Completed source definition
Finally you will be presented with a dialog to inform you that you have successfully defined a new source. You may optionally start indexing the source. Indexing is required to be able to search and explore the items in this source, but can be only performed on Intella Node. Once you click the Finish button, the indexing process will proceed according to the options you have selected.
Tip
Because the active indexing process prevents you from defining more new sources, you may wish to skip this part now (e.g., to define more new sources) and index the sources later by clicking the Re-index menu item in the Sources page.
Note
At any time except before the step “Completed Source Definition,” you can click the Cancel button to return to the Intella Connect interface without having added a new source to the case.
9.3. Indexing
After defining a source Intella Node can index it. During indexing it will inspect all items (emails, files etc.) that it can find in the source file(s), enabling Intella Connect to return instantaneous results during your investigation for relevant evidence.
Warning
Having anti-virus software active during indexing can lead to certain items not being indexed. This will usually be restricted to the files that are blocked by the anti-virus software, but this cannot be guaranteed. Running anti-virus software may also affect indexing performance.
During indexing, Sources page will show you a panel displaying various types of information:
- Statistics on indexing speed.
- Statistics on encountered file types.
- The amount of data that is being indexed and how much has been indexed already.
- The number of indexing steps to perform, which current step is being performed and (for some steps) a progress percentage.
You can stop the index process at any time by clicking the Stop button. Intella Connect/Node will finish processing the current item and then complete its case databases with the information that has been extracted thus far.
Note
For remote indexing example please take a look at the Remote indexing example using Intella Connect and Intella Node section.
9.3.1. Note on closing cases
After certain operations related to indexing (ex. indexing of new source or reindexing the entire case) the case will remain open on an instance of Intella Node. To close it, one has to navigate to Sources page and click on Close case button.
9.3.2. Re-indexing a case
There may be circumstances when you want to re-index the entire case, e.g. to use extraction features offered by a newer Intella Connect/Node version or fix a broken index. To rebuild the case index from scratch, use the Re-index option on the Sources page. Intella Connect/Node will remove all indices it has previously created and create new ones. In order for this to work, all evidence files have to be present at the location they had during the initial indexing.
9.3.3. Updating a case
Alternatively, there may be times when you want to update an index, e.g. in the following scenarios:
- Files and/or folders have been added to folders that have already been indexed.
- New sources have been defined but were not indexed immediately.
- The set of mailboxes to index in an EDB source has been extended.
- You interrupted indexing using the Stop button.
In these cases the “Index new data” option in the Sources view will scan all sources for new evidence items. Items that have already been indexed are not changed, also when their original evidence items are no longer available.
9.4. Post-processing
After indexing has completed, the case owner can opt to refine the indexing results in a number of ways. These steps are kept separate from indexing as they typically contribute considerably to the processing time and disk space usage and, depending on the case at hand, may not be needed.
9.4.1. Tasks
Intella Connect/Node allows for the definition of “tasks”. These are essentially compound processing steps such as searching for all items that match a certain keyword or keyword list and tag or export the results. These tasks can be defined and selected during source creation, which will run these tasks right after indexing. The tasks editor can also be reached by selecting Tasks from the File menu, which allows for defining and running the tasks at any point in time after index creation.
Each task consists of conditions, post-conditions and actions. A task must have at least one condition and one action.
A condition (Step 1 in the task dialog) defines a search query that select items from the case. Currently the following conditions can be defined:
- A keyword search.
- A keyword list search.
- An MD5 list search.
- An arbitrary Saved Search, which can combine all of Intella’s search facets.
- A tag, possibly assigned by one of the tasks executed earlier.
- A date range search on all date fields.
- An OCR Candidates search. It allows to select various categories of images and documents that are usually subject to OCR.
A task may combine any number of conditions. The match option controls if the items should match all specified criteria or at least one of them, i.e. a Boolean AND or OR of the specified conditions.
An optional list of post-conditions (Step 2) specify how to transform the item set retrieved in the previous step. Possible post-condition steps are:
- Deduplicate results
- Identify parents of the retrieved items
- Identify children of the retrieved items
- Suppress irrelevant items
It is possible to define multiple post-conditions for a single task. The first post-condition is applied on the set of items resulting from the conditions in Step 1. Subsequent post-conditions are applied on the outcome of the preceding post-condition.
Finally, task actions (Step 3) define the operations that will be applied to the items resulting from the previous steps. The following actions can be defined:
- Tag all found items with one or more tags. The tag(s) can optionally be inherited by items in the same family hierarchy and/or by duplicates of the found items.
- Set custodian attributes.
- Flag all found items.
- Add a comment to all found items.
- Export all found items using an export template.
- Export the metadata of all found items to a CSV file. Click the Configure button to set the CSV file name and path and to select the metadata fields that are to be included.
- Start an OCR process on the found items using the embedded ABBY Fine Reader, by connecting to an ABBYY Recognition Server or by running an external OCR tool.
- Start a Content Analysis process on the found items for the selected entity types.
- Start the email threading process on the found items.
Every task may define multiple actions that will be applied sequentially to the determined item set.
Tasks can be exported to a file so that they can be reused in other cases. These files are self-contained, i.e. when the task involves MD5 hash lists or keyword lists, these lists are embedded in the task file.
Tasks are executed in the order they have in the task list. This makes it possible to “pipeline” tasks, e.g. use one task to assign specific tags to a subset of the items and use a subsequent task that is based on those tags. The order can be changed by selecting a task and using the “Move Up” and “Move Down” buttons.
9.4.2. Custodians
The Custodian attribute can be assigned to items after indexing. This can be used to represent the custodian of the evidence items. To enable automated assigning of multiple custodians in a folder source, the root folder should organize the evidence in subfolders, one subfolder for every custodian. If the evidence folder is structured in this way, the “Indexing Tasks” step in the Source Wizard will contain a “Custodians” tab that opens the settings panel for automated assigning of multiple custodians. By default the custodian names are set to equal the subfolder names. It is possible to alter the used custodian names in the table. This Custodian value will be assigned to all items obtained from the evidence files within the respective subfolder. For other types of sources, the “Indexing Tasks” tab contains a text field for setting a single custodian name. Besides the above method, the Custodian attributes can also be set or changed using the “Set Custodian” indexing task with an arbitrary condition, or edited manually in the Details’ right-click menu.
9.4.3. Thumbnail generation
To improve the images loading speed you can pre-generate thumbnails after processing case sources. You can learn more about this in Reviewer’s manual > Preferences > Thumbnails Pre Generation.
9.4.4. Importing an overlay file
An overlay file is a file that contains additional information about the current items in a case. By importing the overlay file, the metadata of these items can be extended.
Intella currently only supports the importing of tags, tag columns and comments. Importing overlay images, texts, natives and custom columns may be added in a future release.
The following file formats are supported for overlay files:
- Concordance/Relativity load file (.DAT)
- Comma Separated Values file (.CSV)
To import an overlay file you need to add another Load file source. Set the Import operation to Overlay and specify the location of the file. You can optionally use a previously saved template.
On the “Configure delimiters” page you can set the file encoding, delimiter settings and date formats. Please see the Adding sources > Load file section for a description of these options.
On the “Map fields” page you need to specify the identifier field and type. This is how Intella Connect will match items in the overlay file with the existing items in the case. There are four options for matching items:
- By Document ID, also known as DocID. This is the most common way to import new tags and comments into previously imported load file.
- The Item ID is the internal item identifier used by Intella Connect. This is the simplest way to process your data using an external tool and then import the result back into Intella Connect. Note that if the case has been reindexed, the item IDs will no longer match.
- By MD5 Hash. This is the most flexible way of matching items. Using the MD5 hash it is possible to transfer tags from one case to another. Note that the imported tags will be applied to all copies.
- The Item URI is an internal item identifier that is not changed after re-indexing the case, but it may be changed when re-indexed with a newer Intella Connect/Node version due to changes in the crawling software. This method can be used to transfer tags when other options are not suitable, e.g. when migrating tags from a case backup to a live case that has been re-indexed in the meantime.
Please see the Adding sources > Load file section for a description of the remaining options on this page.
9.4.5. Content analysis
Content analysis can be scheduled to run either as an indexing Task or by a reviewer directly from a shared case. The later procedure is described in Reviewer’s manual > Details panel > Content analysis.
9.5. Showing Source Details
To see the configuration of a source, go to Sources page. When you click on the “Details” button for a respective source, its details will be shown in a modal window. The name, type and time zone are shown as well as source type-specific details such as files or folders to index, indexing options, etc. See the section on adding sources above for the precise meaning of these settings per source type. Presented properties are not editable.
To close the window click on the “Close” button.
9.6. Editing Sources
To edit the configuration of a source, go to Sources page. When you click on the “Edit” button for a respective source, its editable fields will be shown in a modal window. The name and time zone are editable for every source. The rest of editable fields depends on the source type.
To save your changes click on the “Add” button. If click the “Cancel” button then any changes you’ve made will be discarded.
9.7. Removing Sources
To remove a source, go to Sources page and click the “Remove” button for a respective source.
Note
Source removal is an expensive operation as it requires several of case databases to be altered.
Sources can be added again after removal, by following the normal “Add Source” procedure.
Removing a source will remove:
- The data, metadata, OCR results and (load file) images associated with the removed items, except for those that are still associated with item duplicates originating from other sources.
- Any redactions and comments associated with the removed items.
- All references to the removed items in tags, flags, batches, export sets and custodian sets.
What remains after source removal are:
- References to the source and the evidence items contained in the logs files.
- References to the numeric item IDs in the event log.
- MD5 hashes of item locations.
- Metadata extracted by the email threading procedure, such as Message-ID headers and Conversation Index properties.
These artifacts are typically not visible to the end user, but could be obtained by reverse engineering of the case files. Please consider this when handing over a case with removed sources to an opposing party.